
Remote Desktop Services: Home office in the age of Corona
Remote Desktop Services: Home office in times of Corona
Home office on the rise
„, said Reimann, who praised the concept of mobile working and appealed to „continue to use the good experiences of the last few months with mobile working“. More personal responsibility and the trust of the employer puts some employees in a good mood and increases productivity. Many can also better plan their daily lives with their families and enjoy more flexible working hours and short commutes.

Cons
on the rise. Especially in mobile working, however, the working conditions are often not ideal: smaller screens, poor lighting, awkward sitting positions, etc. are too often the order of the day. Every third person who spends more time in front of monitors even says that his or her vision felt worse during corona time. While hardly any companies themselves have suffered serious productivity losses as a result of mobile working, says Michael Karrenberg, regional director of risk services at Altradius. „However, due to the increase in mobile working, business activities will shift in location.“ This, he says, is leading to increasing uncertainties, especially in those industries whose sales depend on the numerous commuters to the cities and office workers.
Remote Desktop Services - Access from outside
, even including new features, there is no reason for companies to worry in this area.

Beware of hackers
to ward off access attempts such as a brute force attack. Furthermore, it becomes more difficult to keep track that all devices and software have been provided with all updates. Security solutions that protect against RDP attacks are therefore becoming indispensable for companies to protect themselves, their data and their employees against cyber-crime. What is particularly critical is that vulnerabilities in RDP are often unknown and only become public after they have been exploited.
Can the classic office still be saved?
, looking to the future.

Microsoft Outlook: Sharing calendars - Explained clearly
Microsoft Outlook: Sharing calendars - clearly explained
. The prerequisite for this is a Microsoft Exchange account. But even if you do not have such an account, there are useful alternative options. There are three different options to choose from: ⦁ Share calendar ⦁ Send calendar by e-mail ⦁ Publish online
Share calendar
“ in the drop-down menu. Select the desired address and display the colleague’s calendar next to your own:

Send calendar by e-mail
„:

„.
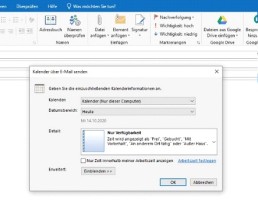
Publish calendar online
„:

„. In the next window, you can specify who is to have access to the calendar. After the invitations have been sent, the recipients are informed by e-mail that the calendar has been published.

Adding a mailbox to Outlook - it's that easy
Adding a mailbox to Outlook - it's that easy
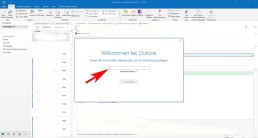
Over the years, numerous e-mail addresses have accumulated – mostly unintentionally, but for both professional and private reasons and circumstances. This is cumbersome and it is easy to lose track of them or, in the worst case, to simply not find that one email you need right now. If you want to check the new e-mails from all these addresses, you do not have to log in to each one individually. The Outlook programme offers the possibility of collecting several mailboxes, so that you have an overview of all your electronic mail. We show you how easy it is to add mailboxes to Outlook. It’s that simple: Fortunately, setting up an additional e-mail account in Outlook is quite simple:
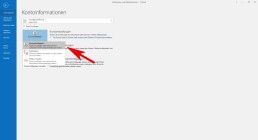
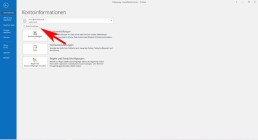
- Select File, the Information tab and then click on „Add account
„.

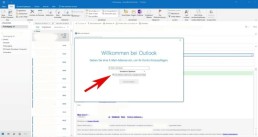
- At this point, enter the name of the user, the e-mail address and the corresponding password.
-
- Confirm the data with „continue
„.
- Outlook then checks the entered data for correctness. If everything is correct, the installation process is complete.
- Finally, click on „Finish
“ and the new mailbox is added. Caution
: If you have added too many mailboxes with large amounts of data, this can lead to considerable performance fluctuations with Outlook – and also with other providers. It is then advisable to delete unimportant data at regular intervals and save important files on an (external) hard disk, for example.
Shared mailbox in Outlook
With shared mailboxes, certain groups of people can easily view and send e-mails using a public e-mail alias such as „info@xy.com“ or „kontakt@xy.com“. If a person in the group replies to a message, the sender of the e-mail is the shared mailbox and not the individual user. In addition, the shared mailbox can function as a shared team calendar. It’s that simple:
- In Outlook, select the File tab in the ribbon.
- SelectAccount Settings and then Account Settings in the menu.
- Select the Email tab.
- Make sure the correct account is highlighted, then select ‚Change‘.
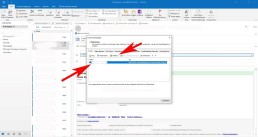
- Select more „Settings“ > „Advanced“ > „Add“.
- Enter the shared email address, selectOKand select Next > Finish > Close
- Next > Finish > Select Close.
However, a shared mailbox is not designed for direct login. The user account for the shared mailbox itself should keep the status „disabled.„
Connecting Outlook with Exchange
To an existing POP3 or IMAP account, you can set up a Microsoft Exchange account in Microsoft Outlook 2019. It’s as simple as this:
- Select File, the Information tab and then click „Add Account„.
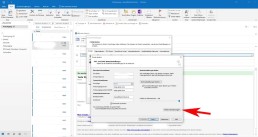
- Enter the email address of the new Microsoft Exchange 2019 account, click on „Advanced options“, activate the option „I want to configure my account manually“ and then click on „Connect„.
- Select the account type „Exchange
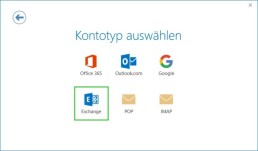
The computer now connects to the Microsoft Exchange servers. The following message is displayed: „By adding a new Microsoft Exchange account, you have changed the location for some of your new email messages and calendar information.“
- Click on „OK
You are asked to authorise Autodiscover to set up Microsoft Outlook on your behalf.
- Click on „Allow„.
- Enter the password and click on „OK„.
The Account Setup Complete window is displayed.
- Click on „OK„.
The Microsoft Exchange account is now set up and ready for use. If you have already created a profile for a Microsoft Exchange account in Microsoft Outlook 2019 and would like to use an additional Microsoft Exchange account, you must create a new profile for this.
Header image: © IB Photography, stock.adobe.com

Windows 10 pin removal: simple instructions!
Remove Windows 10 pin: simple instructions!
Deactivating the Windows 10 pin
To deactivate the Windows pin, open the system settings with the key combination „Windows+I“. Select the „Accounts“ menu and switch to the „Login options“ tab on the left-hand side

Under „Login Options“ click on the button „Windows Hello PIN.„In the button box that now opens, next click the „Remove.“ button Windows 10 now displays a notice that it is easier to log in with a pin and that without a pin the face and fingerprint recognition no longer works. A second click on „Remove“ removes the pin.

If you often take your laptop to appointments or to work, or if you live in a household where not everyone should have access to your desktop PC, you should choose a different password protection for your end device.
Deactivating the login for reactivations
If you only want to switch off the login information when you reactivate your computer, you can do this in the system settings. To do this, call up the control panel with the key combination „Windows+I“. As before, go to „Accounts“ and open the „Login Options “ window Select the option „ Never“ under „ Logon required „.
Disable the login for Windows 10
If youdon ‚t need or want a password for your computer at all, you can also deactivate it completely – although this is a bit more complicated. To deactivate the login, first open the „Run “ window with the key combination „ Windows+R “ and enter the command “ netplwiz“. Then confirm your entry with the Enter key. This command opens the „User Accounts “ window Here, under the tab „Users „, you will find the field „Users must enter user name and password“ Remove the tick here by clicking on the square field to the left of it and confirm with „OK“ After clicking on „Ok“, a new window should open. Here you type your own password into thefields provided for confirmation and confirm again with „Ok.“
Header image: © Pixel-Shot, stock.adobe.com

Microsoft Word: Insert page numbers - easy from page 3 onwards
Microsoft Word: Inserting page numbers - simply starting on page 3
Inserting page numbers in Microsoft Word
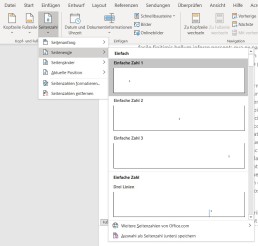
To insert page numbers in Microsoft Word, go to the „Insert“ tab and find a drop-down menu „Footer“ in the „Header and Footer “ section Here you can select a footer according to your taste

As soon as you have selected a format for the footer, Word automatically switches to the header or footer view.
In this tab „Header and Footer „you navigate via „Page Number“ and „ Page End“ to yourfavourite formatting. You can choose whether the page number should be positioned at the bottom (or top) on the left, in the middle or on the right.
If you insert the page number in this way, it will automatically start on the first page and each page will have a page number.

To edit the page number format further, you can switch to the „Start“ tab(while editing the header or footer is active) and edit the page numberas you wouldany other body of text. To do this, you only need to select the number on one page and then choose the type, font size and font colour. This setting is then also applied to the other pages. When you are satisfied with the page number, you can finish editing the footer either by clicking on „Close header and footer“ or by double-clicking in the document.
Start with the page number only on page 3
If you want to format your term paper correctly in your studies, you need to format the page number so that it doesn’t start until page 3. The cover page and the outline are not formatted. You can either do this with a crutch of two different documents (but then you cannot automatically create the table of contents), or you can divide the document into two sections. To divide the document into two (or more) sections, move the cursor to page 2, switch to the „Layout“ tab and add a new „Section break“ under „Breaks„. Now the document is divided into two sections. The second section now starts after the page on which the cursor was located (in this example on page 3). If you activate the paragraph marks and formatting symbols, you can see the section break here.

Thengo to page 3 and change to the header and footer menu, by double-clicking on the header or footer. In the „Header and Footer“ menu, in the middle of the upper menu band, you will find the Navigation field with the button „Link to previous page“Deactivate this button so that the page numbers are only inserted from page 3 onwards. Now you can insert the page number as usual. By default, page number 3 appears here, but to number page 3 of the document as page 1, navigate via „Page number“ in the „Insert“ tab to „Format page number Here you enter the value 1 for „Start at“.
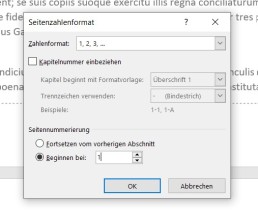
Now page number 1 appears on page 3 of the document.
Header image: © adam121, stock.adobe.com

Microsoft Word: Creating a table of contents in Word
Microsoft Word: Create a table of contents in Word
How to create a table of contents with Word
To create a table of contents with Word, you must first format all headings accordingly. In the „Start“ tab, there are various format templates that can designate a paragraph as a heading or subheading.
A paragraph is created in Word by pressing the ENTER key and ismarked with the formatting character „¶“. A line break does not automatically mark the end of the paragraph.
Format headings
Word can create up to 9 heading levels. The different levels are also displayed accordingly in the table of contents. A chapter heading should always be formatted as „Heading 1“, followed by a „Heading 2“ and so on. The next chapter heading is then again a „Heading 1.“
To create a heading, simply type it in, move the cursor to the heading and click on thedesired heading level in the „Style sheets„. The entire paragraph in which the cursor is located is always formatted as a heading.
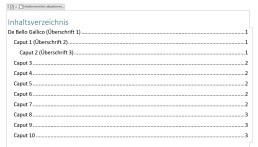
This is how correctly formatted headings look in the document:
Insert table of contents
After you have formatted the headings correctly, you can insert the table of contents with a few clicks. To do this, move the cursor with the mouse to the place where the table of contents is to be inserted – this is usually on the second page of the document. Then switch to the „References“ tab and click on „Table of contents “ A drop-down menu opens from which you can choose a format. By clicking on the table of contents, Word automatically inserts the table of contents.
Update table of contents
Word automatically displays the page number onwhich a heading or subheading appears when the table of contents‘ is created. If you make changes to the text after the table of contents has been created, the position of a heading may change. In order for the table of contents to show the correct page number, the table of contents must be updated.
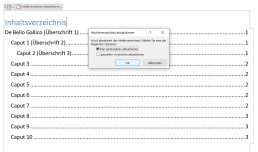
To update the table of contents, switch back to the „References“ tab and click the „Update table of contents.“ button here If you only want to update other page numbers, click on „Update page numbers only.“ in the context menu If you have also inserted new headings or changed headings, click on „Update entire table of contents.“[/vc_column_text]
The table of contents does not need page numbers
In order for the table of contents to display correctly, you do not need to insert page numbers in Word.Even if no page numbers are displayed on the individual pages, Word displays the page number in the table of contents. If you want to have page numbers displayed in your document, we have already created the corresponding instructions. Here you will also find instructions on how to insert the page number only from page 3 onwards.
Header image: © pit24, stock.adobe.com

Microsoft Teams: Disable or enable autostart
Microsoft Teams: Disable or enable autostart
Autostart of Microsoft Teams deactivate
To deactivate the autostart of Microsoft Teams, simply follow the instructions below:
-
- Open Task Manager
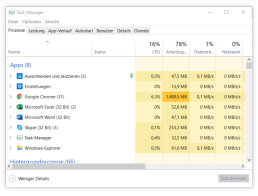
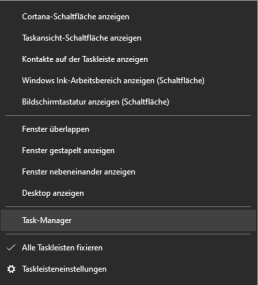
a. Simultaneously press the „Windows key“ and „X“ or click with a Right-click on the start bar. b. In the menu that opens, right-click on the Task Manager the Task Manager. (Alternatively, you can also open the Task Manager with „Ctrl“ + „Alt“ + „Del“ )
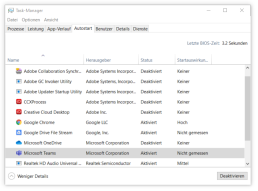
2. the autostart tab a. The task manager is organised by different tabs (tabs). Here you need to select the„Autostart“tab.
3. disable Microsoft Teams a. In the autostart list you must now search for theprogramme „Microsoft Teams“ (Under certain circumstances, however, a large number of programmes may be listed here. If you cannot find Microsoft Teams, you can simply type in the first letter „M“. The automatic search jumps directly to the place where the programmes begin with „M“) b. If Microsoft Teams is selected, you can deactivate it by clicking on the„Deactivate“ button at the bottom right.
Activating Microsoft Teams Autostart
Activating Microsoft Teams works in the same way as deactivating it. If you jumped straight to this part of the text, here are the step-by-step instructions again:
- Call up Task Manager
a. Simultaneously press the „Windows key“ and „X or click with a Right-click on the start bar. b. In the menu that opens, right-click on the Task Manager the Task Manager. (Alternatively, you can also open the Task Manager with „Ctrl“ + „Alt“ + „Del“ ) 2. The Autostart tab a. The task manager is organised by different tabs. Here you must select the tab „Autostart select. 3. Deactivate Microsoft Teams a. In the autostart list you must now search for the programme „Microsoft Teams“ (Under certain circumstances, however, a large number of programmes may be listed here. If you cannot find Microsoft Teams, you can simply type in the initial letter Type in the first letter „M“. The automatic search jumps directly to the place where the programmes begin with „M“) b. If Microsoft Teams is selected, you can deactivate it by clicking on the button „Deactivate in the bottom right-hand corner.

Synchronise Microsoft Outlook Calendar and Google Calendar - Simple instructions!
Synchronise Microsoft Outlook Calendar and Google Calendar - Simple instructions!
Synchronising Google Calendar with Outlook
The Microsoft Outlook synchronisation programme was unfortunately discontinued years ago. Nevertheless, there is still a simple way to connect your Outlook with Google Calendar. The aim of this synchronisation is that – no matter in which calendar you enter something – the events show up in both calendars Important to know: If you use a smartphone from Apple or Android, you can simply use several calendars in one calendar app. So you can save yourself the synchronisation here. When using Outlook in the online version, it is also possible to use several calendars next to each other.
Merging Microsoft and Google calendars – options at a glance
There are various ways to merge the two calendars. We have listed the best ones below:
- The simplest way to merge the two calendars is to export and import the current appointment status of a calendar. However, this is not synchronisation – this is described below.
- A continuous updating and extension of the appointments in both calendars at the same time can only take place through synchronisation. However,this requires a third party application.
- A very simple possibility is to subscribe to your own Google or Microsoft calendar. In this way, the appointments of the subscribed calendar are transferred and continuously updated.
In the following text, we describe these 3 options for merging Microsoft Outlook and Google Calendar.
-
Export Google Calendar and import it into Outlook App
To export the Google Calendar, you have to call up the online version of the service in the browser. To do this, you must be logged in to the corresponding Google account in the browser. You can access the calendar via this link: https://calendar.google.com/
- In the first step, click on the settings symbol (cogwheel) and then on „Settings“.
2. In the menu on the left side you will find the menu item „Import & Export“. Click on it and the following window appears:

In the list under „Export“youcan now select all the calendars that can be edited and that are to be exported. With a click on the „Export“ button, these are now combinedinto a zipped archive and downloaded. The .ics file contained in the archive is now used to import the Google calendar archive into Outlook. 3. Now the Google Calendar is imported intothe Outlook calendar with the help of the .ics file. To do this, follow the following path in the Outlook app: „File -> Open and Export -> Import/Export“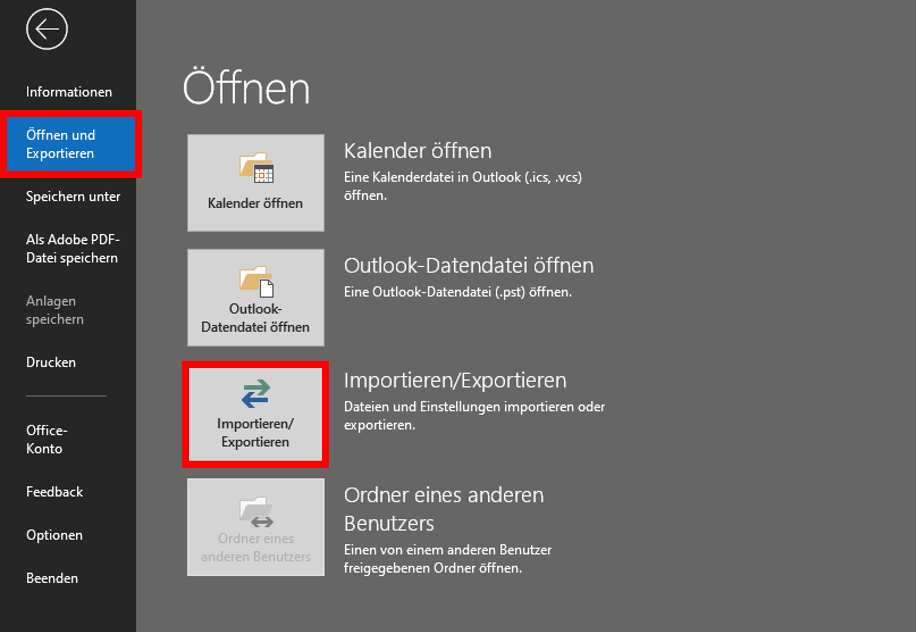 4. In the window that opens, click on „Import iCalender (ICS) or vCalender (VCS) file“ and then on „Next“
 5. Now select the previously saved.ics filein the „Browse„window and click on „Open“ Now the calendar can be found in Microsoft Outlook under „Other calendars“ or „My calendars“. However, since it is only importing the calendar at a fixed time, the newly added or updated appointments in Google Calendar will not be synchronised.
Synchronising Google and Microsoft calendars
Subscribe to Google Calendar and display it in Outlook
Outlook’s „Subscribe to Calendar“ function is a good way to avoid synchronisation by third-party software. The effect is the same as a real synchronisation. All data is continuously updated by subscribing to the calendar. Moreover, this subscription function is not limited to one’s own calendar. If you have the individual address of another person’s calendar, you can also see their calendar. However, this person can decide whether to allow all appointments to be viewed or whether to set certain appointments to „Private“ to prevent viewing. To subscribe to a Google Calendar with Outlook, simply follow the steps below:
- A prerequisite for subscribing to Google Calendar is the exact iCal address.
This can be found in the Google Calendar application in the browser in the left bar under „My Calendars“. Click on the 3 dots next to the name of the selected calendar and then on „Settings and Sharing“.


4. copy the iCal address into the window that opens. Confirm with „Ok“ to subscribe to the calendar. The calendars can now be organised on top of each other or next to each other.
Header image: © dennizn, stock.adobe.com
Instructions: Install Microsoft Office in 5 steps
Instructions: Install Microsoft Office in 5 steps

What versions of Microsoft 365 are available?
What versions of Microsoft 365 are available?
Installing Office 365 on a PC is simple, but a little confusing due to the subscription model. First of all, you should decide on an Office 365 package. Microsoft has put together two different packages for the different needs of users. There is also the Microsoft Home & Student 2019, which is available as a classic single purchase The Microsoft 365 packages come as Microsoft 365 Personal and as Microsoft 365 Family. Both packages include Word, Excel, PowerPoint, OneNote, Outlook, Access and Publisher. The Single subscription is only suitable for one user and provides 1 TB of cloud volume. The Family package can be used by up to six users and provides access to 6 TB of cloud storage.
Install Microsoft 365 in five steps – this is how it works:
First you have to log in with your Microsoft account, then you can get started. Microsoft 365 is only offered as a download. This means that you do not have a CD or DVD as a backup medium.
- On the website https://www.office.com/signin you can log in with the Microsoft 365 account you used to buy the product. If you have never registered here before, you have to create a new account. Next, you are redirected to a page where you enter the product key you received when you purchased the product.
- Once you have successfully logged in, you will find the „Install Office.“ box at the top of the page Click on this button to download and install Microsoft 365
- Before that, you have to select on the website whether you want to installthe programme for PC, Mac or a mobile device (such as smartphone or tablet).
- If the installation menu does not open automatically, you can start by double-clicking on the installation file.
5. Once you have confirmed that the installer is allowed to make changes to the device, the programme installs and you can use it.
How to uninstall Microsoft 365?
To uninstall Microsoft 365 again, you can download an appropriate uninstaller from Microsoft Download toolthat takes care of the uninstallation. Otherwise, you can remove the programme manually. At Windows 10 this is possible, for example, via the system settings.
Header image: © dennizn, stock.adobe.com

Microsoft Excel - Insert table into Word
Microsoft Excel - Paste table into Word
How to insert an Excel table into Word
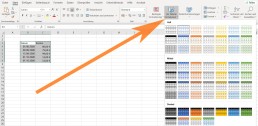
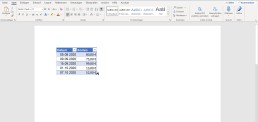
Then switch to the Word document, click on the place where the table should be inserted and select „insert“(or insert the content with CTRL+V). By default, the format of the Excel table is adopted in Word. If you have only entered values in cells in Excel, you will only get a list without table lines or coloured formatting. In Excel, you can simply select a formatting under „Format as table“ in the „Start“ tab in the „Format templates“ area.
To link an Excel table in Word
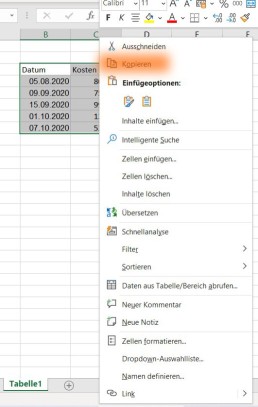
If you want to insert your values and data into Word sorted, you should create the table in Excel and then insert it into Word. This is because in Excel, with the help of an intelligent table, you can sort and systematise the values as you like. Once you have inserted the table in Word, you can only change the table in Word. Changes to the table in Excel are then no longer accepted. Therefore, it makes more sense to link the Excel table in Word. To link an Excel table with Word, first copy the contents into Excel as described above. However, you do not simply paste them into Word. Instead, move the cursor to where you want to insert the table. Then click on the small arrow under „Paste“ in the tab „Start“ in the section “ Clipboard.“
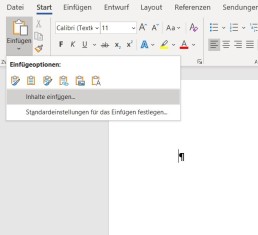
In the drop-down menu that opens, select the function „Insert content“ and a new window with this name opens. Here you select the option „Microsoft Excel workbook object“.
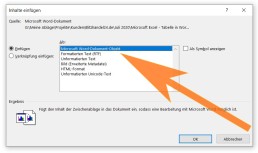
Click on „Ok“ toconfirm the selection and the Excel table is inserted into the document. If you now change something in the Excel table, the data is transferred to Word. To do this, you must save the changes in Excel and reopen Word so that the changes are displayed in the document.
If you often need tables for your work, you can save yourself a lot of work with this practical function.
Header image: © monticellllo, stock.adobe.com