
The differences between Windows Server and Windows OS
The differences between Windows Server and Windows OS
The basis: similar code
What are the advantages of Windows Server? Windows OS and the Windows Server have numerous differences. Nevertheless, they have a common basis: the source code. This serves as a kind of agreement through which it is possible to switch back and forth between the Windows OS and the Windows Server. Since both have the same task view, desktop and start buttons, it can sometimes be difficult to tell them apart. The similar code also helps to make it possible to use the same kernel on both, i.e. the central part of the operating system, as well as the same software. However, in order to access the Windows server, so-called Windows Server CALs are needed to access the Windows server. Only if they are available in sufficient numbers can a network connection be established. For users, the advantages of the Windows server are not least that preferred applications such as Microsoft Office or Google Chrome can be used on both.
The advantages of Windows Server
The advantages of a Windows Server are obvious for many companies, which is why they regularly opt for a new version of the product. Although it is not necessary to always run the latest edition, it should be considered as soon as major changes are imminent that will take the company further. The latest version of Windows Server stands for more security and a fundamental modernisation of the infrastructure, which is why the investment pays off in most cases:
- The new platform supports a hybrid IT environment and is equally flexible, scalable and ready for the cloud.
- Companies can choose a so-called Azure Edition so that they receive a direct connection to the Microsoft Azure data centre. This means that investments already made can continue to be used.
- A better network connection, additional virtual machines and a revamped admin interface increase the efficiency of administration and make the data centre’s work easier.
- The combination of a local infrastructure and the cloud resources used is favoured by optimised server management.
- The modern server version also shows that the advantages of Windows Server focus strongly on containerised applications. This increases performance while simplifying development and deployment.
- Remote access for external employees, employees in the home office or remote workers is noticeably simplified. Since data and applications are available at any time and from any location, comfortable and productive work is possible.
- Another advantage of Windows Server is the increased and multi-layered security functions. They simplify protection against cyber attacks and protect sensitive company data as well as the apps.

Management software specifically for businesses
The Windows server is mainly used in companies, where it is used to run numerous services over a specific network. For simple offices or schools, on the other hand, a normal Windows OS is sufficient for day-to-day tasks in most cases. For this reason, the management software is specially tailored to the needs of companies and allows them comprehensive administrative control: from applications to data storage to the company network.
Fewer hardware restrictions
The new server from Microsoft makes it easier to connect additional hardware components to the existing system. In most cases, the appropriate software is offered directly for new end devices such as a printer. The same applies to other parts of the hardware, for example an extension of the existing memory.
Only relevant functions
Since Windows Server 2022 is aimed at different companies, it contains a wide range of functions. This includes all central aspects that are important in the daily workflow. Of course, not all functions have to be used: Instead, the company has a set of tools at hand with which the individual departments can be supported.
Conclusion
Companies benefit from the numerous advantages that the new Windows Server offers them. While most functions have been fundamentally improved, new approaches can also be found in the latest edition. These include, among other things, the focus on security. This makes the new Windows Server an important companion especially for companies that would like to use cloud computing. Private users, on the other hand, usually manage without the high range of functions – for them, the desktop version is usually sufficient.
Header image: © dennizn, stock.adobe.com
Format your scientific paper in just a few steps
Format your scientific paper in just a few steps
In order to score points with a bachelor’s thesis, master’s thesis, diploma thesis or doctoral dissertation, very specific formatting is prescribed. Even the brightest minds sometimes despair of setting the correct page numbering or margins in Word. Aren’t there a few tricks in Microsoft Office 365 Home or Microsoft Word for formatting your academic work without risking a nervous breakdown? Yes, there are – and we’ll show you what they are.
Which areas do you need to format for a scientific paper?
Depending on the university, it is possible that there are very specific requirements as to how the formatting in Word should look. Therefore, it is helpful to find out exactly what the university’s requirements are before formatting the document for the academic paper. In general, however, you must always keep these points in mind when formatting a scientific paper:
- Font and font size
- Line spacing
- Page margins
- Page numbering
- Cover page
With formatting in Word, it’s basically quite easy – if you know how!
Formatting font and font size
If you want to format a scientific paper, you should make sure to choose a consistent, easy-to-read font. Usually, the sometimes somewhat old-fashioned serif font Times New Roman or the modern sans-serif Arial are used. For body text, the font should be used in 12 point, for headings 14 point.
Choose the correct line spacing
The texts are formatted as justified text, i.e. flush on the left and right so that nothing flutters at the edges. As a rule, the line spacing is 1.5; only for footnotes can a single line spacing be chosen. Remember the margins Especially in justified type, it is important that the margins – the space between the letters and the edge of the page – are large enough, because this makes reading easier. Before starting to write, the document should be set up so that the following margins are pre-formulated:
- top and bottom margins 2 to 2.5 cm each
- left margin 3 to 3.5 cm
- right margin 2 to 2.5 cm
Format academic paper and set page numbering
First things first: Neither the cover page nor the table of contents are given a page number (pagination). Depending on how the bachelor’s or doctoral thesis, etc. is structured, pagination will therefore only start from the third page or from the page on which the introduction is written. The page number is set in the formatting in the middle of the footer or right-justified. In order to start page numbering only from page 3 when formatting in Word, a few steps are necessary:
- a section break is inserted on page 2
- the footer must not be linked to the previous one
- now start with the command „Format page numbers“ from 1
How to make the cover page work
Pretty much every university requires a cover sheet for academic papers. It contains the most important key data and should give the examiners a quick overview of the formal aspects of the work. In a way, it’s like the cover of a book: it has to make a good first impression! The cover sheet must include the following information:
- Type of thesis (Bachelor’s thesis, Master’s thesis, doctoral thesis, etc.)
- the title and possibly a subtitle of the academic paper
- Name of the university, if possible also the logo in very good print quality
- The name of the author of the thesis and his/her matriculation number
- the author’s contact details
- the names of the persons who supervised the author during his or her work
- if available, the name of the second corrector
- Name of the degree programme or department
- Date of submission
Tip: How to structure a Bachelor's or Master's thesis
With these forms of academic work, the correct outline is crucial if you want to achieve a good grade. Usually, the outline looks like this:
- Cover page
- Abstract (preface/introduction)
- Table of contents
- List of images used (if available)
- List of tables used (if available)
- List of abbreviations
- Continuous text divided into
- Introduction
- theoretical framework
- Methodology
- Results
- Conclusion
- List of literature used
- Appendices, if any
- Affidavit
Header image: © monticellllo, stock.adobe.com

How to use the Google Authenticator on Windows
How to use the Google Authenticator on Windows
Google Authenticator is a fine thing. The app makes surfing the net much safer. Above all, it prevents unauthorised persons from accessing pages that are doubly secured with the so-called 2FA method. The problem is: the app is actually only available for iOS and Android devices. Double authentication via the PC is therefore not possible. Or is it? We show you how to set up the Microsoft Authenticator to be on the safe side from the computer as well.
This is two-factor authentication
More and more online service providers are requiring users to identify themselves in addition to their password in order to log in to their account Authentication is usually done by entering a password. But instead of being able to access the site, the user must first identify himself with another code, which he can retrieve on his installed Google Authenticator, for example, and which is only valid for a few minutes.
Google Authenticator or Microsoft Authenticator?
Although Google Authenticator works equally well for iOS and Android, Microsoft Authenticator is the better choice for some. Especially if Microsoft Office, Microsoft Office 365 Pro Plus, Windows 10 or Windows 10 Pro are to be equipped with this security tool
Google Authenticator
It is one of the most popular authentication apps. Many iOs and Android users are particularly fond of its ease of use. To add a new account to the app, simply photograph the QR code. This also works while the app is still open. Disadvantages: Unfortunately, the software cannot be locked (for example, via a PIN or fingerprint). So if someone manages to unlock the smartphone, they have access to all the codes stored in the app. Synchronising the 2FA codes between two devices does not work either. With a new smartphone, all accounts must therefore be added again
Microsoft Authenticator App
The Microsoft Authenticator app, which is also free of charge, also works on iOS and Android. However, it has the advantage that it can be easily integrated into other Microsoft accounts. Several devices can be set up with the Microsoft Authenticator app. The authentication codes are encrypted and synchronised via the cloud Another plus: All added accounts are automatically backed up, so that switching to a new device goes smoothly. So anyone who works daily with Windows 10 every day will have an easier time with the Microsoft Authenticator.

How to use Google Authenticator on Windows too
With the Microsoft programs Microsoft Office, Microsoft Office 365 Pro Plus, Windows 10 or Windows 10 Pro the Google Authenticator can be used if you don’t want to activate your mobile phone or set up the Microsoft Authenticator every time for two-factor authentication The prerequisite for this, however, is that you have the secret key that the respective online provider provides during the initial setup. Attention:The Google Authenticator is not offered as a separate tool for Windows! In order to use the security tool, the algorithm with which the security codes are created must first be found. The open-source app WinAuth knows this algorithm and generates the same codes as on a smartphone after entering the secret key. This is how you proceed if you want to set up Google Authenticator or Microsoft Authenticator for Microsoft Office, Microsoft Office 365 Pro Plus, Windows 10 or Windows 10 Pro:
- Download the latest version of WinAuth.
- Unzip and launch, then click „add“ to add a new provider.
- Select Google as the first provider to find the algorithm.
- Enter the name of the provider and select the icon.
- Then enter the secret key in the middle field.
- Under „Verify Authenticator“ a code appears to log in to the corresponding provider.
- click „OK“ and set up further providers
- A new 2FA code is generated simply by clicking the update code next to the provider name.
Header image: © Proxima Studio, stock.adobe.com

What is an SSD (Solid State Drive)?
The term SSD is an abbreviation and stands for "solid-state drive". It is an electronic storage medium. Flash memory chips and SDRAMs are used for SSD storage. SSD storage media are silent. This is because they do not have any moving parts and therefore cannot generate any noise. While the data in conventional hard disk drives (HDDs) are written magnetically to disks by mechanical read-write heads, the SSD is a purely electronic hard disk. The data is stored in digital memory cells. Its greatest advantage is the short access time, because each of these cells can be accessed directly and without detours via its own address With HDDs, on the other hand, the read-write heads must first travel to the data. If the data are distributed in different locations, they have to be gathered together in a time-consuming process
Advantages and disadvantages of SSDs
SSDs run completely noiselessly, are insensitive to shocks, produce little waste heat and do their job even under extreme conditions. Above all, SSDs are blazingly fast and can give any hard drive system a major performance boost. But they also have disadvantages. One disadvantage of SSDs compared to HDDs is their durability. While classic HDDs can theoretically be written to an infinite number of times, the memory cells in SSDs wear out somewhat with each write operation.
The most important advantages of solid state drives in brief are:
- short access times
- high transfer rates
- no start-up times
- no mechanical wear - high reliability
- robust against shocks and vibrations
- low energy consumption
- low heat generation
- silent operation
- high storage density
The following disadvantages can be listed
- more expensive than conventional hard disks
- the number of read/write cycles of the semiconductor memory is limited
System turbo
As a system data carrier, the SSD gives every PC and notebook an enormous performance advantage over the HDD, among other things because the operating system in particular retrieves small data blocks from a wide variety of locations. In addition, the user benefits from short storage times for applications. However, if you have an HDD and would like to clean and speed up your hard drive, we have the Paragon Hard Drive Manager 15 Professional for you, with which you can clean out and relieve your hard drive.
Installing Windows 10 - Info on versions and installation
Installing Windows 10 - Version and installation info
Although Microsoft stopped supporting Windows 7 in January 2020, not all Windows users have installed the latest Windows 10 operating system. One month after the end of support, about a quarter of all computers worldwide were still using Windows 7 as their operating system. Using this Windows 7 instead of the new Windows 10 is a security risk for every user that should not be underestimated. It is easy to bring your computer up to date with a Windows 10 upgrade. Until a few months ago, Windows users could download Windows 10 free of charge. This offer from Windows has now expired – now you have to buy Windows 10 to get the licence key. There are several ways to install Windows 10. Windows 10 as a download can be installed like an update. Alternatively, you can download a Windows 10 iso file and install it from there. We present which variant is the right one for you in this blog article.
Windows 10 as an update
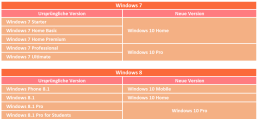
Installing Windows 10 as an update is particularly easy for Windows 7 and Windows 8.1 users. With these two operating systems, the Windows 10 upgrade can be installed almost like a normal update. If you choose this option, Windows will automatically offer to install the corresponding Windows 10 version. There are differences between the upgrades. Depending on the installed version, you will receive a corresponding Windows 10 version. This can be seen in the following table:
After entering the Windows 10 key, the installation programme takes over the installation almost completely independently and retains most of the system settings, passwords, bookmarks, preferences and already installed programmes should continue to work after the update. With this variant, the Windows 7 or 8.1 user must click on the small icon for the Windows 10 Update in their taskbar. The computer then starts the Windows 10 download automatically. The installation of Windows 10 is then almost completely automatic, the user only has to enter the Windows 10 key and some preferences during the installation. Although experience has shown that this form of installing Windows 10 runs completely smoothly, it is still advisable to back up your own files, such as documents, photos and music, on an external data carrier before the upgrade.
Re-installing the system with Windows 10
Those who do not want to keep their old system as much as possible can also rebuild the system. Before the installation, all important files should be backed up again! After the Windows 10 update, users can then select the item „Recovery“ and „PC“ via the system settings in the submenu “ Update and Security„. A complete reinstallation of the system can be carried out here. Alternatively, the system can also be deleted manually and the new operating system installed with a Windows 10 iso file. To do this, the file must be downloaded from Microsoft using the Media Creation Tool. This Windows 10 iso file must then be installed on an external data carrier, via which the installation runs after the system has been deleted. This method is also suitable for installing Windows 10 on a PC that was not used to download Windows 10.
Windows 10 as a second operating system on a computer
Those who want to keep their old operating system can buy Windows 10 and also install it as a second operating system. For example, the old Windows 7 installation can still be used offline, while Windows 10 serves for all online tasks. Users who still often have to fall back on older programmes that are not compatible with Windows 10 should opt for this variant. To do this, a second hard disk partition must first be created for Windows 10. With Windows 7, this can be done via the disk management. For Windows 10, the „NTFS“ format must be used for the new partition! For this installation, Windows 10 must be downloaded via the Media Creation Tool. Here, the option „Create installation medium for other PC“ is selected. The installation on a partition other than drive C: works best via a Windows 10 iso installed via an external data medium. During the setup of the installation, the option „Custom“ must be selected so that the installation path itself can be selected. Otherwise Windows 10 would automatically install itself on drive C:. The following Windows 10 versions are available from us:
- Buy Windows 10 Home
- Buy Windows 10 Pro
- Buy Windows 10 Enterprise
- Buy Windows 10 Enterprise LTSB 2015
- Buy Windows 10 Enterprise LTSB 2016
- Buy Windows 10 Enterprise LTSC 2019
- Buy Windows 10 Education
Header image: © rvlsoft, stock.adobe.com
Create screenshot (Windows 10)
Create screenshot (Windows 10)
This does not even require any other programmes to be downloaded and installed anywhere. Windows itself has programmes such as the „Snipping Tool“. Alternatively, screenshots can also still be provided with symbols and other coloured markings using tools such as „Paint“.
How to take a normal screenshot under Windows 10
If you want to take a screenshot of the current screen content, press the key combination “ Windows key + Print“. The image is now saved in the clipboard and can be pasted from there into a programme such as „Paint“. To do this, press the key combination „Ctrl + V“. If you use several monitors, a complete large image of all screens is created. Alternatively, to take a screenshot of the current active window, press the key combination „Alt+Print“. Again, the screenshot can be pasted into any programme with „Ctrl + V“
How to create a screenshot with the Snipping Tool
The Snipping Tool is an on-board Windows tool. If you want to take a screenshot quickly, it is best to call up the small programme in the Start menu by entering its name. After the tool has started, you can mark the area to be displayed in the screenshot with the mouse pointer. This is particularly advantageous if you only want to show individual small areas. After taking the screenshot, functions such as a highlighter, pen and eraser are available. Furthermore, the screenshot can also be saved or sent directly by e-mail with just one mouse click. Try it out for yourself.
Header image: © charnsitr, stock.adobe.com
Windows 10 Change language
Change Windows 10 language
With Windows 10, it is possible to use not only the language set by default. In addition, other language packages can also be installed, managed and assigned to different users. For example, the respective languages of their user profile are assigned to different speakers and can be changed. In this guide, we will show you how to successfully adjust the language settings.
Managing languages in Windows 10
You have the option to change the user language and keyboard language of Windows 10 at any time. This is how they manage the different languages:
- Add a new language by opening the system settings. To do this, press the key combination „Windows key + I„. Then click on „Change language and keyboard options„.
- In the administration you will see a list of all languages available on the computer under „Preferredlanguages“. When apps and websites are opened, Windows 10 tries to display them in the selected language. If this is not available, the language below it is used. Using the arrow symbols, it is possible to change the order.
- There are symbols to the right of the language. These show you for which areas of application this language is suitable (for example, speech recognition, keyboard language, etc.).
Installing additional languages in Windows 10
- You can install a new language at any time. To do so, click on the „plus„symbolabove the list.
- Now enter the name of the desired language. All languages available for installation are displayed in the results list. Here, too, the symbols to the right of the name indicate what the language can be used for. Click on the language and then on „Next„.
- Now a selection menu opens in which several features can be selected. If you select „Set as my Windows display language„, the entire operating system is displayed in this language.
Change display language in Windows 10
If the installation of the new language was carried out successfully, it can be directly adjusted under „Region and language“ in the settings. Windows is now displayed in the national language.
Change language for home screen and new accounts
- Open the normal and classic control panel to change the display language of Windows 10.
- Enter the term „Region“ in the search field and then open the search hit.
- Switch to the „Administrative Tools“ tab and click on „Copy Settings“.
- At the bottom, you now have the option to change the activated display language for the start screen, the lock screen and newly created user accounts by means of checkboxes. Click on „OK“ to apply the new settings.
Change keyboard language in Windows 10
- If several languages are installed, you can change the keyboard language in Windows 10 separately.
- To do this, press the key combination „Windows key + space bar„.
- A small info box opens showing the available languages. Now click the „space bar“ again to switch back and forth between the languages.
Change speech output in Windows 10
- The voice output can also be changed in Windows 10. To do this, open the „Speech output settings“ in the system settings. Enter the term in the search field.
- The individual languages are displayed in the list under „Select voice„. These are installed together with the respective language package.
- After selection, you can also change settings such as „Speech speed“, „Voice pitch“ and the „Voice volume„.
Changing the language of Cortana voice input in Windows 10
- To change the language of the Cortana speech input, open the system settingsas in the previous step and search for „Settings for speech recognition“.
- In the upper selection, you can then change the desired speech recognition language for Cortana. Further settings such as speed are also possible here.
Header image: © kotoyamagami, stock.adobe.com

Merge partitions in Windows 10
Merge partitions in Windows 10
Managing and setting up partitions can be quite useful. They provide more order and overview on the hard disk. If certain storage spaces are no longer used and are superfluous, these partitions can be assigned to others. In this article we explain how it works.
How to merge partitions in Windows 10
Windows 10 has its own tool for this purpose, which can be used to manage partitions. The disk management. In any case, it is important that all files on the partition are backed up beforehand. Partitions that are used by Windows and contain backup/restore points cannot be easily dissolved.
-
- Click with the right mouse button on the Windows symbol (bottom left in the task bar) and then on „Disk Management
„.
-
- Now select the partition in the administration that is to be dissolved and assigned to another partition. To do this, click on the partition with the right mouse button and on „Delete volume
„.
-
- Now the deleted partition is available as „Unallocated
volume“.
-
- Select the partition that is to be enlarged. Click with the right mouse button on the drive and then on „Expand Volume
„.
- Now select the volume you deleted in step 2.
- Both partitions are now merged and your new larger drive is ready for use.
Header image: © Pichsakul, stock.adobe.com