
Move folders in Microsoft Teams - this is how!
Move folders in Microsoft Teams - explained quickly and simply
Move to Teams Folder sounds simple, but it’s not that simple. With Windows 11 Home and also Windows 11 Pro for Workstation you can do quite a lot. Especially if you also have a tool package such as Microsoft Office 2021 Standard or Microsoft Office 2021 Home and Business is installed. Especially recently, teams has established itself as one of the most popular programmes. But it is precisely here that a problem occurs time and again, which is actually based on a misunderstanding: If you want to move folders in Teams, it simply does not work. What to do then is explained here.
The „Folder“ function in Teams
With, for example, the Microsoft Office 365 Home for example under Windows 11 Pro N you can collect files in folders in the Teams tool. In this way, related files are grouped together and the overview is not lost.
- To now be able to share a team folder between several people, in the dashboard of the admin console first click on „Create Team Folder“ in the dashboard.
- In the next step, select the storage location by clicking on „Existing Mandate Storage“ and then „Default Client Storage“ is selected.
- Now name the folder with a short, concise name Name (please do not use any special characters!). Go to „Next“ button.
- Distribute the access authorisations under „Staff“ and in the second step „Add responsible persons is possible.
After a few moments, the folder is available to all authorised participants either on the Datastore drive, for example in Windows 11 Education or Windows 11 Enterprise or it is displayed on the computers, for example with Microsoft 365 Family on the web interface. However, it is not easy to move the Teams folder.
Moving teams folders is only possible in a roundabout way
Of course, it would be practical to be able to move a Teams folder with a simple mouse click. Some users are annoyed that this does not work so easily. Microsoft itself is well aware of the problem, and when asked, the company promises to come up with something Until then, however, there is only one way to move Teams folders. And that is via SharePoint.

What is SharePoint?
This is a website-based system that optimises collaboration between different employees, certain workflow applications, list databases and security functions. Numerous companies use the programme, for example, as an intranet, company portal, document management system or as a pure knowledge database. The greatest advantages of SharePoint are the automation of time-consuming manual tasks, the structured organisation of data and the enormous time savings due to less internal e-mail traffic. Many Microsoft packages include SharePoint as an integrated tool, but the cloud version SharePoint Online is also available With SharePoint it is possible, for example, to Microsoft 365 Business Premium Websites can be created and information can be securely stored, structured – and also shared. To move a folder that was created in Teams, proceed as follows:
- Select the folder to be moved and click on the right on the „three-point menu on the right.
- Option „Open in SharePoint option.
- The folder and the files it contains are now automatically saved in SharePoint.
- Now the folder can be placed at another location, such as a higher hierarchy level, in two different ways.
Method 1: by drag & drop
- To do this, simply „hold“ the corresponding folder with the mouse cursor and drag it to the desired level
- To ensure that the folder is now displayed in the correct place, refresh the page in the next step
- In the browser, such as Chrome, go to the „View“ tab.
- Select the option „Reload This Page“.
Method 2: via „Move to
- In the „three-point menu“ next to the folder, you can now select the option „Move to can be selected.
- A menu opens on the right-hand side of the screen.
- Select the option „Search Website“.
- Click on the corresponding team event.
- Select the destination.
- If necessary, select a sub-destination and click on the menu item „Move here“.
Header image: ©Renan, stock.adobe.com

OneNote: How to integrate a notebook into teams
OneNote: How to integrate a notebook into teams
Many still cope with everyday work without a OneNote notebook: you have an idea and jot it down on a piece of paper in between. You also scribble down the telephone number you want a colleague to call you back. You discover a great savings offer on the internet and write down the URL on a piece of paper … In no time at all you get lost among all these pieces of paper and in the end you can’t find anything anymore. But all those who have signed up under one of the packages of Windows 11 for example with the Microsoft Office 2021 Standard or Microsoft Office 365 Home have a tool at hand that makes this paperwork unnecessary: the OneNote notebook.
What is the OneNote notebook?
Word, Excel, PowerPoint and Outlook are familiar to anyone who works on a PC with Windows 11 Home, Windows 11 Pro or Windows 11 Pro N, Microsoft Office 2021 Home and Business or Microsoft 365 Family on a PC. But very few people know that the OneNote notebook is already installed there. This is a digital notebook that can replace calendars, notebooks and memos. Sketches, handwritten notes, graphics, pictures, lists and documents can be conveniently inserted and managed. Multimedia content such as e-mails, websites and videos can also be organised well with the OneNote notebook Since you can also save all content in a cloud, there is no danger of misplacing or forgetting anything.

OneNote as part of Teams
One of the components of the Microsoft Office suite such as Microsoft 365 Business Premium in the operating system Windows 11 Education or Windows 11 Enterprise is the communication platform Teams. OneNote is also integrated into this. Working with it facilitates many processes and is very simple: [/vc_column_text ]
Create a new notebook
- On the Office start page, click the OneNote icon on the left.
- Click on the button "+ New notebook".
- Enter the title for the notebook and confirm with "Create".
- You will be prompted to press the enter key to create a first section in the OneNote new notebook.
Share notebook
To work together, the OneNote notebook can be shared:
- In the web under OneNote open the Open the notebook, that you want to share.
- At "File" select "Share then select "Share with others".
- In the left column under "Share" you must "Invite people must be activated.
- In the field "To" enter the e-mail address of the person with whom you want to share the OneNote notebook.
- In the field below you can enter a short Note for the recipient.
- If you do not want the recipient to be able to edit the contents after sharing the OneNote notebook, you have to click on the blue link "Recipients can edit items" change the settings for the permissions.
- Send the invitation with "Share".
Exporting the OneNote notebook
For example, as a backup copy or to use the notes in another format, individual sections or even an entire OneNote notebook can be exported:
- In OneNote open the Open the page that you want to export.
- Click on " Export" in the "File " tab.
- Specify whether the computer should export only a section or the entire OneNote note book.
- Format for the export. You can choose between the OneNote format, PDF or Word.
- Click on "Export" and select a storage location.
Exporting a saved OneNote notebook
If the notebook is stored in a cloud or on OneDrive, for example, it must also be exported in order to continue working on it. This is how you proceed:
- With the Microsoft user account log in.
- In the navigation "More notebooks select.
- At "My notebooks click with the right mouse button on the corresponding notebook.
- A new menu window appears, in which click on "Export Notebook click.
- Set storage location
The PC automatically creates a zip file of the exported OneNote notebook. This just needs to be unzipped to use the notebook as usual.
Header image: ©monticellllo, stock.adobe.com

Microsoft Teams Guide - Important Functions Explained!
Microsoft Teams guide - key features explained!
– and you can also integrate external services. Online meetings, group chats and the joint editing of documents are among the standard functions that offer numerous advantages for employers and employees alike, especially in times of Corona. How to work together efficiently with Teams and what functions the application has to offer are explained below.
Free at Corona time
. Anyone who currently logs into Teams automatically receives a free licence of the otherwise chargeable functions.

The most important functions
Office 365
. This makes collaboration more transparent. With one of the paid plans, the Office suite is available as a desktop version.
Business app integration
Conference calls

Chat
Newsfeed
Personalisation
Cloud storage

Create team
- At the bottom left, go to „Join or Create Team“ and select „Create Team“ – „Create a Team from scratch“ or create a „Team from an existing Office 365 group or team“.
- After specifying the team type, enter the team name and description, then generate the team via „Create“.

Add channels and members
- In the „Members“ tab, click on „Add member“, then enter the email address and specify whether the person may act as a member or guest. Then click on “ Add“.
- To invite a person to Microsoft Teams, click on „Invite people“ at the bottom left.
- Select the method you want to use to reach the person. Switch to the „Channels“ tab and click on „Add channel“.
- enter„Channel name“ and „Description“ and determine whether it should be a standard channel or a private channel. Then click on „Add“.
Leave team or delete team
- Click on the three-dot symbol next to the team name and click on „Leave team“. Finally, confirm with „Leave team“.
- As the sole owner of the team, you can only delete it. To do this, click on the three-dot symbol and then on “ Delete team“. In the subsequent dialogue window, confirm that everything will be deleted and click on „ Delete“.

Microsoft Teams: Disable or enable autostart
Microsoft Teams: Disable or enable autostart
Autostart of Microsoft Teams deactivate
To deactivate the autostart of Microsoft Teams, simply follow the instructions below:
-
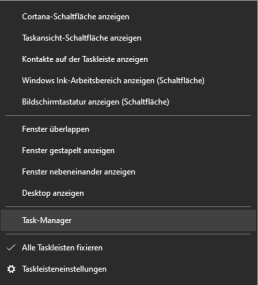
- Open Task Manager
a. Simultaneously press the „Windows key“ and „X“ or click with a Right-click on the start bar. b. In the menu that opens, right-click on the Task Manager the Task Manager. (Alternatively, you can also open the Task Manager with „Ctrl“ + „Alt“ + „Del“ )
2. the autostart tab a. The task manager is organised by different tabs (tabs). Here you need to select the„Autostart“tab.
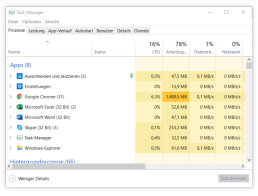
3. disable Microsoft Teams a. In the autostart list you must now search for theprogramme „Microsoft Teams“ (Under certain circumstances, however, a large number of programmes may be listed here. If you cannot find Microsoft Teams, you can simply type in the first letter „M“. The automatic search jumps directly to the place where the programmes begin with „M“) b. If Microsoft Teams is selected, you can deactivate it by clicking on the„Deactivate“ button at the bottom right.
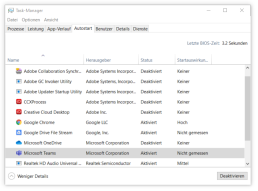
Activating Microsoft Teams Autostart
Activating Microsoft Teams works in the same way as deactivating it. If you jumped straight to this part of the text, here are the step-by-step instructions again:
- Call up Task Manager
a. Simultaneously press the „Windows key“ and „X or click with a Right-click on the start bar. b. In the menu that opens, right-click on the Task Manager the Task Manager. (Alternatively, you can also open the Task Manager with „Ctrl“ + „Alt“ + „Del“ ) 2. The Autostart tab a. The task manager is organised by different tabs. Here you must select the tab „Autostart select. 3. Deactivate Microsoft Teams a. In the autostart list you must now search for the programme „Microsoft Teams“ (Under certain circumstances, however, a large number of programmes may be listed here. If you cannot find Microsoft Teams, you can simply type in the initial letter Type in the first letter „M“. The automatic search jumps directly to the place where the programmes begin with „M“) b. If Microsoft Teams is selected, you can deactivate it by clicking on the button „Deactivate in the bottom right-hand corner.