
Antivirus programme - Protect the system
Antivirus programme - Protecting the system
As almost everyone has access to PCs, smartphones and tablets these days, and through them to the Internet, the dangers in the form of malware from cybercriminals have increased at the same time. An antivirus programme increases IT security and protects the system. Antivirus is the counter term to computer virus, which emerged with the introduction of computer systems in the 1980s. Antivirus software includes programmes that find malware and remove it from the system on their own. In the meantime, antivirus programmes prevent a wide range of cyberattacks and infections with malware such as worms, Trojans, keyloggers and ransomware in advance. Despite all the advantages, 27 percent of Windows users have no virus protection installed, although the choice and variety of functions are greater than ever. A suitable virus scanner and the ideal antivirus programme can be found on this page.

Different types of antivirus
Real-time antivirus
Real-time antivirus is active around the clock and in most cases runs unnoticed in the background. This type of antivirus programme scans all files, programmes and memory via a system interface. If the real-time scanner detects something suspicious, it informs the user and asks whether he or she should block access, delete the file or move it to quarantine. The user can do the same manually to check the entire system.
Online antivirus
Online antiviruses load the virus pattern to be checked via the Internet connection and thus keep an eye on current threats. This type of antivirus is often referred to as an online virus scanner. It is often used as an additional safeguard to the installed virus scanner if the user suspects that his system has been infected.
Other virus scanners
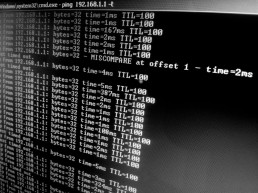
Numerous threats mean numerous protection options and thus virus scanners. Especially in the business environment, antivirus software is used for network analysis. However, the different types of virus scanners also have some disadvantages.
Disadvantages of antivirus programmes
Real-time antivirus often slows down the systemwhile other software applications are delayed. Furthermore, it is possible that the antivirus programme reports malware that is not actually malware. And this may delete files or applications incorrectly identified as computer viruses. Besides, it can be counterproductive to have two antivirus scanners in use at the same time because they can block each other. As a result, the desired IT security is endangered rather than secured. In some cases, antivirus programmes take things too seriously and block harmless software or block access to harmless websites . This is known as „false positives“ Tools that „tune“ or „clean“ the operating system are also of dubious use. This is because Windows already includes functions such as disk clean-up and memory optimisation to free up space on the hard disk. A so-called registry cleaner can even damage the operating system, and Microsoft is known for refusing support to customers who use such programmes.

The right virus protection
Home users of Windows have a viable antivirus solution in Windows Defender, which Microsoft developed and therefore integrates smoothly with Windows. Other free antivirus programmes are basically advertisements for their commercial brethren For business users, Windows Defender is probably not the best choice. Using the software requires active participation in Microsoft’s reputation service SpyNet. If Windows Defender finds suspicious files on a computer, it uploads them to Microsoft without asking – in case of doubt also confidential data. Professional users therefore tend to use a commercial antivirus solution instead . Most of them offer the option of preventing the upload of suspicious files, even if this can reduce the level of protection To find the right antivirus, one should first install a trial version . This way, one can try out the application extensively and decide whether the package meets the requirements.
Header image: © Ico Maker, stock.adobe.com

Terminal Server - more flexibility or just higher costs
Taking a closer look at the advantages and disadvantages of terminal servers
Terminal Servers enable organisations to centrally host applications and resources and publish them remotely to client devices – regardless of the location or platform of the end device. Advantages of terminal servers are, for example, more flexibility for users and a less costly IT infrastructure for maintenance and security. Disadvantages are the high data load and possible higher costs.
What is a terminal server?
A terminal server is a server or network device that can make connections to multiple client systems toconnect to a LAN network without a modem or network interface. In effect, it acts like your own computer, even though you can access it remotely.

Advantages and disadvantages of desktop virtualisation
Advantages of terminal servers
- More flexibility for employees: Direct access to the workplace is no longer tied to the desk, but is possible from anywhere and at any time via the virtual desktop.
- More security: IT security is now focused on a single device. In addition, server systems can be better secured, as backup, firewall and security policies only need to be implemented centrally.
- Less effortiT staff only have to maintain and update this one device.
- Uncomplicated outsourcing: The location and maintenance of the terminal server can also be outsourced to an external partner. This keeps the hardware investment low, flexible and gives you the option of buying some IT services externally.
Disadvantages of terminal servers
- Large data load and high latenciesbecause only the image is usually transmitted at a few KB/s between a thin client and a terminal server, most connections are sufficient. It is somewhat more problematic if the users are to be able to copy data to the terminals or print something
- Online constraint for workstationsif the server is not located in your own building, nothing works without the Internet because client and server can no longer communicate with each other. In order not to slow down work, employees can work from their home office or via hotspots, or a second internet connection can be provided. It should also be taken into account that there is no or very poor access from the train or on the plane. Then you can at least set up the Office package, including Outlook, locally on the end device, but this softens the overall concept somewhat.
- Higher server costs: High availability and performance, perhaps even 3D graphics performance, are the requirements for a server for desktop virtualisation. You can rent a ready-made solution from a cloud provider; the high level of standardisation at the provider usually reduces the investment costs.
The costs
Virtualised desktops are not necessarily cheaper than classic server-client models. In addition to the good server components, there is the licence for the use of desktop virtualisation. On the other hand, you can save on the client side because you don’t necessarily need strong devices, but weaker ones that are much cheaper. If, for example, you don’t have your own IT department that can take care of the administration of a powerful terminal server, this can also be done by an external partner – for example as a managed service. Central administration saves costs.

Perfect for companies with multiple locations
Terminal servers are indeed an exciting alternative to a sea of office computers. Employees are thus more mobile and flexible, can do their work faster and need to ask the IT department for advice less often. Not only corporations can afford this technology, small and medium-sized enterprises should also consider the advantages of desktop virtualisation. The most important advantage is certainly that work can be done regardless of location; the technology is ideal for companies with multiple locations. Centralised management is also perfect for streamlining the business, simplifying the set-up of new employees and managing access rights and software access.
Header image: © Scanrail, stock.adobe.com

How to deactivate Cortana
How to deactivate Cortana
Cortana is software from Microsoft and the vendor’s personal productivity assistant. It’s supposed to help save time so users can focus on what’s important. However, it is not clear what Cortana records and where the recording of Cortana’s voice commands end up. These privacy issues are leading many users to want to disable Cortana.
The problem
The voice assistant Cortana in Windows 10 is criticised by some users because Cortana is suspected of transferring users‘ data to the cloud and monitoring the user. Cortana cannot simply be deleted and uninstalled, but there are a few ways to deactivate the tool in Windows 10. Especially users with Windows 10 Pro and Enterprise find it easy because they can rely on group policies. In the smaller Windows 10 versions, you have to rely on manual settings.
Disable Cortana
Cortana can be deactivated at any time – but the configuration is retained if desired. Those who still use the original version of Windows 10 can deactivate Cortana quickly and easily in the settings:
- To deactivate, click on the search field in the taskbar and then on the left-hand side on the Notebook symbol (third symbol from the top), then click on Settings
- The Slider for Cortana can offer suggestions, ideas, reminders, alerts and much more slide it to „Off. At this point, you can reactivate the assistant at any time
Deactivating Cortana in Windows 10 versions before Anniversary Update (1607)
Even from version 1607 and 1703, Cortana can neither be uninstalled nor completely removed. However, Cortana can be largely eliminated from the system so that the assistant can no longer collect data. Users with Windows 10 Pro and Windows 10 Enterprise have it a little easier: They can deactivate Cortana in the policy settings. To do this,open the tool „gpedit.msc“ and navigate to Computer ConfigurationAdministrative TemplatesWindows ComponentsSearch. On the right-hand side, you can prevent users from activating Cortana and searching the Internet, for example, with „Do not search the web and do not display web results in the search“ With the policy setting „Allow Cortana„, one candisableCortana on all computers using this policyby setting the option „Disable„.Users will then only be able to use normal search, but not Cortana.
Deactivating Cortana in Windows 10 Home via the Registry
In smaller Windows 10 versions, you can only disable Cortana via the registry:
- Open the registry editor by entering regedit.exe in the search field of the Start menu.

- Go to the path „HKEY_LOCAL_MACHINESOFTWAREPolicyManagercurrentdeviceExperience„navigate
- On the right-hand side, select the entry „AllowCortana“ to „0“ (zero) and restart the computer
If the entry is not available, proceed as follows:
- Right-click on the key „Experience“ and select from the context menu New DWORD value (32-bit) from the context menu. There give the value the designation „AllowCortana and set the value to „0“ (zero).
- Restart the computer. In the search field the entry „Search Windows“ instead of „Ask me something“ should appear.
Uninstall Cortana
If you are willing to experiment, you can uninstall Cortana via an unofficial script that can be found on the site „deskmodder.de“. However, you should make a full backup of Windows 10 before uninstalling, as there is no guarantee that the system will survive this unscathed. The execution of the script is only recommended for experienced users.
Header image: © monticellllo, stock.adobe.com

Create Word template - Simple instructions in a few steps
Create a Word template - Simple instructions in just a few steps
Free word processing software abounds, yet Microsoft’s Word remains the most widely used in the world. One of the most important features of Word is the format templates, which ensure uniform formatting with the help of defined characteristics such as font, font size and line spacing. Especially in the business sector, for job applications or for scientific papers where special specifications have to be met, templates are extremely helpful. By designing the format templates in advance, you prepare the creation of long texts in Word and save yourself a lot of work in finally putting the finished text into the correct layout. Even if the text is already written, templates ensure that all text modules are standardised and that no formatting errors remain. Word already contains some pre-installed templates for formats as well as for special forms or document types such as letterhead, invitations or business cards. However, if these do not meet your needs, you can create your own Word template and save the individual configurations as a basis for further texts.
Two different templates
There are two different types of templates available in Microsoft Word: Format Templates and Document Templates:
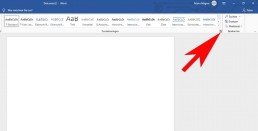
- The style sheet specifies formal categories such as font, line spacing or paragraphs. Corresponding templates are located in the „Start“ tab under „Format templates“
- The document template contains formal settings as well as additional elements such as headers and footers, logos, lists, placeholders or text fields. These can be individually designed so that they can be used as an invoice, letterhead, cover letter, etc. Can be used.
Change or create a style sheet
- Open a new Word document.
- Click on the arrow on the right below the menu bar „Format templates„.
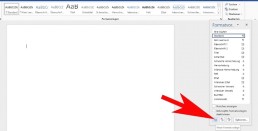
- In the newly opened window, click on „New style“ at the bottom left.
- Enter a name for the style in the first field.
- Then configure all the properties that your template should contain.
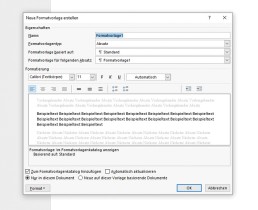
- Finally, click on „OK„. The template will then be added to the style sheets that can be found in the „Start“ tab.
Create Word template for documents
To create a new Word template in which you can save a special document according to your own ideas, there are several possibilities. There are already various ready-made templates available in Word. To use such a template, click on „File“ in Word and then on „New„. There are many different options under „Office-com templates„. After you have selected a template, it opens in a new window and is available for editing. Edit and save template After you have found a suitable template, you can edit it according to your own ideas and insert graphics, tables or logos, change the formatting and make other changes. When everything is ready, the result can be saved as a template: ⦁ Click on „Save and send“ in the menu item „File“. ⦁ Click on „Change file type“ and double-click on „Template„.
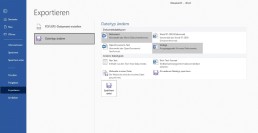
⦁ A window opens in which you can give the template a name and select the storage location. ⦁ Click on „Save“ and the new template will be created.
Header image: © wachiwit, stock.adobe.com
Activate Windows 10 via (CMD)
Activate Windows 10 via (CMD)
Sometimes Windows cannot be activated via the interface Without third-party Windows 10 activation tools, you can activate Windows 10with CMD for free. You can open the command prompt in two variants under Windows 10: With administrator rights or as a user with limited rights. Some actions performed in the command line require extended rights. In such cases, you can then specifically start the Windows 10command prompt as an administrator. 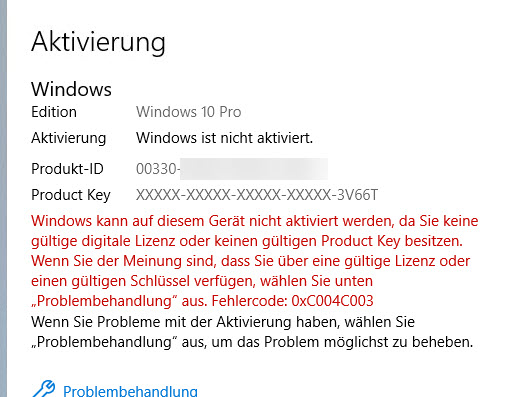 1. Start the command prompt as administrator (right click):
 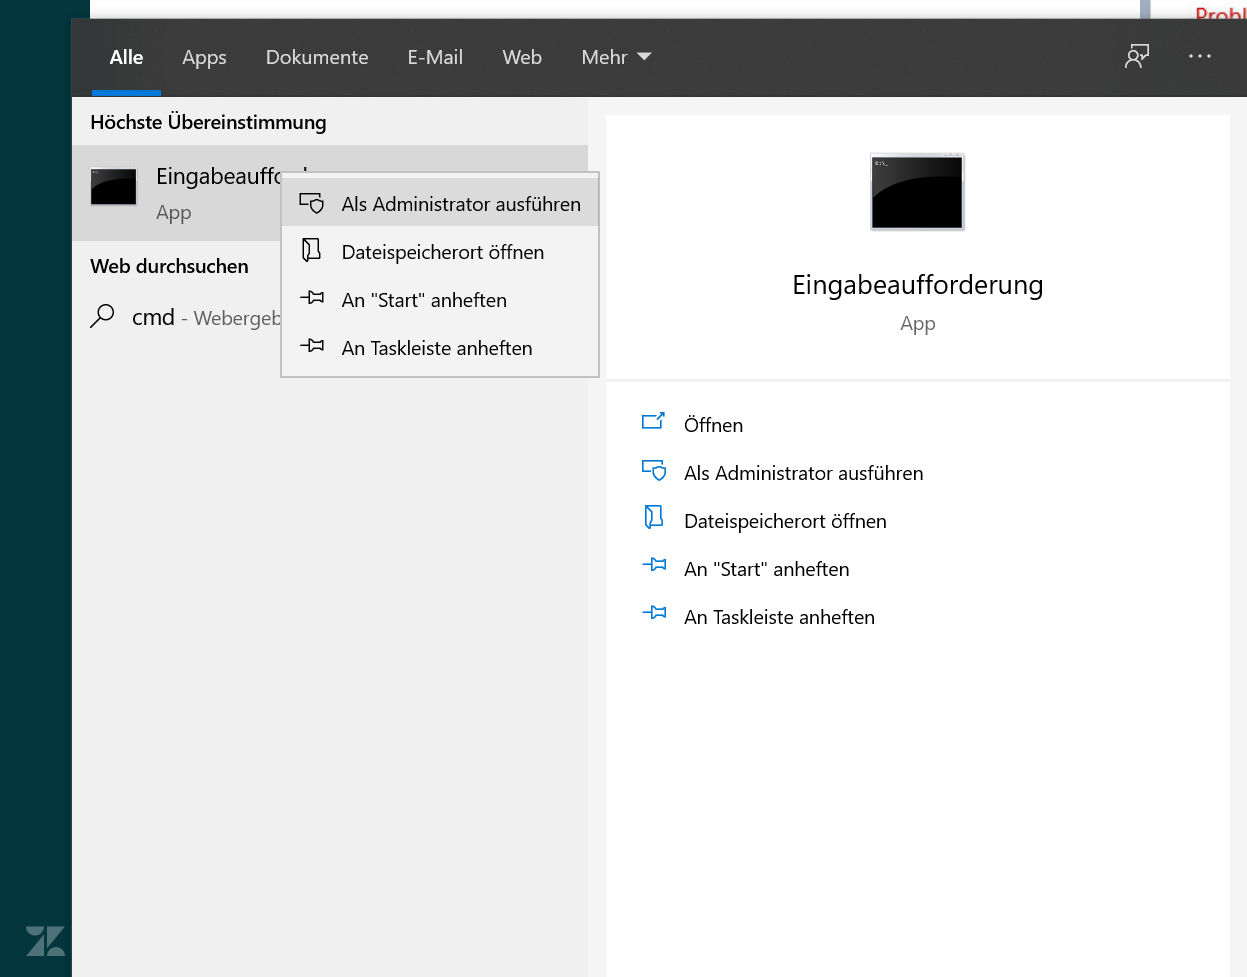 2. Write the following code in the window: slmgr -ipk XXXXX-XXXXX-XXXXX-XXXXX (Instead of XXXX, please enter the product key)
 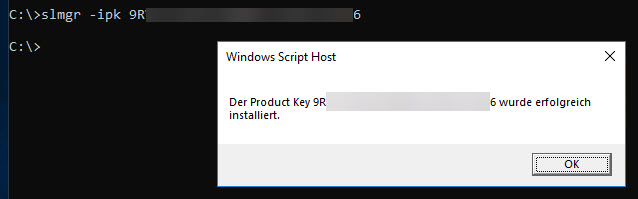 3. The key must then be activated. Write the following lines in the command prompt: slmgr -ato
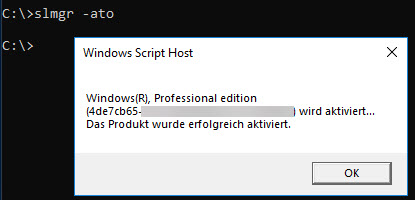
What is new in the New Update of Windows 10? We will be happy to answer this question under this link here