
Change Outlook signature - this is how!
Change Microsoft Outlook signature - explained quickly and easily!
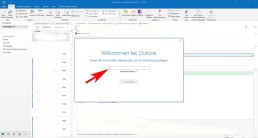
How to change the Outlook signature? In the past, when all letters were still sent in paper form, the so-called farewell formula could not be missing under any circumstances. Something like „Best regards“ or „Yours sincerely“ and a personal signature was a must. But who actually says that this should no longer be the case in e-mail correspondence today? If you work with Microsoft Outlook, for example in Windows 11 or Windows 11 Home, you can easily create an Outlook signature and change it at any time.
Do I have to create an Outlook signature?
That depends on whether you are writing a purely private or a business e-mail. In the business sector, a signature has been mandatory for e-mails since 2007. This means that for self-employed persons, freelancers or companies, as soon as they send an invoice or an offer by e-mail, the same information as in an imprint must be included as sender information. These minimum details are mandatory:
- Company name
- full name of the owner
- summonable address
Fortunately, with Microsoft Outlook 2021, this can be done in almost no time at all. And a great company logo, a ready-made signature or even a portrait of the sender can also be easily integrated when you want to create the Outlook signature.
And this is how it’s done
For example, in the Microsoft Outlook 2019 Multilanguage full version with the Windows 11 Pro or Windows 11 Pro N operating system, signatures can be automatically attached to all outgoing mails. It is also possible to add a signature to individual e-mails. If you want to change an Outlook signature, proceed in the same way:
- To do this, first open a new e-mail message.
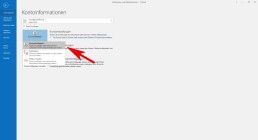
- Select the option „Signature“ in the menu “ Message „.
- Under „Edit signature“select the option „New“.
- In the „New Signature“ dialogue box, give the signature a name.
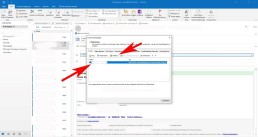
- Use „Edit signature“ to write the personal farewell formula. The font, font size, text alignment and colour can be easily specified. If you want to change the Outlook signature later, each individual point can also be edited later.
- Using the option „Select default signature“ in the drop-down menu „E-mail account“, first select the corresponding account to which the signature is to be assigned.
Tip: Each e-mail account in Outlook, for example in Windows 11 Education, can be given its own individual signature. The more individual and specific these are, the more personally the recipients feel addressed. In a business context, this can have a more professional effect.
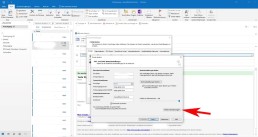
- If all messages are to receive the signature, select one of the signatures in the drop-down menu „New messages“ .
- If you do not want all new messages to automatically receive a signature, simply click (none)
- If the signature is also to be shown on reply mails or forwards, select an appropriate signature under „Replies/Forwards“.
- If this is not necessary, select the standard option (none).

Add signature manually one by one
If you have decided not to automatically add a signature to every e-mail, you can still add a signature, address, picture, etc. to individual e-mails afterwards. Select an individual e-mail and choose the option „Signature“ on the „Message“ tab. In the flyout menu, each signature created can now be selected to be displayed under the individual message.
Add picture, logo and signature
With Microsoft Outlook, a signature with pictures can also be created or the Outlook signature can be changed accordingly under Windows 11 Enterprise and Windows 11 Pro for Workstation.
- To do this, select Signature> Signatures in a new e-mail.
- In the field „Select signature for editing„, click on the signature that is to be provided with a logo, an image or with the digitised signature (as an image).
- Now select a corresponding image file on the PC with the icon Image and connect it to the signature by clicking on „Insert“.
- With a right mouse click on the picture under the tab „Size“ adjust the area of the picture.
Tip: If the „Lock aspect ratio“ check box is activated, the image ratios are retained.
Header Image: ©monticellllo, stock.adobe.com
Link Outlook, Word and Excel
Link Outlook, Word and Excel - this is how it works!
In this article we show you how to link Microsoft Outlook, Word and Excel. Whether for private or business use – the Office Suite on the PC facilitates many work processes and enables a clean presentation of a wide variety of documents. Microsoft Word can be used to create formatted texts, Microsoft Excel is the top programme for spreadsheets, calculations and data processing. And finally, Microsoft Outlook is used to manage all e-mails and organise appointments with the help of the integrated calendar.
Linking Word and Excel
In everyday office life, it is often necessary to integrate a table into a Microsoft Word document. This can either be created in the programme itself – or simply linked to a table in Microsoft Excel. To do this, first open the corresponding Excel file. Now mark the table or individual sections of the table and copy them with the keyboard command „CTRL+C“. Then open the Microsoft Word document into which the table or parts of it are to be inserted. Now direct the cursor to the place where the table is to appear. With the keyboard command „CTRL+V“ you can now place it exactly there. The disadvantage, however, is that changes to the table can now only be made with the functions of Microsoft Word. It is more convenient to be able to insert an Excel link into Word. How to link Word with Excel:
- First, select the corresponding table in Microsoft Excel and copy it using the shortcut command.
- In the Microsoft Word document, click on the arrow under „Paste“ in the „Start“ tab and select „Paste contents“ in the drop-down menu.
- In the new window, click on „Insert link“.
- Then select „Microsoft Excel Workbook Object“ in the menu window and confirm with „Ok“.
- Changes that are now made to the table in Microsoft Excel automatically appear in the Microsoft Word document.

Linking Microsoft Outlook with Word and Excel
With a Microsoft account, it is easy to harmonise the functions of all three tools. So not only Excel links can be inserted into Word. But tasks, appointments and changes can also be viewed on different end devices by different employees. The first step is to prepare the toolbar for DeepL access.
- To do this, click with the right mouse button on a symbol in the toolbar.
- Select the option „Customise the toolbar for DeepL access“. A new dialogue box opens (depending on the selected programme in Microsoft Word or Microsoft Excel).
- In the entry „Toolbar for DeepL access“ in the navigation bar in the list field „Select commands“, select the item „Commands not included in the ribbon“.
- Click on „Create Microsoft Outlook task“ in the list and activate it.
One of the advantages of this option is that the document sent via Microsoft Outlook remains on the original PC. Before it is sent, it can be „released“ or „locked“ so that editing by others is prevented or made possible. In this way, tasks can be distributed quickly and without effort by switching programmes. It makes sense to distribute tasks, for example, when working on a Word document or an Excel spreadsheet. And the employee needs to be informed about a current change of deadline, for example. Then this new task does not have to be created in Microsoft Outlook first. Instead, it can be displayed directly in the document being worked on. If there are no other tasks associated with the document, it can be sent to all or individual contacts from the address book in Outlook – without having to change the programme. New recipients can also be added at any time using the table function.
Tip: Working with highlighters in Microsoft Word documents
If several people are working together on a Microsoft Word document, it makes sense to mark particularly important text passages with markers. Such bookmarks make it possible to find certain sections of the text quickly, especially in an extensive document or a shared directory that has been shared with Outlook. Previously uninvolved contacts can then continue to work on these as a task, for example, or make changes.
Header Image: © Prima91, stock.adobe.com

Sort Outlook mails automatically - this is how it works!
Sort Outlook mails automatically - this is how it works!
Office management without Outlook? Almost unthinkable! From receiving and sending e-mails to calendar management and tracking tasks to storing all contact data, the programme in Microsoft Office 365 on Windows 11 is a real jack-of-all-trades. But what many people don’t know: You can also sort mails with Outlook and move Outlook mails automatically.
Sort Outlook mails
In order not to lose the overview in the overflowing mailbox, you can sort Outlook mails by size, among other things, with Microsoft Outlook 2019. But also by sender name, read or unread messages, subject or date. If you want to sort Outlook mails by size, the procedure is very simple:
Sort Outlook mails by size
- In the inbox, first click on „Filter“ in the upper area.
- Now various options appear under „Sort by“, here select „Size“.
Sort Outlook mails by subject line
The programme also allows you to sort mails not only by size and other options, but also by certain keywords in the subject line. To do this, first create a subfolder in which every incoming mail containing this keyword in the subject line is automatically filed. The prerequisite for this is, of course, that the sender also knows and uses this keyword so that Microsoft Outlook 2019 recognises that it should sort this mail.
- Click on the corresponding mail and select the „Start“ tab.
- Next click on „Rules“, then select the option „Create rule“.
- In the subsection „If an incoming message meets all conditions“ in the „Create rule“ dialogue box, activate „Subject contains“.
- Enter the keyword in the corresponding text field.
- Now go to the subsection „Execute the following“ and select the created and named subfolder under „Move item to folder“.
- Press the „OK“ button and answer the control question with Yes.
Move Outlook mails automatically
With hundreds of mails arriving in a short period of time, confusion can quickly arise. A function of Microsoft Outlook 2019 as part of Microsoft Office 365 in Windows 11 helps to create clarity and order. This is the option to automatically move certain Outlook mails to previously created subfolders with the corresponding names.
- First click on the e-mail folder with the right mouse button.
- A context menu appears. Select the option „New folder“.
- Each new folder must now be given its own name.
In order to be able to sort the individual Outlook mails so that they are automatically placed in the correct folders according to the specifications, a few rules have to be set:
Automatically move Outlook mails to folders
If, for example, you want to automatically move all Outlook mails from a certain sender into folders, first click on any mail from this sender.
- Select the option „Rules“ on the „Start“ tab.
- In the context menu that appears, select the option „Always move messages from (name)“.
- Now just select the corresponding, previously named subfolder in the „Rules and Notifications“ dialogue box and click the OK button.

More tips
Time-shift sending: With Microsoft Outlook 2019, you can also send mails at a later time. To do this, select the „Options“ tab, go to the „Delay transmission“ button and select the date and time in the dialogue box. Then click on „Send“ as usual. Automatic forwarding: Before sending a mail, click on the „Options“ button and select „Reply directly to“. Then enter the desired recipient under „Forwarding functions“. The reply mail is now automatically sent to the selected recipient – for example, to a colleague if you are on holiday yourself. Recalling mails: If you have sent a mail by mistake, you can edit it with the „Actions“ button. After clicking on the corresponding mail, select the option „Recall this message“. Then select either „Delete unread copies of this message“ or „Replace unread copies with a new message“. Now the mail is deleted at the recipient’s or replaced by a corrected or extended mail. However, this only works if the recipient has not yet opened the original message.
Header image: © Leowolfert, stock.adobe.com
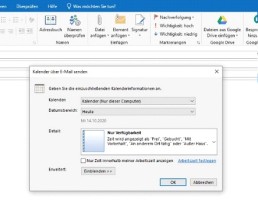
Microsoft Outlook: Sharing calendars - Explained clearly
Microsoft Outlook: Sharing calendars - clearly explained
. The prerequisite for this is a Microsoft Exchange account. But even if you do not have such an account, there are useful alternative options. There are three different options to choose from: ⦁ Share calendar ⦁ Send calendar by e-mail ⦁ Publish online
Share calendar
“ in the drop-down menu. Select the desired address and display the colleague’s calendar next to your own:

Send calendar by e-mail
„:

„.
Publish calendar online
„:

„. In the next window, you can specify who is to have access to the calendar. After the invitations have been sent, the recipients are informed by e-mail that the calendar has been published.

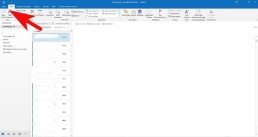
Adding a mailbox to Outlook - it's that easy
Adding a mailbox to Outlook - it's that easy
Over the years, numerous e-mail addresses have accumulated – mostly unintentionally, but for both professional and private reasons and circumstances. This is cumbersome and it is easy to lose track of them or, in the worst case, to simply not find that one email you need right now. If you want to check the new e-mails from all these addresses, you do not have to log in to each one individually. The Outlook programme offers the possibility of collecting several mailboxes, so that you have an overview of all your electronic mail. We show you how easy it is to add mailboxes to Outlook. It’s that simple: Fortunately, setting up an additional e-mail account in Outlook is quite simple:
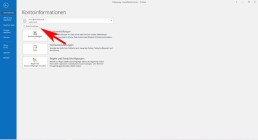
- Select File, the Information tab and then click on „Add account
„.

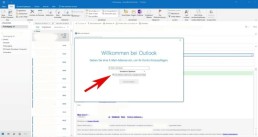
- At this point, enter the name of the user, the e-mail address and the corresponding password.
-
- Confirm the data with „continue
„.
- Outlook then checks the entered data for correctness. If everything is correct, the installation process is complete.
- Finally, click on „Finish
“ and the new mailbox is added. Caution
: If you have added too many mailboxes with large amounts of data, this can lead to considerable performance fluctuations with Outlook – and also with other providers. It is then advisable to delete unimportant data at regular intervals and save important files on an (external) hard disk, for example.
Shared mailbox in Outlook
With shared mailboxes, certain groups of people can easily view and send e-mails using a public e-mail alias such as „info@xy.com“ or „kontakt@xy.com“. If a person in the group replies to a message, the sender of the e-mail is the shared mailbox and not the individual user. In addition, the shared mailbox can function as a shared team calendar. It’s that simple:
- In Outlook, select the File tab in the ribbon.
- SelectAccount Settings and then Account Settings in the menu.
- Select the Email tab.
- Make sure the correct account is highlighted, then select ‚Change‘.
- Select more „Settings“ > „Advanced“ > „Add“.
- Enter the shared email address, selectOKand select Next > Finish > Close
- Next > Finish > Select Close.
However, a shared mailbox is not designed for direct login. The user account for the shared mailbox itself should keep the status „disabled.„
Connecting Outlook with Exchange
To an existing POP3 or IMAP account, you can set up a Microsoft Exchange account in Microsoft Outlook 2019. It’s as simple as this:
- Select File, the Information tab and then click „Add Account„.
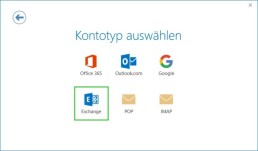
- Enter the email address of the new Microsoft Exchange 2019 account, click on „Advanced options“, activate the option „I want to configure my account manually“ and then click on „Connect„.
- Select the account type „Exchange
The computer now connects to the Microsoft Exchange servers. The following message is displayed: „By adding a new Microsoft Exchange account, you have changed the location for some of your new email messages and calendar information.“
- Click on „OK
You are asked to authorise Autodiscover to set up Microsoft Outlook on your behalf.
- Click on „Allow„.
- Enter the password and click on „OK„.
The Account Setup Complete window is displayed.
- Click on „OK„.
The Microsoft Exchange account is now set up and ready for use. If you have already created a profile for a Microsoft Exchange account in Microsoft Outlook 2019 and would like to use an additional Microsoft Exchange account, you must create a new profile for this.
Header image: © IB Photography, stock.adobe.com