Microsoft Outlook: Sharing calendars - clearly explained
To simplify the coordination of team or group appointments considerably, you can share the calendar in Microsoft Outlook
. The prerequisite for this is a Microsoft Exchange account. But even if you do not have such an account, there are useful alternative options. There are three different options to choose from: ⦁ Share calendar ⦁ Send calendar by e-mail ⦁ Publish online
Share calendar
To do this, the person or persons with whom the calendar is to be shared and used must also have a Microsoft Exchange account. This is how it works: Open the calendar area in Outlook:
Click on „Share calendar„, a new window opens. Enter the e-mail address of the person who should have access to the calendar in the „To“ field. To also have permission to view the recipient’s calendar, check the box „Request permission to view recipient’s ‚Calendar‘„. Then click on „Send“ and send the release invitation. If the calendar to be shared is not the default calendar but a calendar you have created yourself, right-click on the calendar name in the navigation area and select the option „Share [calendar name]„. If you want to display a calendar that has been shared by a colleague, click on „Open calendar“ and select „Select address
“ in the drop-down menu. Select the desired address and display the colleague’s calendar next to your own:

Send calendar by e-mail
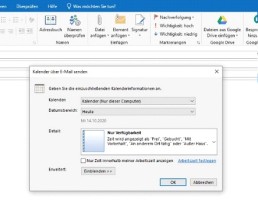
If you do not have a Microsoft Exchange account, you can alternatively send the Outlook calendar by e-mail. The calendar is sent as a snapshot in the attachment and displayed in the message text at the same time. click on „Send calendar by e-mail
„:

In the newly opened window, select the desired calendar and enter the date range of the calendar to be displayed to the recipient. If necessary, you can also specify further settings. Finally, click on „Ok
„.
Publish calendar online
The second way to share a calendar without a Microsoft Exchange account is to publish it online. This involves publishing the calendar on the Internet on Office.com, for which a free registration is required. Click on „Publish online“ and then on „Publish on Office.com
„:

In the newly opened window, you can select the desired calendar as well as the date range and other settings, similar to sending the calendar by e-mail. Confirm the changes with „Ok
„. In the next window, you can specify who is to have access to the calendar. After the invitations have been sent, the recipients are informed by e-mail that the calendar has been published.
Header image: © dennizn, stock.adobe.com