Activate macros in Microsoft Word and Excel
PowerPoint: Edit the Excel link without problems
Anyone who works with Microsoft Office 2021 or Microsoft 365 has probably heard about it: you should activate macros to be able to work more effectively. Microsoft Word and Microsoft Excel in particular are supposed to benefit from this. But many people don’t know what these ominous macros actually are and how to activate them. For all those, here are our instructions.
What are macros in Microsoft Word and Microsoft Excel?
Basically, macros are commands on the PC that enormously facilitate and accelerate work processes that are carried out again and again. This means that macros in Microsoft Word or Microsoft Excel, for example, save these commands and automatically make them available as needed with a simple click of the mouse. Such recurring instructions or commands are executed together with the help of macros either via the mouse or via a key combination. In Excel spreadsheets, for example, data can be quickly organised, formatted and imported by clicking on a defined symbol or using a specific key combination. Or constantly recurring phrases in correspondence, such as „Yours sincerely“, do not have to be typed under the letter, but can be inserted automatically under every letter with a macro. A text that has been written once or a sequence of frequently used commands are therefore automatically recorded or executed by the macros. In order to be able to do this, however, they must first „learn“ which work steps they should save. You must therefore first activate the macros in order to work with them.
Activating Macros in Microsoft Office 2021
First you decide whether you want to activate Excel macros or Word macros. Accordingly, open the desired programme in Microsoft Office 2021 or Microsoft 365 and proceed as follows:
- In Microsoft Word or Microsoft Excel 2010, go to the File tab.
- Select Options.
- Go to the section Security Centre (Trust Center).
- Click on the button Settings for the Trust Center.
- Now go to the section Settings for Macros (Macro Settings).
- Click on Activate all macros (Activate VBA macros).
- Confirm changes with OK.
Now the macros can be programmed in Microsoft Excel or Microsoft Word to make work easier. To create macros, click on „View“ at the top of the Excel menu bar – on the far right you will find the macro area where you can create new macros with the function „Record macro…“. You can define each macro with the following properties:
- Macro name
- Key combination with which you want to trigger the macro
- Save macro in
- Description (optional)

Activating and programming Excel macros
First, the macros in Microsoft Excel must be activated as described above. To programme the individual automated commands, the following steps are still carried out:
- Click on „View“ in the Excel menu bar at the top.
- Create new macros on the right in the macro area with the function „Record macro…“.
- Each individual macro must be defined with certain properties
- Name of the macro
- Key combination that is to activate the macro
- Storage location for the macro
- If desired, description of the macro
Activate Word macros via button
Word macros can be activated not only via a specific key combination, but also via a defined button:
- Go to the „View“ tab in the menu bar and click on the symbol for „Macros“.
- In the context menu, select the middle option „Record macro“.
- Now define the „Macro name“.
- The selection „Save macro in“ offers the option to use the macro in all Word documents by selecting „All documents (Normal.dotm)“.
- Now select the option „Button“ under „Assign Macro“.
- Click on the newly created macro („Normal.NewMacros.MacroName“)
- click „Add“.
- With the „Change“ button, the macro can now be given a symbol and a suitable name.
- Confirm with „OK“.
From now on, the symbol given to the macro appears in the button above the menu bar. If you now want to activate this or several macros, all you have to do is click on the corresponding symbol at the appropriate place in the text.
Header Image: © Gorodenkoff, stock.adobe.com
PowerPoint: Edit the Excel link without problems
PowerPoint: Edit the Excel link without problems
Microsoft Office 2021 or Microsoft 365 contains a lot of practical services that make everyday office life, but also communication and organisation in the private sphere, much easier. Editing texts with Word, creating calculations with Excel or designing presentations with PowerPoint … Some features also make it possible to link the individual programmes with each other. For example, an Excel table can be inserted effortlessly into Word – and just as easily into Microsoft PowerPoint. Here we show how to edit such an Excel link.
Often it is not possible to edit an Excel link because ..
… when inserting an Excel table into Microsoft PowerPoint, the link was not considered in one of the first steps or was executed incorrectly. A link also does not react to changes if the Excel workbook in which the Microsoft Excel table is originally located has been renamed at some point. Another source of error is when the Excel workbook has been moved to another directory within Microsoft 365 or Microsoft Office 2021. In both cases, Microsoft PowerPoint can no longer access the original Microsoft Excel spreadsheet. It simply no longer exists for the programme and it is not possible to update it. Now there is only one thing that helps: Edit the Excel link so that PowerPoint automatically adopts changes to the original Microsoft Excel spreadsheet.
Inserting an Excel table and editing the Excel link
If you want to insert an Excel table into a Microsoft PowerPoint presentation, you should select the function „Insert link“ from the outset. The Excel workbook then automatically takes over the data.
How to insert the Excel table into the PowerPoint slide
Anyone who works a lot with Word and Excel has certainly already successfully mastered the option „Insert Excel table into Word“. In the PowerPoint programme, the procedure for inserting an Excel table is very similar.
- Open the corresponding presentation in Excel PowerPoint.
- Then open the Excel workbook with the table to be inserted.
- Select the table.
- Click the „Start“ tab and navigate to the „Copy“ button.
- Now click on the appropriate place on the Excel PowerPoint slide to be able to paste the Excel table there. Again, open the „Start“ tab and select „Paste“ under „Clipboard“.

Edit Excel link
The above steps can be used to insert the Excel spreadsheet into Microsoft PowerPoint and it is then linked so that changes are automatically applied. However, if the Excel workbook was later renamed or moved, the Excel link must be edited.
- Logically, the PowerPoint presentation whose link is faulty is opened first.
- The „Backstage View“ can be opened via the „File“ tab.
- In the menu that appears, click on „Information“.
- The active PowerPoint slide appears, with various selection options below it.
- Under „Related documents“, click on „Edit links with files“.
- In the „Links“ dialogue window, the command „Change source“ can now be clicked.
- Another dialogue window „Change source“ opens and a list appears with several documents available for selection.
- The correct document must now be selected and the command „Open“ must be given by clicking on it.
- Back in the „Links“ dialogue window, click on „Update now“.
- If the updated link works, the command „Close“ is outlined in blue and can be clicked.
Now you can continue working on the Microsoft PowerPoint slide. After the presentation has been closed and reopened once, the programme has automatically adopted the changes or updates to the Excel spreadsheet.
This is also possible: Create an Excel spreadsheet directly in PowerPoint
Sometimes it is not necessary to first create a table in Excel and then integrate it into a PowerPoint presentation – you can create it directly on a slide.
- Click on the slide in the thumbnail view on which an Excel table is to be created.
- Select the „Insert“ tab and click on the small arrow under „Tables“.
- click on „Insert Excel table“ in the drop-down menu.
- A table appears on the Power-Point slide, which can be edited as usual using Excel’s ribbon.
Header image: © monticellllo, stock.adobe.com
Link Outlook, Word and Excel
Link Outlook, Word and Excel - this is how it works!
In this article we show you how to link Microsoft Outlook, Word and Excel. Whether for private or business use – the Office Suite on the PC facilitates many work processes and enables a clean presentation of a wide variety of documents. Microsoft Word can be used to create formatted texts, Microsoft Excel is the top programme for spreadsheets, calculations and data processing. And finally, Microsoft Outlook is used to manage all e-mails and organise appointments with the help of the integrated calendar.
Linking Word and Excel
In everyday office life, it is often necessary to integrate a table into a Microsoft Word document. This can either be created in the programme itself – or simply linked to a table in Microsoft Excel. To do this, first open the corresponding Excel file. Now mark the table or individual sections of the table and copy them with the keyboard command „CTRL+C“. Then open the Microsoft Word document into which the table or parts of it are to be inserted. Now direct the cursor to the place where the table is to appear. With the keyboard command „CTRL+V“ you can now place it exactly there. The disadvantage, however, is that changes to the table can now only be made with the functions of Microsoft Word. It is more convenient to be able to insert an Excel link into Word. How to link Word with Excel:
- First, select the corresponding table in Microsoft Excel and copy it using the shortcut command.
- In the Microsoft Word document, click on the arrow under „Paste“ in the „Start“ tab and select „Paste contents“ in the drop-down menu.
- In the new window, click on „Insert link“.
- Then select „Microsoft Excel Workbook Object“ in the menu window and confirm with „Ok“.
- Changes that are now made to the table in Microsoft Excel automatically appear in the Microsoft Word document.

Linking Microsoft Outlook with Word and Excel
With a Microsoft account, it is easy to harmonise the functions of all three tools. So not only Excel links can be inserted into Word. But tasks, appointments and changes can also be viewed on different end devices by different employees. The first step is to prepare the toolbar for DeepL access.
- To do this, click with the right mouse button on a symbol in the toolbar.
- Select the option „Customise the toolbar for DeepL access“. A new dialogue box opens (depending on the selected programme in Microsoft Word or Microsoft Excel).
- In the entry „Toolbar for DeepL access“ in the navigation bar in the list field „Select commands“, select the item „Commands not included in the ribbon“.
- Click on „Create Microsoft Outlook task“ in the list and activate it.
One of the advantages of this option is that the document sent via Microsoft Outlook remains on the original PC. Before it is sent, it can be „released“ or „locked“ so that editing by others is prevented or made possible. In this way, tasks can be distributed quickly and without effort by switching programmes. It makes sense to distribute tasks, for example, when working on a Word document or an Excel spreadsheet. And the employee needs to be informed about a current change of deadline, for example. Then this new task does not have to be created in Microsoft Outlook first. Instead, it can be displayed directly in the document being worked on. If there are no other tasks associated with the document, it can be sent to all or individual contacts from the address book in Outlook – without having to change the programme. New recipients can also be added at any time using the table function.
Tip: Working with highlighters in Microsoft Word documents
If several people are working together on a Microsoft Word document, it makes sense to mark particularly important text passages with markers. Such bookmarks make it possible to find certain sections of the text quickly, especially in an extensive document or a shared directory that has been shared with Outlook. Previously uninvolved contacts can then continue to work on these as a task, for example, or make changes.
Header Image: © Prima91, stock.adobe.com
Format your scientific paper in just a few steps
Format your scientific paper in just a few steps
In order to score points with a bachelor’s thesis, master’s thesis, diploma thesis or doctoral dissertation, very specific formatting is prescribed. Even the brightest minds sometimes despair of setting the correct page numbering or margins in Word. Aren’t there a few tricks in Microsoft Office 365 Home or Microsoft Word for formatting your academic work without risking a nervous breakdown? Yes, there are – and we’ll show you what they are.
Which areas do you need to format for a scientific paper?
Depending on the university, it is possible that there are very specific requirements as to how the formatting in Word should look. Therefore, it is helpful to find out exactly what the university’s requirements are before formatting the document for the academic paper. In general, however, you must always keep these points in mind when formatting a scientific paper:
- Font and font size
- Line spacing
- Page margins
- Page numbering
- Cover page
With formatting in Word, it’s basically quite easy – if you know how!
Formatting font and font size
If you want to format a scientific paper, you should make sure to choose a consistent, easy-to-read font. Usually, the sometimes somewhat old-fashioned serif font Times New Roman or the modern sans-serif Arial are used. For body text, the font should be used in 12 point, for headings 14 point.
Choose the correct line spacing
The texts are formatted as justified text, i.e. flush on the left and right so that nothing flutters at the edges. As a rule, the line spacing is 1.5; only for footnotes can a single line spacing be chosen. Remember the margins Especially in justified type, it is important that the margins – the space between the letters and the edge of the page – are large enough, because this makes reading easier. Before starting to write, the document should be set up so that the following margins are pre-formulated:
- top and bottom margins 2 to 2.5 cm each
- left margin 3 to 3.5 cm
- right margin 2 to 2.5 cm
Format academic paper and set page numbering
First things first: Neither the cover page nor the table of contents are given a page number (pagination). Depending on how the bachelor’s or doctoral thesis, etc. is structured, pagination will therefore only start from the third page or from the page on which the introduction is written. The page number is set in the formatting in the middle of the footer or right-justified. In order to start page numbering only from page 3 when formatting in Word, a few steps are necessary:
- a section break is inserted on page 2
- the footer must not be linked to the previous one
- now start with the command „Format page numbers“ from 1

How to make the cover page work
Pretty much every university requires a cover sheet for academic papers. It contains the most important key data and should give the examiners a quick overview of the formal aspects of the work. In a way, it’s like the cover of a book: it has to make a good first impression! The cover sheet must include the following information:
- Type of thesis (Bachelor’s thesis, Master’s thesis, doctoral thesis, etc.)
- the title and possibly a subtitle of the academic paper
- Name of the university, if possible also the logo in very good print quality
- The name of the author of the thesis and his/her matriculation number
- the author’s contact details
- the names of the persons who supervised the author during his or her work
- if available, the name of the second corrector
- Name of the degree programme or department
- Date of submission
Tip: How to structure a Bachelor's or Master's thesis
With these forms of academic work, the correct outline is crucial if you want to achieve a good grade. Usually, the outline looks like this:
- Cover page
- Abstract (preface/introduction)
- Table of contents
- List of images used (if available)
- List of tables used (if available)
- List of abbreviations
- Continuous text divided into
- Introduction
- theoretical framework
- Methodology
- Results
- Conclusion
- List of literature used
- Appendices, if any
- Affidavit
Header image: © monticellllo, stock.adobe.com
Create Word template - Simple instructions in a few steps
Create a Word template - Simple instructions in just a few steps
Free word processing software abounds, yet Microsoft’s Word remains the most widely used in the world. One of the most important features of Word is the format templates, which ensure uniform formatting with the help of defined characteristics such as font, font size and line spacing. Especially in the business sector, for job applications or for scientific papers where special specifications have to be met, templates are extremely helpful. By designing the format templates in advance, you prepare the creation of long texts in Word and save yourself a lot of work in finally putting the finished text into the correct layout. Even if the text is already written, templates ensure that all text modules are standardised and that no formatting errors remain. Word already contains some pre-installed templates for formats as well as for special forms or document types such as letterhead, invitations or business cards. However, if these do not meet your needs, you can create your own Word template and save the individual configurations as a basis for further texts.
Two different templates
There are two different types of templates available in Microsoft Word: Format Templates and Document Templates:
- The style sheet specifies formal categories such as font, line spacing or paragraphs. Corresponding templates are located in the „Start“ tab under „Format templates“
- The document template contains formal settings as well as additional elements such as headers and footers, logos, lists, placeholders or text fields. These can be individually designed so that they can be used as an invoice, letterhead, cover letter, etc. Can be used.
Change or create a style sheet
- Open a new Word document.
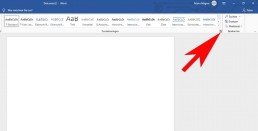
- Click on the arrow on the right below the menu bar „Format templates„.
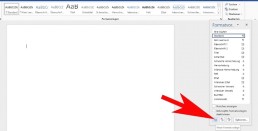
- In the newly opened window, click on „New style“ at the bottom left.
- Enter a name for the style in the first field.
- Then configure all the properties that your template should contain.
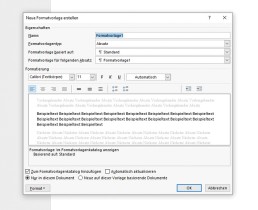
- Finally, click on „OK„. The template will then be added to the style sheets that can be found in the „Start“ tab.
Create Word template for documents
To create a new Word template in which you can save a special document according to your own ideas, there are several possibilities. There are already various ready-made templates available in Word. To use such a template, click on „File“ in Word and then on „New„. There are many different options under „Office-com templates„. After you have selected a template, it opens in a new window and is available for editing. Edit and save template After you have found a suitable template, you can edit it according to your own ideas and insert graphics, tables or logos, change the formatting and make other changes. When everything is ready, the result can be saved as a template: ⦁ Click on „Save and send“ in the menu item „File“. ⦁ Click on „Change file type“ and double-click on „Template„.
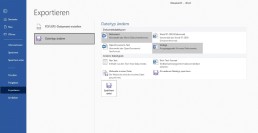
⦁ A window opens in which you can give the template a name and select the storage location. ⦁ Click on „Save“ and the new template will be created.
Header image: © wachiwit, stock.adobe.com
Microsoft Word: Insert page numbers - easy from page 3 onwards
Microsoft Word: Inserting page numbers - simply starting on page 3
Inserting page numbers in Microsoft Word
To insert page numbers in Microsoft Word, go to the „Insert“ tab and find a drop-down menu „Footer“ in the „Header and Footer “ section Here you can select a footer according to your taste
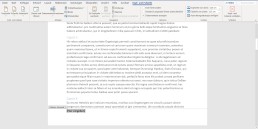
As soon as you have selected a format for the footer, Word automatically switches to the header or footer view.
In this tab „Header and Footer „you navigate via „Page Number“ and „ Page End“ to yourfavourite formatting. You can choose whether the page number should be positioned at the bottom (or top) on the left, in the middle or on the right.
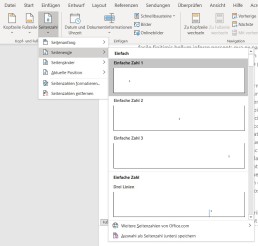
If you insert the page number in this way, it will automatically start on the first page and each page will have a page number.
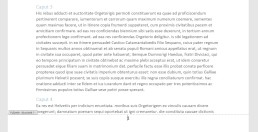
To edit the page number format further, you can switch to the „Start“ tab(while editing the header or footer is active) and edit the page numberas you wouldany other body of text. To do this, you only need to select the number on one page and then choose the type, font size and font colour. This setting is then also applied to the other pages. When you are satisfied with the page number, you can finish editing the footer either by clicking on „Close header and footer“ or by double-clicking in the document.
Start with the page number only on page 3
If you want to format your term paper correctly in your studies, you need to format the page number so that it doesn’t start until page 3. The cover page and the outline are not formatted. You can either do this with a crutch of two different documents (but then you cannot automatically create the table of contents), or you can divide the document into two sections. To divide the document into two (or more) sections, move the cursor to page 2, switch to the „Layout“ tab and add a new „Section break“ under „Breaks„. Now the document is divided into two sections. The second section now starts after the page on which the cursor was located (in this example on page 3). If you activate the paragraph marks and formatting symbols, you can see the section break here.

Thengo to page 3 and change to the header and footer menu, by double-clicking on the header or footer. In the „Header and Footer“ menu, in the middle of the upper menu band, you will find the Navigation field with the button „Link to previous page“Deactivate this button so that the page numbers are only inserted from page 3 onwards. Now you can insert the page number as usual. By default, page number 3 appears here, but to number page 3 of the document as page 1, navigate via „Page number“ in the „Insert“ tab to „Format page number Here you enter the value 1 for „Start at“.
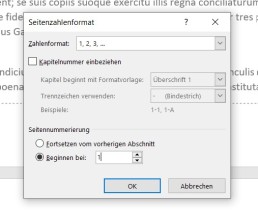
Now page number 1 appears on page 3 of the document.
Header image: © adam121, stock.adobe.com
Microsoft Word: Creating a table of contents in Word
Microsoft Word: Create a table of contents in Word
How to create a table of contents with Word
To create a table of contents with Word, you must first format all headings accordingly. In the „Start“ tab, there are various format templates that can designate a paragraph as a heading or subheading.
A paragraph is created in Word by pressing the ENTER key and ismarked with the formatting character „¶“. A line break does not automatically mark the end of the paragraph.
Format headings
Word can create up to 9 heading levels. The different levels are also displayed accordingly in the table of contents. A chapter heading should always be formatted as „Heading 1“, followed by a „Heading 2“ and so on. The next chapter heading is then again a „Heading 1.“
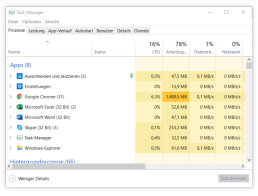
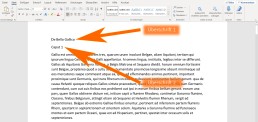
To create a heading, simply type it in, move the cursor to the heading and click on thedesired heading level in the „Style sheets„. The entire paragraph in which the cursor is located is always formatted as a heading.
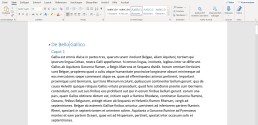
This is how correctly formatted headings look in the document:
Insert table of contents
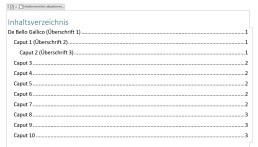
After you have formatted the headings correctly, you can insert the table of contents with a few clicks. To do this, move the cursor with the mouse to the place where the table of contents is to be inserted – this is usually on the second page of the document. Then switch to the „References“ tab and click on „Table of contents “ A drop-down menu opens from which you can choose a format. By clicking on the table of contents, Word automatically inserts the table of contents.
Update table of contents
Word automatically displays the page number onwhich a heading or subheading appears when the table of contents‘ is created. If you make changes to the text after the table of contents has been created, the position of a heading may change. In order for the table of contents to show the correct page number, the table of contents must be updated.
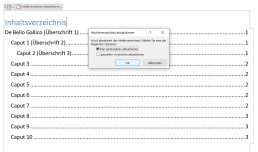
To update the table of contents, switch back to the „References“ tab and click the „Update table of contents.“ button here If you only want to update other page numbers, click on „Update page numbers only.“ in the context menu If you have also inserted new headings or changed headings, click on „Update entire table of contents.“[/vc_column_text]
The table of contents does not need page numbers
In order for the table of contents to display correctly, you do not need to insert page numbers in Word.Even if no page numbers are displayed on the individual pages, Word displays the page number in the table of contents. If you want to have page numbers displayed in your document, we have already created the corresponding instructions. Here you will also find instructions on how to insert the page number only from page 3 onwards.
Header image: © pit24, stock.adobe.com


