Microsoft Word: Inserting page numbers - simply starting on page 3
Inserting page numbers in Microsoft Word
To insert page numbers in Microsoft Word, go to the „Insert“ tab and find a drop-down menu „Footer“ in the „Header and Footer “ section Here you can select a footer according to your taste

As soon as you have selected a format for the footer, Word automatically switches to the header or footer view.
In this tab „Header and Footer „you navigate via „Page Number“ and „ Page End“ to yourfavourite formatting. You can choose whether the page number should be positioned at the bottom (or top) on the left, in the middle or on the right.
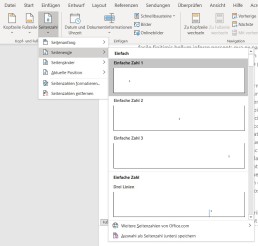
If you insert the page number in this way, it will automatically start on the first page and each page will have a page number.

To edit the page number format further, you can switch to the „Start“ tab(while editing the header or footer is active) and edit the page numberas you wouldany other body of text. To do this, you only need to select the number on one page and then choose the type, font size and font colour. This setting is then also applied to the other pages. When you are satisfied with the page number, you can finish editing the footer either by clicking on „Close header and footer“ or by double-clicking in the document.
Start with the page number only on page 3
If you want to format your term paper correctly in your studies, you need to format the page number so that it doesn’t start until page 3. The cover page and the outline are not formatted. You can either do this with a crutch of two different documents (but then you cannot automatically create the table of contents), or you can divide the document into two sections. To divide the document into two (or more) sections, move the cursor to page 2, switch to the „Layout“ tab and add a new „Section break“ under „Breaks„. Now the document is divided into two sections. The second section now starts after the page on which the cursor was located (in this example on page 3). If you activate the paragraph marks and formatting symbols, you can see the section break here.

Thengo to page 3 and change to the header and footer menu, by double-clicking on the header or footer. In the „Header and Footer“ menu, in the middle of the upper menu band, you will find the Navigation field with the button „Link to previous page“Deactivate this button so that the page numbers are only inserted from page 3 onwards. Now you can insert the page number as usual. By default, page number 3 appears here, but to number page 3 of the document as page 1, navigate via „Page number“ in the „Insert“ tab to „Format page number Here you enter the value 1 for „Start at“.
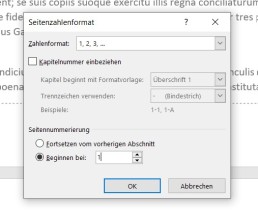
Now page number 1 appears on page 3 of the document.
Header image: © adam121, stock.adobe.com