
Synchronise Microsoft Outlook Calendar and Google Calendar - Simple instructions!
Synchronise Microsoft Outlook Calendar and Google Calendar - Simple instructions!
Synchronising Google Calendar with Outlook
The Microsoft Outlook synchronisation programme was unfortunately discontinued years ago. Nevertheless, there is still a simple way to connect your Outlook with Google Calendar. The aim of this synchronisation is that – no matter in which calendar you enter something – the events show up in both calendars Important to know: If you use a smartphone from Apple or Android, you can simply use several calendars in one calendar app. So you can save yourself the synchronisation here. When using Outlook in the online version, it is also possible to use several calendars next to each other.
Merging Microsoft and Google calendars – options at a glance
There are various ways to merge the two calendars. We have listed the best ones below:
- The simplest way to merge the two calendars is to export and import the current appointment status of a calendar. However, this is not synchronisation – this is described below.
- A continuous updating and extension of the appointments in both calendars at the same time can only take place through synchronisation. However,this requires a third party application.
- A very simple possibility is to subscribe to your own Google or Microsoft calendar. In this way, the appointments of the subscribed calendar are transferred and continuously updated.
In the following text, we describe these 3 options for merging Microsoft Outlook and Google Calendar.
-
Export Google Calendar and import it into Outlook App
To export the Google Calendar, you have to call up the online version of the service in the browser. To do this, you must be logged in to the corresponding Google account in the browser. You can access the calendar via this link: https://calendar.google.com/
- In the first step, click on the settings symbol (cogwheel) and then on „Settings“.
2. In the menu on the left side you will find the menu item „Import & Export“. Click on it and the following window appears:

In the list under „Export“youcan now select all the calendars that can be edited and that are to be exported. With a click on the „Export“ button, these are now combinedinto a zipped archive and downloaded. The .ics file contained in the archive is now used to import the Google calendar archive into Outlook. 3. Now the Google Calendar is imported intothe Outlook calendar with the help of the .ics file. To do this, follow the following path in the Outlook app: „File -> Open and Export -> Import/Export“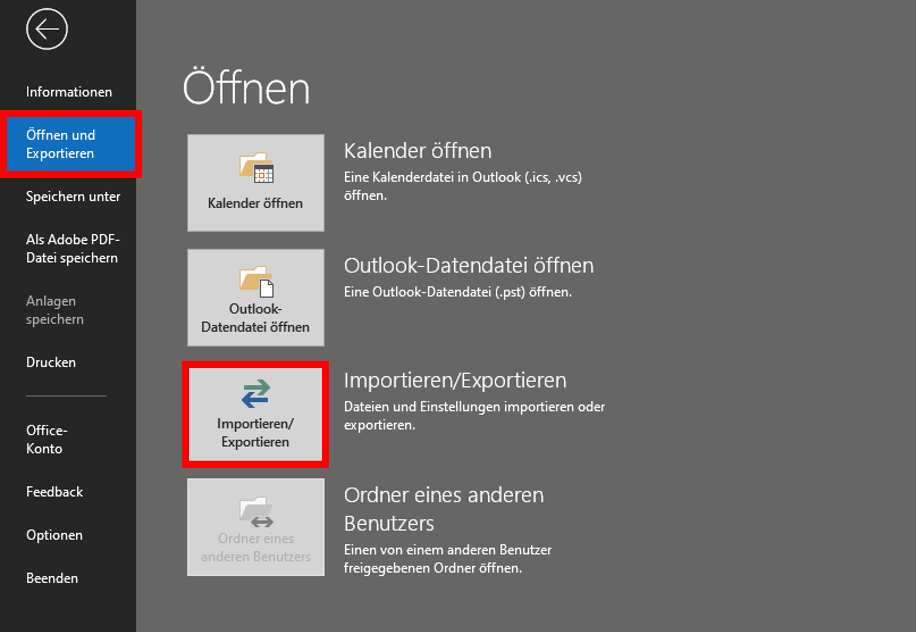 4. In the window that opens, click on „Import iCalender (ICS) or vCalender (VCS) file“ and then on „Next“
 5. Now select the previously saved.ics filein the „Browse„window and click on „Open“ Now the calendar can be found in Microsoft Outlook under „Other calendars“ or „My calendars“. However, since it is only importing the calendar at a fixed time, the newly added or updated appointments in Google Calendar will not be synchronised.
Synchronising Google and Microsoft calendars
Subscribe to Google Calendar and display it in Outlook
Outlook’s „Subscribe to Calendar“ function is a good way to avoid synchronisation by third-party software. The effect is the same as a real synchronisation. All data is continuously updated by subscribing to the calendar. Moreover, this subscription function is not limited to one’s own calendar. If you have the individual address of another person’s calendar, you can also see their calendar. However, this person can decide whether to allow all appointments to be viewed or whether to set certain appointments to „Private“ to prevent viewing. To subscribe to a Google Calendar with Outlook, simply follow the steps below:
- A prerequisite for subscribing to Google Calendar is the exact iCal address.
This can be found in the Google Calendar application in the browser in the left bar under „My Calendars“. Click on the 3 dots next to the name of the selected calendar and then on „Settings and Sharing“.


4. copy the iCal address into the window that opens. Confirm with „Ok“ to subscribe to the calendar. The calendars can now be organised on top of each other or next to each other.
Header image: © dennizn, stock.adobe.com
Instructions: Install Microsoft Office in 5 steps
Instructions: Install Microsoft Office in 5 steps

What versions of Microsoft 365 are available?
What versions of Microsoft 365 are available?
Installing Office 365 on a PC is simple, but a little confusing due to the subscription model. First of all, you should decide on an Office 365 package. Microsoft has put together two different packages for the different needs of users. There is also the Microsoft Home & Student 2019, which is available as a classic single purchase The Microsoft 365 packages come as Microsoft 365 Personal and as Microsoft 365 Family. Both packages include Word, Excel, PowerPoint, OneNote, Outlook, Access and Publisher. The Single subscription is only suitable for one user and provides 1 TB of cloud volume. The Family package can be used by up to six users and provides access to 6 TB of cloud storage.
Install Microsoft 365 in five steps – this is how it works:
First you have to log in with your Microsoft account, then you can get started. Microsoft 365 is only offered as a download. This means that you do not have a CD or DVD as a backup medium.
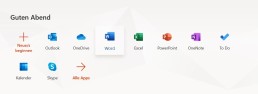
- On the website https://www.office.com/signin you can log in with the Microsoft 365 account you used to buy the product. If you have never registered here before, you have to create a new account. Next, you are redirected to a page where you enter the product key you received when you purchased the product.
- Once you have successfully logged in, you will find the „Install Office.“ box at the top of the page Click on this button to download and install Microsoft 365
- Before that, you have to select on the website whether you want to installthe programme for PC, Mac or a mobile device (such as smartphone or tablet).
- If the installation menu does not open automatically, you can start by double-clicking on the installation file.
5. Once you have confirmed that the installer is allowed to make changes to the device, the programme installs and you can use it.
How to uninstall Microsoft 365?
To uninstall Microsoft 365 again, you can download an appropriate uninstaller from Microsoft Download toolthat takes care of the uninstallation. Otherwise, you can remove the programme manually. At Windows 10 this is possible, for example, via the system settings.
Header image: © dennizn, stock.adobe.com

Microsoft Excel - Insert table into Word
Microsoft Excel - Paste table into Word
How to insert an Excel table into Word
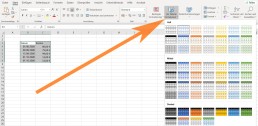
Then switch to the Word document, click on the place where the table should be inserted and select „insert“(or insert the content with CTRL+V). By default, the format of the Excel table is adopted in Word. If you have only entered values in cells in Excel, you will only get a list without table lines or coloured formatting. In Excel, you can simply select a formatting under „Format as table“ in the „Start“ tab in the „Format templates“ area.
To link an Excel table in Word
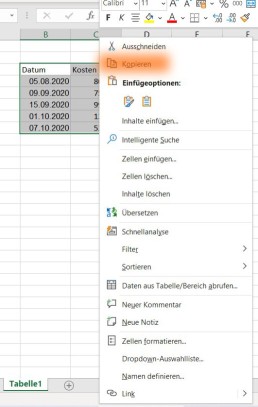
If you want to insert your values and data into Word sorted, you should create the table in Excel and then insert it into Word. This is because in Excel, with the help of an intelligent table, you can sort and systematise the values as you like. Once you have inserted the table in Word, you can only change the table in Word. Changes to the table in Excel are then no longer accepted. Therefore, it makes more sense to link the Excel table in Word. To link an Excel table with Word, first copy the contents into Excel as described above. However, you do not simply paste them into Word. Instead, move the cursor to where you want to insert the table. Then click on the small arrow under „Paste“ in the tab „Start“ in the section “ Clipboard.“
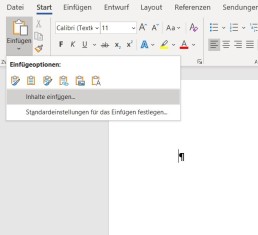
In the drop-down menu that opens, select the function „Insert content“ and a new window with this name opens. Here you select the option „Microsoft Excel workbook object“.
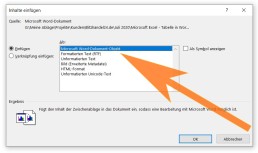
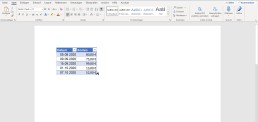
Click on „Ok“ toconfirm the selection and the Excel table is inserted into the document. If you now change something in the Excel table, the data is transferred to Word. To do this, you must save the changes in Excel and reopen Word so that the changes are displayed in the document.
If you often need tables for your work, you can save yourself a lot of work with this practical function.
Header image: © monticellllo, stock.adobe.com

Work more productively in the office - with next generation speech recognition
Work more productively in the office - with next generation speech recognition
Faster and more accurate than ever Nuance Dragon Professional Individual 15
With its next-generation speech recognition engine, Dragon Professional Individual 15 expands the possibilities of speech recognition. Dragon recognises dictations extremely accurately and uses deep learning and an adaptation technique to continuously adjust to your voice and changing environmental conditions – even during dictation.
- Up to 99% accuracy
- A new engine ensures optimal recognition even of speakers with accents or in background noise (open-plan office).
- Highest recognition accuracy from the start, no speech training required.
- Personalised, voice-controlled user experience
- Highest recognition accuracy right from the start, no speech training required
- Personalised to you: Dragon remembers words and phrases you use frequently
- Even better recognition accuracy with optional additional training or analysis of existing documents and emails.
- Fast response times
- Speak at normal speed. Your words are immediately displayed on the screen.
- You see the dictation immediately and can review it instantly.
- No idea is lost any more, Dragon captures your ideas and thoughts instantly, as fast as you speak.
Speak instead of typing, wherever the keyboard is normally used Nuance Dragon Professional Individual 15
Create user-defined terms and vocabularies
Use self-created voice commands for frequently used expressions and graphics
Convert audio recordings into text Nuance Dragon Professional Individual 15
Synchronisation with the separate Dragon Anywhere mobile app
Can also be used on touch devices
Comfortable voice-controlled PC operation and control
Launch applications, select menu items, press keys, switch between windows, surf the web, compose and send emails and much more – all by speaking. Dragon Professional Individual gives you maximum flexibility:
- You really can operate it completely hands-free.
- Experience a particularly ergonomic and comfortable way of working at the computer.
- Protect your body through less strain and stress.
- Use your voice to dictate and execute commands.
Easy proofreading with natural sounding speech synthesis or audio playback
Wide range of microphone options for even more freedom and flexibility Nuance Dragon Professional Individual 15
Connected microphones are automatically recognised by Dragon Professional Individual and displayed in a convenient selection list. With Dragon it is even possible to use different types of audio devices in one and the same user profile. This means you can use your personal settings for recognition accuracy and formatting with different microphones. This can be a USB microphone at home, a wireless microphone in the office and the built-in laptop microphone on the road. The following options are supported:
- Microphones built into newer laptops: you can dictate documents and voice commands directly into your laptop without an additional headset.
- Wireless Bluetooth microphone: Use a Nuance-certified Bluetooth headset microphone that also provides premium wireless performance and maximum freedom of movement when dictating.
- Other Nuance certified microphones: For more information, visit support.nuance.com/compatibility.
Break down barriers and work ergonomically Nuance Dragon Professional Individual 15
Easy to get started, easy to use Nuance Dragon Professional Individual 15
Nuance Dragon Professional Individual 15 makes it easy to get started with speech recognition and enables efficient and productive use in no time at all. This also applies to familiarisation with the advanced functions, which increase your productivity even further. Nuance Dragon Professional Individual 15 makes it easy to unlock your productivity potential and get the most out of the software very quickly. It gives you tips and points out particularly practical functions. The benefits of Dragon:
- Helpful tutorials ensure maximum efficiency right from the start.
- An intuitive design allows easy access to the full range of functions and provides a noticeable increase in productivity.
- Dragon gives you context-driven instructions based on how you use the software. This allows you to really get the most out of Dragon and work more efficiently than ever before.
Here you can buy the full version as a download or box variant: Nuance Dragon Professional v15 Nuance Dragon Home 15 Nuance Dragon NaturallySpeaking 13
Header image: © WrightStudio, stock.adobe.com