Adding a mailbox to Outlook - it's that easy
Over the years, numerous e-mail addresses have accumulated – mostly unintentionally, but for both professional and private reasons and circumstances. This is cumbersome and it is easy to lose track of them or, in the worst case, to simply not find that one email you need right now. If you want to check the new e-mails from all these addresses, you do not have to log in to each one individually. The Outlook programme offers the possibility of collecting several mailboxes, so that you have an overview of all your electronic mail. We show you how easy it is to add mailboxes to Outlook. It’s that simple: Fortunately, setting up an additional e-mail account in Outlook is quite simple:
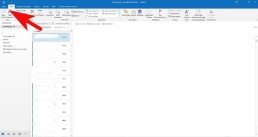
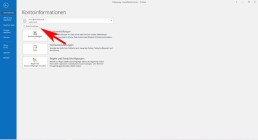
- Select File, the Information tab and then click on „Add account
„.

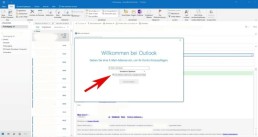
- At this point, enter the name of the user, the e-mail address and the corresponding password.
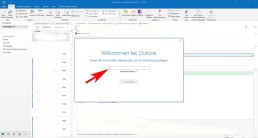
-
- Confirm the data with „continue
„.
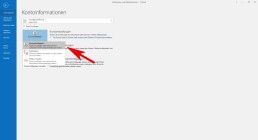
- Outlook then checks the entered data for correctness. If everything is correct, the installation process is complete.
- Finally, click on „Finish
“ and the new mailbox is added. Caution
: If you have added too many mailboxes with large amounts of data, this can lead to considerable performance fluctuations with Outlook – and also with other providers. It is then advisable to delete unimportant data at regular intervals and save important files on an (external) hard disk, for example.
Shared mailbox in Outlook
With shared mailboxes, certain groups of people can easily view and send e-mails using a public e-mail alias such as „info@xy.com“ or „kontakt@xy.com“. If a person in the group replies to a message, the sender of the e-mail is the shared mailbox and not the individual user. In addition, the shared mailbox can function as a shared team calendar. It’s that simple:
- In Outlook, select the File tab in the ribbon.
- SelectAccount Settings and then Account Settings in the menu.
- Select the Email tab.
- Make sure the correct account is highlighted, then select ‚Change‘.
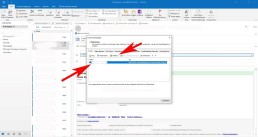
- Select more „Settings“ > „Advanced“ > „Add“.
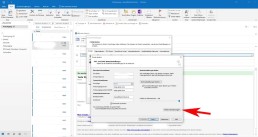
- Enter the shared email address, selectOKand select Next > Finish > Close
- Next > Finish > Select Close.
However, a shared mailbox is not designed for direct login. The user account for the shared mailbox itself should keep the status „disabled.„
Connecting Outlook with Exchange
To an existing POP3 or IMAP account, you can set up a Microsoft Exchange account in Microsoft Outlook 2019. It’s as simple as this:
- Select File, the Information tab and then click „Add Account„.
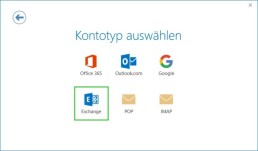
- Enter the email address of the new Microsoft Exchange 2019 account, click on „Advanced options“, activate the option „I want to configure my account manually“ and then click on „Connect„.
- Select the account type „Exchange
The computer now connects to the Microsoft Exchange servers. The following message is displayed: „By adding a new Microsoft Exchange account, you have changed the location for some of your new email messages and calendar information.“
- Click on „OK
You are asked to authorise Autodiscover to set up Microsoft Outlook on your behalf.
- Click on „Allow„.
- Enter the password and click on „OK„.
The Account Setup Complete window is displayed.
- Click on „OK„.
The Microsoft Exchange account is now set up and ready for use. If you have already created a profile for a Microsoft Exchange account in Microsoft Outlook 2019 and would like to use an additional Microsoft Exchange account, you must create a new profile for this.
Header image: © IB Photography, stock.adobe.com