
Adding a mailbox to Outlook - it's that easy
Adding a mailbox to Outlook - it's that easy
Over the years, numerous e-mail addresses have accumulated – mostly unintentionally, but for both professional and private reasons and circumstances. This is cumbersome and it is easy to lose track of them or, in the worst case, to simply not find that one email you need right now. If you want to check the new e-mails from all these addresses, you do not have to log in to each one individually. The Outlook programme offers the possibility of collecting several mailboxes, so that you have an overview of all your electronic mail. We show you how easy it is to add mailboxes to Outlook. It’s that simple: Fortunately, setting up an additional e-mail account in Outlook is quite simple:
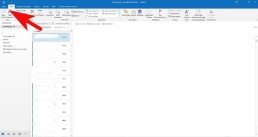
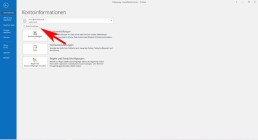
- Select File, the Information tab and then click on „Add account
„.

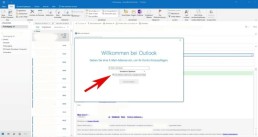
- At this point, enter the name of the user, the e-mail address and the corresponding password.
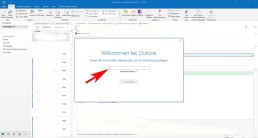
-
- Confirm the data with „continue
„.
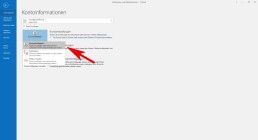
- Outlook then checks the entered data for correctness. If everything is correct, the installation process is complete.
- Finally, click on „Finish
“ and the new mailbox is added. Caution
: If you have added too many mailboxes with large amounts of data, this can lead to considerable performance fluctuations with Outlook – and also with other providers. It is then advisable to delete unimportant data at regular intervals and save important files on an (external) hard disk, for example.
Shared mailbox in Outlook
With shared mailboxes, certain groups of people can easily view and send e-mails using a public e-mail alias such as „info@xy.com“ or „kontakt@xy.com“. If a person in the group replies to a message, the sender of the e-mail is the shared mailbox and not the individual user. In addition, the shared mailbox can function as a shared team calendar. It’s that simple:
- In Outlook, select the File tab in the ribbon.
- SelectAccount Settings and then Account Settings in the menu.
- Select the Email tab.
- Make sure the correct account is highlighted, then select ‚Change‘.
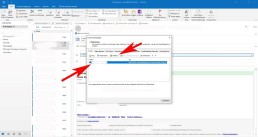
- Select more „Settings“ > „Advanced“ > „Add“.
- Enter the shared email address, selectOKand select Next > Finish > Close
- Next > Finish > Select Close.
However, a shared mailbox is not designed for direct login. The user account for the shared mailbox itself should keep the status „disabled.„
Connecting Outlook with Exchange
To an existing POP3 or IMAP account, you can set up a Microsoft Exchange account in Microsoft Outlook 2019. It’s as simple as this:
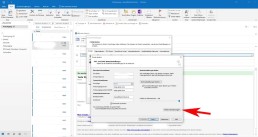
- Select File, the Information tab and then click „Add Account„.
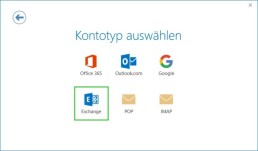
- Enter the email address of the new Microsoft Exchange 2019 account, click on „Advanced options“, activate the option „I want to configure my account manually“ and then click on „Connect„.
- Select the account type „Exchange
The computer now connects to the Microsoft Exchange servers. The following message is displayed: „By adding a new Microsoft Exchange account, you have changed the location for some of your new email messages and calendar information.“
- Click on „OK
You are asked to authorise Autodiscover to set up Microsoft Outlook on your behalf.
- Click on „Allow„.
- Enter the password and click on „OK„.
The Account Setup Complete window is displayed.
- Click on „OK„.
The Microsoft Exchange account is now set up and ready for use. If you have already created a profile for a Microsoft Exchange account in Microsoft Outlook 2019 and would like to use an additional Microsoft Exchange account, you must create a new profile for this.
Header image: © IB Photography, stock.adobe.com

Windows 10 pin removal: simple instructions!
Remove Windows 10 pin: simple instructions!
Deactivating the Windows 10 pin
To deactivate the Windows pin, open the system settings with the key combination „Windows+I“. Select the „Accounts“ menu and switch to the „Login options“ tab on the left-hand side

Under „Login Options“ click on the button „Windows Hello PIN.„In the button box that now opens, next click the „Remove.“ button Windows 10 now displays a notice that it is easier to log in with a pin and that without a pin the face and fingerprint recognition no longer works. A second click on „Remove“ removes the pin.

If you often take your laptop to appointments or to work, or if you live in a household where not everyone should have access to your desktop PC, you should choose a different password protection for your end device.
Deactivating the login for reactivations
If you only want to switch off the login information when you reactivate your computer, you can do this in the system settings. To do this, call up the control panel with the key combination „Windows+I“. As before, go to „Accounts“ and open the „Login Options “ window Select the option „ Never“ under „ Logon required „.
Disable the login for Windows 10
If youdon ‚t need or want a password for your computer at all, you can also deactivate it completely – although this is a bit more complicated. To deactivate the login, first open the „Run “ window with the key combination „ Windows+R “ and enter the command “ netplwiz“. Then confirm your entry with the Enter key. This command opens the „User Accounts “ window Here, under the tab „Users „, you will find the field „Users must enter user name and password“ Remove the tick here by clicking on the square field to the left of it and confirm with „OK“ After clicking on „Ok“, a new window should open. Here you type your own password into thefields provided for confirmation and confirm again with „Ok.“
Header image: © Pixel-Shot, stock.adobe.com

Microsoft Word: Insert page numbers - easy from page 3 onwards
Microsoft Word: Inserting page numbers - simply starting on page 3
Inserting page numbers in Microsoft Word
To insert page numbers in Microsoft Word, go to the „Insert“ tab and find a drop-down menu „Footer“ in the „Header and Footer “ section Here you can select a footer according to your taste
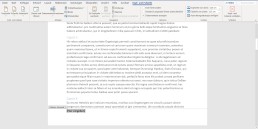
As soon as you have selected a format for the footer, Word automatically switches to the header or footer view.
In this tab „Header and Footer „you navigate via „Page Number“ and „ Page End“ to yourfavourite formatting. You can choose whether the page number should be positioned at the bottom (or top) on the left, in the middle or on the right.
If you insert the page number in this way, it will automatically start on the first page and each page will have a page number.

To edit the page number format further, you can switch to the „Start“ tab(while editing the header or footer is active) and edit the page numberas you wouldany other body of text. To do this, you only need to select the number on one page and then choose the type, font size and font colour. This setting is then also applied to the other pages. When you are satisfied with the page number, you can finish editing the footer either by clicking on „Close header and footer“ or by double-clicking in the document.
Start with the page number only on page 3
If you want to format your term paper correctly in your studies, you need to format the page number so that it doesn’t start until page 3. The cover page and the outline are not formatted. You can either do this with a crutch of two different documents (but then you cannot automatically create the table of contents), or you can divide the document into two sections. To divide the document into two (or more) sections, move the cursor to page 2, switch to the „Layout“ tab and add a new „Section break“ under „Breaks„. Now the document is divided into two sections. The second section now starts after the page on which the cursor was located (in this example on page 3). If you activate the paragraph marks and formatting symbols, you can see the section break here.

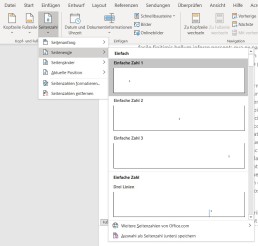
Thengo to page 3 and change to the header and footer menu, by double-clicking on the header or footer. In the „Header and Footer“ menu, in the middle of the upper menu band, you will find the Navigation field with the button „Link to previous page“Deactivate this button so that the page numbers are only inserted from page 3 onwards. Now you can insert the page number as usual. By default, page number 3 appears here, but to number page 3 of the document as page 1, navigate via „Page number“ in the „Insert“ tab to „Format page number Here you enter the value 1 for „Start at“.
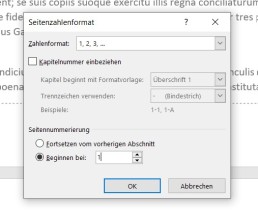
Now page number 1 appears on page 3 of the document.
Header image: © adam121, stock.adobe.com

Microsoft Word: Creating a table of contents in Word
Microsoft Word: Create a table of contents in Word
How to create a table of contents with Word
To create a table of contents with Word, you must first format all headings accordingly. In the „Start“ tab, there are various format templates that can designate a paragraph as a heading or subheading.
A paragraph is created in Word by pressing the ENTER key and ismarked with the formatting character „¶“. A line break does not automatically mark the end of the paragraph.
Format headings
Word can create up to 9 heading levels. The different levels are also displayed accordingly in the table of contents. A chapter heading should always be formatted as „Heading 1“, followed by a „Heading 2“ and so on. The next chapter heading is then again a „Heading 1.“
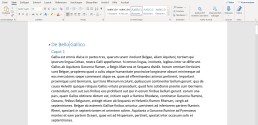
To create a heading, simply type it in, move the cursor to the heading and click on thedesired heading level in the „Style sheets„. The entire paragraph in which the cursor is located is always formatted as a heading.
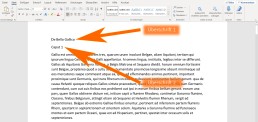
This is how correctly formatted headings look in the document:
Insert table of contents
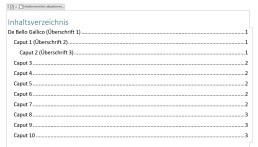
After you have formatted the headings correctly, you can insert the table of contents with a few clicks. To do this, move the cursor with the mouse to the place where the table of contents is to be inserted – this is usually on the second page of the document. Then switch to the „References“ tab and click on „Table of contents “ A drop-down menu opens from which you can choose a format. By clicking on the table of contents, Word automatically inserts the table of contents.
Update table of contents
Word automatically displays the page number onwhich a heading or subheading appears when the table of contents‘ is created. If you make changes to the text after the table of contents has been created, the position of a heading may change. In order for the table of contents to show the correct page number, the table of contents must be updated.
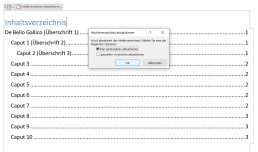
To update the table of contents, switch back to the „References“ tab and click the „Update table of contents.“ button here If you only want to update other page numbers, click on „Update page numbers only.“ in the context menu If you have also inserted new headings or changed headings, click on „Update entire table of contents.“[/vc_column_text]
The table of contents does not need page numbers
In order for the table of contents to display correctly, you do not need to insert page numbers in Word.Even if no page numbers are displayed on the individual pages, Word displays the page number in the table of contents. If you want to have page numbers displayed in your document, we have already created the corresponding instructions. Here you will also find instructions on how to insert the page number only from page 3 onwards.
Header image: © pit24, stock.adobe.com

Microsoft Teams: Disable or enable autostart
Microsoft Teams: Disable or enable autostart
Autostart of Microsoft Teams deactivate
To deactivate the autostart of Microsoft Teams, simply follow the instructions below:
-
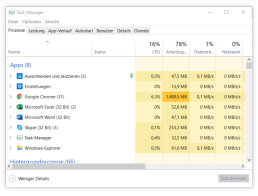
- Open Task Manager
a. Simultaneously press the „Windows key“ and „X“ or click with a Right-click on the start bar. b. In the menu that opens, right-click on the Task Manager the Task Manager. (Alternatively, you can also open the Task Manager with „Ctrl“ + „Alt“ + „Del“ )
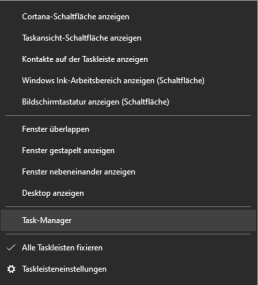
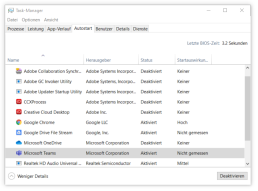
2. the autostart tab a. The task manager is organised by different tabs (tabs). Here you need to select the„Autostart“tab.
3. disable Microsoft Teams a. In the autostart list you must now search for theprogramme „Microsoft Teams“ (Under certain circumstances, however, a large number of programmes may be listed here. If you cannot find Microsoft Teams, you can simply type in the first letter „M“. The automatic search jumps directly to the place where the programmes begin with „M“) b. If Microsoft Teams is selected, you can deactivate it by clicking on the„Deactivate“ button at the bottom right.
Activating Microsoft Teams Autostart
Activating Microsoft Teams works in the same way as deactivating it. If you jumped straight to this part of the text, here are the step-by-step instructions again:
- Call up Task Manager
a. Simultaneously press the „Windows key“ and „X or click with a Right-click on the start bar. b. In the menu that opens, right-click on the Task Manager the Task Manager. (Alternatively, you can also open the Task Manager with „Ctrl“ + „Alt“ + „Del“ ) 2. The Autostart tab a. The task manager is organised by different tabs. Here you must select the tab „Autostart select. 3. Deactivate Microsoft Teams a. In the autostart list you must now search for the programme „Microsoft Teams“ (Under certain circumstances, however, a large number of programmes may be listed here. If you cannot find Microsoft Teams, you can simply type in the initial letter Type in the first letter „M“. The automatic search jumps directly to the place where the programmes begin with „M“) b. If Microsoft Teams is selected, you can deactivate it by clicking on the button „Deactivate in the bottom right-hand corner.

Synchronise Microsoft Outlook Calendar and Google Calendar - Simple instructions!
Synchronise Microsoft Outlook Calendar and Google Calendar - Simple instructions!
Synchronising Google Calendar with Outlook
The Microsoft Outlook synchronisation programme was unfortunately discontinued years ago. Nevertheless, there is still a simple way to connect your Outlook with Google Calendar. The aim of this synchronisation is that – no matter in which calendar you enter something – the events show up in both calendars Important to know: If you use a smartphone from Apple or Android, you can simply use several calendars in one calendar app. So you can save yourself the synchronisation here. When using Outlook in the online version, it is also possible to use several calendars next to each other.
Merging Microsoft and Google calendars – options at a glance
There are various ways to merge the two calendars. We have listed the best ones below:
- The simplest way to merge the two calendars is to export and import the current appointment status of a calendar. However, this is not synchronisation – this is described below.
- A continuous updating and extension of the appointments in both calendars at the same time can only take place through synchronisation. However,this requires a third party application.
- A very simple possibility is to subscribe to your own Google or Microsoft calendar. In this way, the appointments of the subscribed calendar are transferred and continuously updated.
In the following text, we describe these 3 options for merging Microsoft Outlook and Google Calendar.
-
Export Google Calendar and import it into Outlook App
To export the Google Calendar, you have to call up the online version of the service in the browser. To do this, you must be logged in to the corresponding Google account in the browser. You can access the calendar via this link: https://calendar.google.com/
- In the first step, click on the settings symbol (cogwheel) and then on „Settings“.
2. In the menu on the left side you will find the menu item „Import & Export“. Click on it and the following window appears:

In the list under „Export“youcan now select all the calendars that can be edited and that are to be exported. With a click on the „Export“ button, these are now combinedinto a zipped archive and downloaded. The .ics file contained in the archive is now used to import the Google calendar archive into Outlook. 3. Now the Google Calendar is imported intothe Outlook calendar with the help of the .ics file. To do this, follow the following path in the Outlook app: „File -> Open and Export -> Import/Export“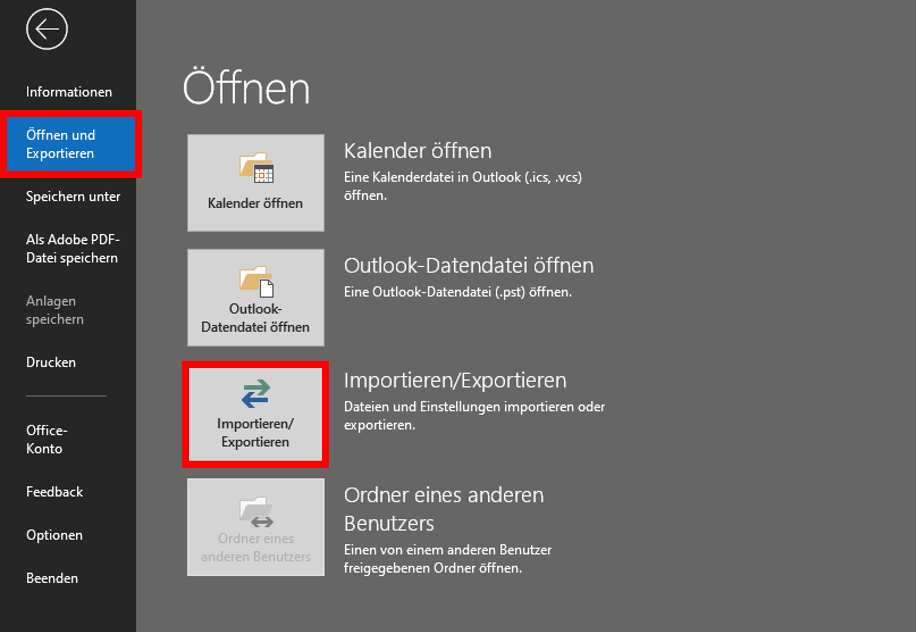 4. In the window that opens, click on „Import iCalender (ICS) or vCalender (VCS) file“ and then on „Next“
 5. Now select the previously saved.ics filein the „Browse„window and click on „Open“ Now the calendar can be found in Microsoft Outlook under „Other calendars“ or „My calendars“. However, since it is only importing the calendar at a fixed time, the newly added or updated appointments in Google Calendar will not be synchronised.
Synchronising Google and Microsoft calendars
Subscribe to Google Calendar and display it in Outlook
Outlook’s „Subscribe to Calendar“ function is a good way to avoid synchronisation by third-party software. The effect is the same as a real synchronisation. All data is continuously updated by subscribing to the calendar. Moreover, this subscription function is not limited to one’s own calendar. If you have the individual address of another person’s calendar, you can also see their calendar. However, this person can decide whether to allow all appointments to be viewed or whether to set certain appointments to „Private“ to prevent viewing. To subscribe to a Google Calendar with Outlook, simply follow the steps below:
- A prerequisite for subscribing to Google Calendar is the exact iCal address.
This can be found in the Google Calendar application in the browser in the left bar under „My Calendars“. Click on the 3 dots next to the name of the selected calendar and then on „Settings and Sharing“.


4. copy the iCal address into the window that opens. Confirm with „Ok“ to subscribe to the calendar. The calendars can now be organised on top of each other or next to each other.
Header image: © dennizn, stock.adobe.com
Instructions: Install Microsoft Office in 5 steps
Instructions: Install Microsoft Office in 5 steps

What versions of Microsoft 365 are available?
What versions of Microsoft 365 are available?
Installing Office 365 on a PC is simple, but a little confusing due to the subscription model. First of all, you should decide on an Office 365 package. Microsoft has put together two different packages for the different needs of users. There is also the Microsoft Home & Student 2019, which is available as a classic single purchase The Microsoft 365 packages come as Microsoft 365 Personal and as Microsoft 365 Family. Both packages include Word, Excel, PowerPoint, OneNote, Outlook, Access and Publisher. The Single subscription is only suitable for one user and provides 1 TB of cloud volume. The Family package can be used by up to six users and provides access to 6 TB of cloud storage.
Install Microsoft 365 in five steps – this is how it works:
First you have to log in with your Microsoft account, then you can get started. Microsoft 365 is only offered as a download. This means that you do not have a CD or DVD as a backup medium.
- On the website https://www.office.com/signin you can log in with the Microsoft 365 account you used to buy the product. If you have never registered here before, you have to create a new account. Next, you are redirected to a page where you enter the product key you received when you purchased the product.
- Once you have successfully logged in, you will find the „Install Office.“ box at the top of the page Click on this button to download and install Microsoft 365
- Before that, you have to select on the website whether you want to installthe programme for PC, Mac or a mobile device (such as smartphone or tablet).
- If the installation menu does not open automatically, you can start by double-clicking on the installation file.
5. Once you have confirmed that the installer is allowed to make changes to the device, the programme installs and you can use it.
How to uninstall Microsoft 365?
To uninstall Microsoft 365 again, you can download an appropriate uninstaller from Microsoft Download toolthat takes care of the uninstallation. Otherwise, you can remove the programme manually. At Windows 10 this is possible, for example, via the system settings.
Header image: © dennizn, stock.adobe.com

Microsoft Excel - Insert table into Word
Microsoft Excel - Paste table into Word
How to insert an Excel table into Word
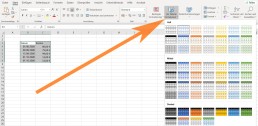
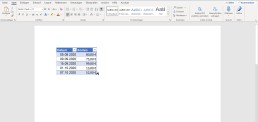
Then switch to the Word document, click on the place where the table should be inserted and select „insert“(or insert the content with CTRL+V). By default, the format of the Excel table is adopted in Word. If you have only entered values in cells in Excel, you will only get a list without table lines or coloured formatting. In Excel, you can simply select a formatting under „Format as table“ in the „Start“ tab in the „Format templates“ area.
To link an Excel table in Word
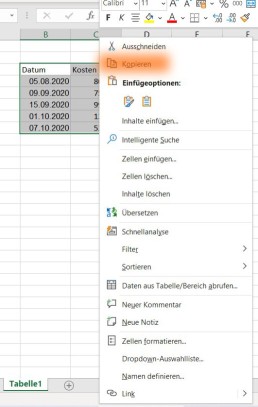
If you want to insert your values and data into Word sorted, you should create the table in Excel and then insert it into Word. This is because in Excel, with the help of an intelligent table, you can sort and systematise the values as you like. Once you have inserted the table in Word, you can only change the table in Word. Changes to the table in Excel are then no longer accepted. Therefore, it makes more sense to link the Excel table in Word. To link an Excel table with Word, first copy the contents into Excel as described above. However, you do not simply paste them into Word. Instead, move the cursor to where you want to insert the table. Then click on the small arrow under „Paste“ in the tab „Start“ in the section “ Clipboard.“
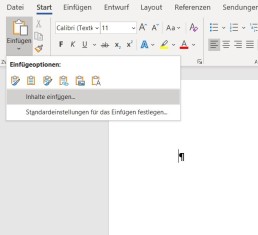
In the drop-down menu that opens, select the function „Insert content“ and a new window with this name opens. Here you select the option „Microsoft Excel workbook object“.
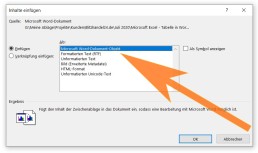
Click on „Ok“ toconfirm the selection and the Excel table is inserted into the document. If you now change something in the Excel table, the data is transferred to Word. To do this, you must save the changes in Excel and reopen Word so that the changes are displayed in the document.
If you often need tables for your work, you can save yourself a lot of work with this practical function.
Header image: © monticellllo, stock.adobe.com

Microsoft Office 2019 - programmes, installation and new features
Microsoft Office 2019 - programmes, installation and new features
The Microsoft Office package is arguably the most widely used program in everyday work. The individual applications included are often pre-installed on computers and knowledge of Word, Excel or Outlook is a prerequisite for many jobs. Even in a private environment or as a pupil or student, very few people can do without MS Office 2019. With the different versions from Microsoft Office Home and Student 2019 to Microsoft Office 2019 Professional Plus, the manufacturer Microsoft ensures that the right version is available for every area of application.
Content: Which programmes are included in the Microsoft Office 2019 packages?
There are a total of 5 different versions of the latest edition of the Office packages, four of which are also available to Mac users. Only the Office Professional Plus 2019 can be played with the Windows 10 operating system alone. The other four also work with Microsoft Office for Mac. List of all Microsoft Office 2019 versions:
- Microsoft Office Home and Student 2019
- Microsoft Office Home and Business 2019
- Microsoft Office Professional Plus 2019
- Microsoft Office 365 Home
- Microsoft Office 365 Personal
Two Office packages are part of the Office 365 range, the other three Microsoft Office 2019 packages differ in the number of Office applications. Those who want to buy Office 2019 are therefore spoilt for choice. The cheapest option is the Microsoft Office Home and Student 2019 version. This includes the applications Word, Excel and PowerPoint – the applications that are most importantin the private sector and for pupils and students. Missing: Outlook. For the email and appointment programme, the more expensive Office Home and Business 2019 version is necessary. This includes the four large parts of the Office package and, unlike the Home and Student version, this version is also licensed for commercial use. With these four applications, most users in the private and business sector are well covered. Anyone who also needs Microsoft Publisher and Microsoft Access will have to invest in the much more expensive Office Professional Plus 2019 version.
Microsoft Office 2019 packages in price comparison
Microsoft Office 2019 apps are good – but they’re also expensive. At Microsoft, the most expensive package, Office 2019 Professional, costs a whopping 579 euros. The cheapest package, Office Home and Student 2019, still costs a good 150 euros. Hardly any student will be able to afford this price. If you look around on the internet, you will come across various dealers who offer the different Microsoft Office 2019 packages for download at a lower price. On the open market, the Microsoft Office 2019 Home and Student version is available from €94.99. The lower prices are possible due to the resale of OEM licences, which is legal due to a ruling by the Federal Court of Justice (ruling BGH, 06.07.2000 – I ZR 244/97). OEM stands for Original Equipment Manufacturer – i.e. providers to whom Microsoft sells cheaper licences. The idea is that these licences are tied to the OEM hardware. However, the BGH ruling makes it possible to separate the OEM software from the OEM hardware – even if Microsoft does not like this.
Installing Microsoft Office 2019
For the installation, the respective Microsoft Office 2019 package must first be downloaded. Before the installation, all older installations of the software package must be uninstalled. Afterwards, you can either start the installation or download the Office Deployment Tool from the Microsoft website, which guides you through the installation and allows you to make changes during the installation. Once the software package has been installed, Office 2019 will ask for the key (licence key) as soon as the programme is opened for the first time. These keys are available either from Microsoft or various online retailers such as Blitzhandel24 here.
What’s new in Office 2019 – Word
The Microsoft Word programme is the most widely used word processing programme of all and is intuitive for the vast majority of computer users. Here, texts can be written and formatted, illustrated with graphics and tables can be easily created. But Microsoft has also introduced a few innovations in MS Office 2019 in this basic office work programme. The latest Office edition supports Word (as well as the other applications) file editing by several users simultaneously – in real time. Since Office 2019, Word can also translate entire documents using a Microsoft Online Document Service and supports a new research, dictation and voice output function. List of notable innovations in Microsoft Word (2019):
- Improved visual impact through Scalable Vector Graphics (SVG)
- Translation of text using Microsoft Translator
- Create mathematical formulas using LaTeX syntax
- Simplified writing using a digital pencil
- Inserting 3D images (rotatable by readers)
What’s new in Office 2019 – Excel
In Excel, the latest Microsoft Office version allows users to calculate with new formulas and insert new chart types. These include funnel charts, 2D maps and timelines. Microsoft has also improved the data import and export functions. List of notable innovations in Microsoft Excel (2019):
- Numerous new functions (including TEXT CHAIN, IF, FIRST VALUE and MAX IF)
- New map and funnel charts
- Improved visual impact with Scalable Vector Graphics (SVG)
- Simplified writing using a digital pencil (can also be used in freehand formulas)
- Improvements to pivot tables (including automatic recognition of relationships, layout personalisation)
New features of Outlook 2019
The email and appointment programme Outlook has also been equipped with new functions. In the inbox, mails can be given a relevance, which helps to keep track of full inboxes and many incoming emails. Those who have to process a particularly large number of mails will be pleased with the read aloud function for mails, which was introduced with MS Office 2019. The new option to schedule meetings in multiple time zones is also particularly practical for companies. List of notable innovations in Microsoft Outlook (2019):
- Prioritising emails by inbox with relevance
- Improved visual impact through Scalable Vector Graphics (SVG)
- Display of different time zones for better scheduling
- Read aloud function for e-mails
- „Mark as read“ when deleting emails
Office 2019 Volume Licences – The Best Option for Businesses Volume licences do not differ in terms of product features. They simply offer a simple and comparatively cheaper option for businesses with many employees. The difference is mainly that the volume licence variant is compatible with the terminal server. This means that all workstations connected to the server can use all programmes without any problems. Here at Blitzhandel24, you as a company also have the option of purchasing an Office 2016 or Office 2019 volume licence:
- Office 2019 Professional Plus Open NL
- Office 2019 Standard Open NL
- Office 2016 Professional Plus Open NL
- Office 2016 Standard Open NL
Header image: © piter2121, stock.adobe.com
Installing Windows 10 - Info on versions and installation
Installing Windows 10 - Version and installation info
Although Microsoft stopped supporting Windows 7 in January 2020, not all Windows users have installed the latest Windows 10 operating system. One month after the end of support, about a quarter of all computers worldwide were still using Windows 7 as their operating system. Using this Windows 7 instead of the new Windows 10 is a security risk for every user that should not be underestimated. It is easy to bring your computer up to date with a Windows 10 upgrade. Until a few months ago, Windows users could download Windows 10 free of charge. This offer from Windows has now expired – now you have to buy Windows 10 to get the licence key. There are several ways to install Windows 10. Windows 10 as a download can be installed like an update. Alternatively, you can download a Windows 10 iso file and install it from there. We present which variant is the right one for you in this blog article.
Windows 10 as an update
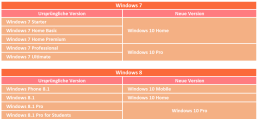
Installing Windows 10 as an update is particularly easy for Windows 7 and Windows 8.1 users. With these two operating systems, the Windows 10 upgrade can be installed almost like a normal update. If you choose this option, Windows will automatically offer to install the corresponding Windows 10 version. There are differences between the upgrades. Depending on the installed version, you will receive a corresponding Windows 10 version. This can be seen in the following table:
After entering the Windows 10 key, the installation programme takes over the installation almost completely independently and retains most of the system settings, passwords, bookmarks, preferences and already installed programmes should continue to work after the update. With this variant, the Windows 7 or 8.1 user must click on the small icon for the Windows 10 Update in their taskbar. The computer then starts the Windows 10 download automatically. The installation of Windows 10 is then almost completely automatic, the user only has to enter the Windows 10 key and some preferences during the installation. Although experience has shown that this form of installing Windows 10 runs completely smoothly, it is still advisable to back up your own files, such as documents, photos and music, on an external data carrier before the upgrade.
Re-installing the system with Windows 10
Those who do not want to keep their old system as much as possible can also rebuild the system. Before the installation, all important files should be backed up again! After the Windows 10 update, users can then select the item „Recovery“ and „PC“ via the system settings in the submenu “ Update and Security„. A complete reinstallation of the system can be carried out here. Alternatively, the system can also be deleted manually and the new operating system installed with a Windows 10 iso file. To do this, the file must be downloaded from Microsoft using the Media Creation Tool. This Windows 10 iso file must then be installed on an external data carrier, via which the installation runs after the system has been deleted. This method is also suitable for installing Windows 10 on a PC that was not used to download Windows 10.
Windows 10 as a second operating system on a computer
Those who want to keep their old operating system can buy Windows 10 and also install it as a second operating system. For example, the old Windows 7 installation can still be used offline, while Windows 10 serves for all online tasks. Users who still often have to fall back on older programmes that are not compatible with Windows 10 should opt for this variant. To do this, a second hard disk partition must first be created for Windows 10. With Windows 7, this can be done via the disk management. For Windows 10, the „NTFS“ format must be used for the new partition! For this installation, Windows 10 must be downloaded via the Media Creation Tool. Here, the option „Create installation medium for other PC“ is selected. The installation on a partition other than drive C: works best via a Windows 10 iso installed via an external data medium. During the setup of the installation, the option „Custom“ must be selected so that the installation path itself can be selected. Otherwise Windows 10 would automatically install itself on drive C:. The following Windows 10 versions are available from us:
- Buy Windows 10 Home
- Buy Windows 10 Pro
- Buy Windows 10 Enterprise
- Buy Windows 10 Enterprise LTSB 2015
- Buy Windows 10 Enterprise LTSB 2016
- Buy Windows 10 Enterprise LTSC 2019
- Buy Windows 10 Education
Header image: © rvlsoft, stock.adobe.com