Create screenshot (Windows 10)
Create screenshot (Windows 10)
This does not even require any other programmes to be downloaded and installed anywhere. Windows itself has programmes such as the „Snipping Tool“. Alternatively, screenshots can also still be provided with symbols and other coloured markings using tools such as „Paint“.
How to take a normal screenshot under Windows 10
If you want to take a screenshot of the current screen content, press the key combination “ Windows key + Print“. The image is now saved in the clipboard and can be pasted from there into a programme such as „Paint“. To do this, press the key combination „Ctrl + V“. If you use several monitors, a complete large image of all screens is created. Alternatively, to take a screenshot of the current active window, press the key combination „Alt+Print“. Again, the screenshot can be pasted into any programme with „Ctrl + V“
How to create a screenshot with the Snipping Tool
The Snipping Tool is an on-board Windows tool. If you want to take a screenshot quickly, it is best to call up the small programme in the Start menu by entering its name. After the tool has started, you can mark the area to be displayed in the screenshot with the mouse pointer. This is particularly advantageous if you only want to show individual small areas. After taking the screenshot, functions such as a highlighter, pen and eraser are available. Furthermore, the screenshot can also be saved or sent directly by e-mail with just one mouse click. Try it out for yourself.
Header image: © charnsitr, stock.adobe.com

You want to install Windows 10 on your PC? using Windows MediaCreationTool
You want to install Windows 10 on your PC? using Windows MediaCreationTool
Create bootable USB stick for Windows 10 from the Internet
If Windows 10 is available to you as an ISO file, the easiest way to create a bootable USB stick is based on Windows 7 or Windows 8 / 8.1 as well as Windows 10. Microsoft provides the ISO files of Windows 10 free of charge. You download the free MediaCreationTool from this page and run it. Then download the ISO files. To do this, select the option Create installation media for another PC.

If you have an ISO file of Windows 10, you can download an ISO for free from Microsoft using a tool.
02. Selecting the edition, language and architecture
On the next page of the tool , you then select the language you want, the edition you want to download and the architecture, i.e. 32-bit or 64-bit. The Enterprise Edition is not available via this route. If you want to create a bootable USB stick from it, you have to get the ISO file in another way.

In the MediaCreationTool you can download an ISO file with your desired edition if you wish.
03. Perform ISO download and select USB stick
In the next step, you can either copy the installation files immediately to a suitable USB stick or download the installation files as an ISO. This is the best way in most cases, as you can quickly and easily create a USB stick from the ISO at any time.

You can quickly and easily create an ISO file from the MediaCreationTool, or a bootable USB stick.
04. Finalise configuration
If you want to create a USB stick from the MediaCreationTool, it must now be connected to the computer. Then you can select which stick you want to use. The stick must have at least 4 GBytes of memory, preferably more. The wizard then downloads the Windows 10 installation files and copies them to the USB stick or to the ISO file.

In the Windows 10 Download Wizard, you can select a USB stick.
05. Creating a bootable USB stick from an existing ISO file
If you already have an ISO file of Windows 10, you can also create a bootable USB stick from Windows 7/8/8.1/10 using on-board tools. To do this, make the ISO file available as a drive via the context menu and start a command prompt with administrator rights. The USB stick must also be connected to the computer. Start a command prompt for this via the context menu in administrator mode. For example, enter cmd on the start page/start menu, click on the command prompt symbol that appears and click on Run as admin.

In Windows 8/8.1 and Windows 10, start the command prompt with administrative rights to create a bootable USB stick.
Header image: © rvlsoft, stock.adobe.com
Windows 10 Change language
Change Windows 10 language
With Windows 10, it is possible to use not only the language set by default. In addition, other language packages can also be installed, managed and assigned to different users. For example, the respective languages of their user profile are assigned to different speakers and can be changed. In this guide, we will show you how to successfully adjust the language settings.
Managing languages in Windows 10
You have the option to change the user language and keyboard language of Windows 10 at any time. This is how they manage the different languages:
- Add a new language by opening the system settings. To do this, press the key combination „Windows key + I„. Then click on „Change language and keyboard options„.
- In the administration you will see a list of all languages available on the computer under „Preferredlanguages“. When apps and websites are opened, Windows 10 tries to display them in the selected language. If this is not available, the language below it is used. Using the arrow symbols, it is possible to change the order.
- There are symbols to the right of the language. These show you for which areas of application this language is suitable (for example, speech recognition, keyboard language, etc.).
Installing additional languages in Windows 10
- You can install a new language at any time. To do so, click on the „plus„symbolabove the list.
- Now enter the name of the desired language. All languages available for installation are displayed in the results list. Here, too, the symbols to the right of the name indicate what the language can be used for. Click on the language and then on „Next„.
- Now a selection menu opens in which several features can be selected. If you select „Set as my Windows display language„, the entire operating system is displayed in this language.
Change display language in Windows 10
If the installation of the new language was carried out successfully, it can be directly adjusted under „Region and language“ in the settings. Windows is now displayed in the national language.
Change language for home screen and new accounts
- Open the normal and classic control panel to change the display language of Windows 10.
- Enter the term „Region“ in the search field and then open the search hit.
- Switch to the „Administrative Tools“ tab and click on „Copy Settings“.
- At the bottom, you now have the option to change the activated display language for the start screen, the lock screen and newly created user accounts by means of checkboxes. Click on „OK“ to apply the new settings.
Change keyboard language in Windows 10
- If several languages are installed, you can change the keyboard language in Windows 10 separately.
- To do this, press the key combination „Windows key + space bar„.
- A small info box opens showing the available languages. Now click the „space bar“ again to switch back and forth between the languages.
Change speech output in Windows 10
- The voice output can also be changed in Windows 10. To do this, open the „Speech output settings“ in the system settings. Enter the term in the search field.
- The individual languages are displayed in the list under „Select voice„. These are installed together with the respective language package.
- After selection, you can also change settings such as „Speech speed“, „Voice pitch“ and the „Voice volume„.
Changing the language of Cortana voice input in Windows 10
- To change the language of the Cortana speech input, open the system settingsas in the previous step and search for „Settings for speech recognition“.
- In the upper selection, you can then change the desired speech recognition language for Cortana. Further settings such as speed are also possible here.
Header image: © kotoyamagami, stock.adobe.com
Windows 7, 8 and 10 - What are the differences?
Windows 7, 8 and 10 - What are the differences?
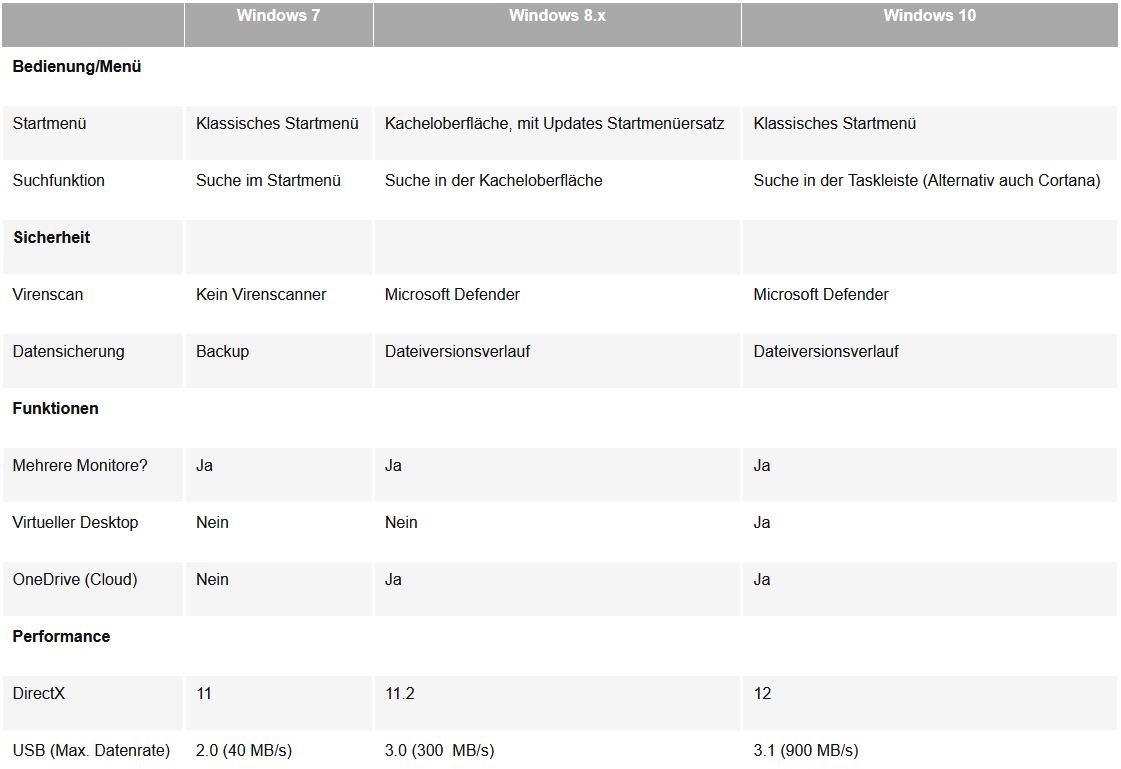
Which version of Windows is right for me? You may have asked yourself this question before and even thought about switching to another higher version. What is there to consider? What are the differences? In this Windows 7, 8 and 10 comparison, we take a close look at all 3 operating systems and explain their features. After that, you should be sure which Windows is right for you. All 3 versions are actively developed by Windows and regularly provided with updates. This primarily ensures more security against attackers and other malicious programmes, but also stability. If you still have an older operating system such as Windows XP, we strongly recommend that you switch to 7, 8 or 10. All versions below this are no longer supported and are therefore no longer provided with security updates. If you compare Windows 7, 8 and 10, the first thing you notice is the graphical user interface, which has changed a lot. From Windows 8 onwards, Microsoft caused a lot of confusion with the tiles instead of the classic desktop and quickly took a different course. With updates and extensions, the classic desktop screen with Start menu was brought back, because that is what users are and were used to. In the background, some technical developments and changes have taken place, which we would like to discuss in more detail in the following sections.
Operation and start menu
Windows 7 has the classic Start menu, as users have always been used to. With version 8 came the big change with the tile interface, which caused a downright dislike among many users. As already mentioned, several updates were rolled out, with which Windows 8.1 got back its classic desktop overview with Start menu. Nevertheless, Microsoft has not abandoned its concept with the tiles, as can be seen very clearly in Windows 10. Still, the good old Start button at the bottom left is back and makes for a much friendlier experience.
Search under Windows
In Windows 7, the search field can still be found in the Start menu, where programmes and files of all kinds can be found. With Windows 8, all you have to do is open the tile interface, now you can simply enter a term without having to click on a search field. Search results from the Bing search engine are also displayed. In Windows 10, on the other hand, the search field can be found in the taskbar and can alternatively be displayed as a small icon. Microsoft has also released the search assistant Cortana with Windows 10, which responds directly to voice commands and answers them.
The functionality of Windows
Those who want to use multiple monitors do not have to do without this in all 3 versions. With Windows 10, even virtual desktops can be managed for the first time, which is not the case with 7 and 8. You want to access files from your laptop, tablet or smartphone at the same time and share them with others? Then OneDrive is the right thing to do! However, this handy tool is only available for Windows 8 and 10, not for 7. Windows 7 still works with Internet Explorer 8, while Windows 8 and 10 work with Internet Explorer 11 or 11 Edge.
Safety First! This is how safe the Windows versions are
While you have to install an extra virus scanner with Windows 7, 8 and 10 come with the in-house virus scanner Defender. This is a security software from Microsoft that scans your files for viruses, malware and spyware. With Windows 8 and 10, the new Secure Boot system was released, which provides more security when starting the computer. Windows 7 does not yet have this tool on board. To make a backup of the files, Windows 7 still has the classic backup. Windows 8 and 10 have a file version history, which automatically backs up data in the background.
Performance
While DirectX 11 is still installed on Windows 7, Windows 8 and 10 come with DirectX 11.2 and 12. There are also some differences in the supported USB versions. Windows 7 still works with 2.0, Windows 8 and 10 support USB 3.0 and 3.1. This allows higher data rates, so files are copied back and forth to your USB medium or device faster.
Comparison table
In the following we show you once again the most important facts and differences between Windows 7, 8 and 10 in a clear table.
Header image: © monticellllo, stock.adobe.com

Remove / disable start-up programs in Windows 10
Remove / disable startup programs in Windows 10
When the computer is switched on, some programmes start automatically when the computer boots up. The so-called start-up programmes (also known as Autostart) can thus be used more quickly. However, not all programmes are always necessary. If a lot of programmes start at the same time, Windows takes a little longer. We show you how to remove or deactivate certain start-up programmes in Windows 10 that are not needed. Often, programmes are simply added to the startup list after installation, even though you don’t want them to be or don’t know about them. Find all programmes that load unnecessarily and thus take up system performance unnecessarily.
How to remove and disable unnecessary start-up programmes in Windows 10
- Open the task manager. For example, you can use the key combination„Ctrl+Shift+Esc„
- In the task manager you will see an overview of all currently open programmes
- Click on„More details“ at the bottom left
- In the overview, click on the„Autostart“ tab. All programmes that can be opened automatically at system start-up are displayed here. Behind each programme name you can see the respective„Status„. This is either activated or deactivated.
- Click on„Status“ at the top to group all elements. In this way, you can see in groups which programmes are intended for automatic system start-up.
- To exclude an activated programme from the autostart, click on it with the right mouse button. Then click on„Deactivate„. It will no longer be loaded at the next system start.
Header image: © dennizn, stock.adobe.com

Only run Windows 10 updates at night
Only run Windows 10 updates at night
Updates are very important to keep the operating system up to date in terms of performance and security on a regular basis. Many users have updates downloaded and installed automatically. For those who often sit at the computer and work with it, for example, updates can quickly become a burden because they are distracting. We show you how to configure Windows 10 so that updates only run at night.
To perform Windows 10 updates only at night
- Click on „Start“ and then on the „Gear icon (Settings)„.
- Now select „Update and Security„.
- Under „Windows Update“ click on „Change time of use„.
- Now set the time at which you frequently sit at the computer. Windows remembers this setting and only carries out updates outside the time you have set. This means that the update time and the time of use do not overlap. Example: You do not sit at your computer between 00:00 and 09:00. Accordingly, set a time between 09:00 and 00:00 (midnight).
- Now click on „Save“ to save the new settings.
Header image: © Claudio Divizia, stock.adobe.com

Start Windows in Safe Mode
Starting Windows in Safe Mode
How to start Windows 10 in safe mode
- The easiest way to start safe mode is with a key combination.
- To do this, press the keys „CTRL + F8“ simultaneously when starting Windows 10.
- Since the operating system sometimes starts very quickly, you can also press the key combination several times to be on the safe side.
1. Alternative: Open with msconfig.exe
You can boot Windows 10 normally? Very good, because then you can also use msconfig.exe as an alternative.
-
- Enter „msconfig.exe“ in the search field of the start menu and click on „System configuration“.
- Then click on the „Start“ tab.
- Now activate the check box „Safe start“.
- After you have confirmed with a click on „OK“, Windows will start in safe mode when you restart. To start up normally again later, simply deactivate the „Safe start“ function again.
2. Alternative: Start with automatic repair
If the Windows 10 startup process is interrupted several (2-3) times, the „Automatic repair“ window appears at startup.
- In the „Automatic Repair“ window, select the entry „Advanced Options“.
- The „Select Option“ window opens. Next, select „Troubleshooting“.
- Now select „Advanced Options“ and then „Startup Settings „.
- After selecting „Restart“, a system menu is displayed in which start-up settings can be made. Now select the entry „Activate Safe Mode“.
3. Alternative: Start Safe Mode directly from Windows 10
- Open the Settings app
- Select „Update and Security“.
- Then click on „Recovery“.
- Now click on „Advanced startup“ and „Restart now“.
Header image: © Tobias Arhelger, stock.adobe.com

Disable Windows 10 Tiles
Disable Windows 10 Tiles
Not everyone likes the new tile look. It has been in use since Windows 8 and is not popular with every user. Do you not like the tiles either? We show you how to deactivate them. This will make your Start menu look smaller and thus more classic like Windows XP and 7. The problem is that the Start menu looks cluttered with too many tiles and is therefore very confusing. With just a few clicks you can tidy up the Start menu and make it look clearer.
- Right-click on a tile that you no longer want to display.
- With a click on the left mouse button on „Detach from Start„, the tile is removed from the menu.
- Depending on the number of tiles, the start menu is automatically displayed slightly smaller when removing individual or several elements. However, this requires the installed Anniversary Update. If this is not the case, you can also make the menu smaller at the edge with a mouse click.
Header image: © EyeSee Microstock, stock.adobe.com