
Windows 10 Update: What can the new version do?
Windows 10 Update: What can the new version do?
And again there’s a new Windows 10 Update … You could almost get the impression that Microsoft sends a release to users every month. You can get confused and ask yourself: If I buy a new Windows 10, for example for my home office, what will the latest release do for me? Don’t worry – we’ll shed some light on this!
New Windows version, old Windows version - which one is installed?
Windows 11 is not on the horizon. Instead, regular updates will be made available to anyone who wants to buy Windows 10. The current release is called the October 2020 Update – or officially: 20H2 – and at first glance is „just“ a maintenance patch. The already announced „Windows 10 21H1“ will probably also be an update that mainly focuses on the maintenance service, while substantial innovations can probably be expected again in autumn with „Windows 10 21H2“. In order to take advantage of the update, one does not have to immediately install a new Buy Windows 10. Those who use the current 2004 version or the 1909 update of Windows 10, for example, for their Office software home office without any problems is on the safe side. Update problems such as a processor that is too slow, insufficient memory or too little RAM do not arise. The concern that the driver signatures may no longer work is also unfounded. To find out which Windows 10 version is installed, the following steps will help:
- About the Start button to open the Start menu.
- At "Settings" select the last item "Info" click on it.
- Now all the information about the Windows 10 version appears.
Download Windows 10 Update - nothing easier than that!
Of course, it’s much more convenient to download the latest update than to keep buying a new version of Windows 10. And even non-professionals can do this in no time at all. However, the prerequisite is that the PC is prepared for the new update The most important element for this is that the computer is already updated to the May 2020 update. otherwise, 20H2 will be completely reinstalled as an operating system – and this can lead to annoying update problems, in the worst case even to a total system failure. Once the computer is ready for the release, everything usually runs smoothly:
- Click on "Settings" in the start menu
- "Select "Update and security
- "Click on "Check for updates
- Select the optional update "Functional update for Windows 10, version 20H2"
- Click on "Download and install"
- Restart the PC to activate.
Attention Older Windows versions perform a complete upgrade of the system for installation. The whole process will therefore take much longer!
New update - new features!
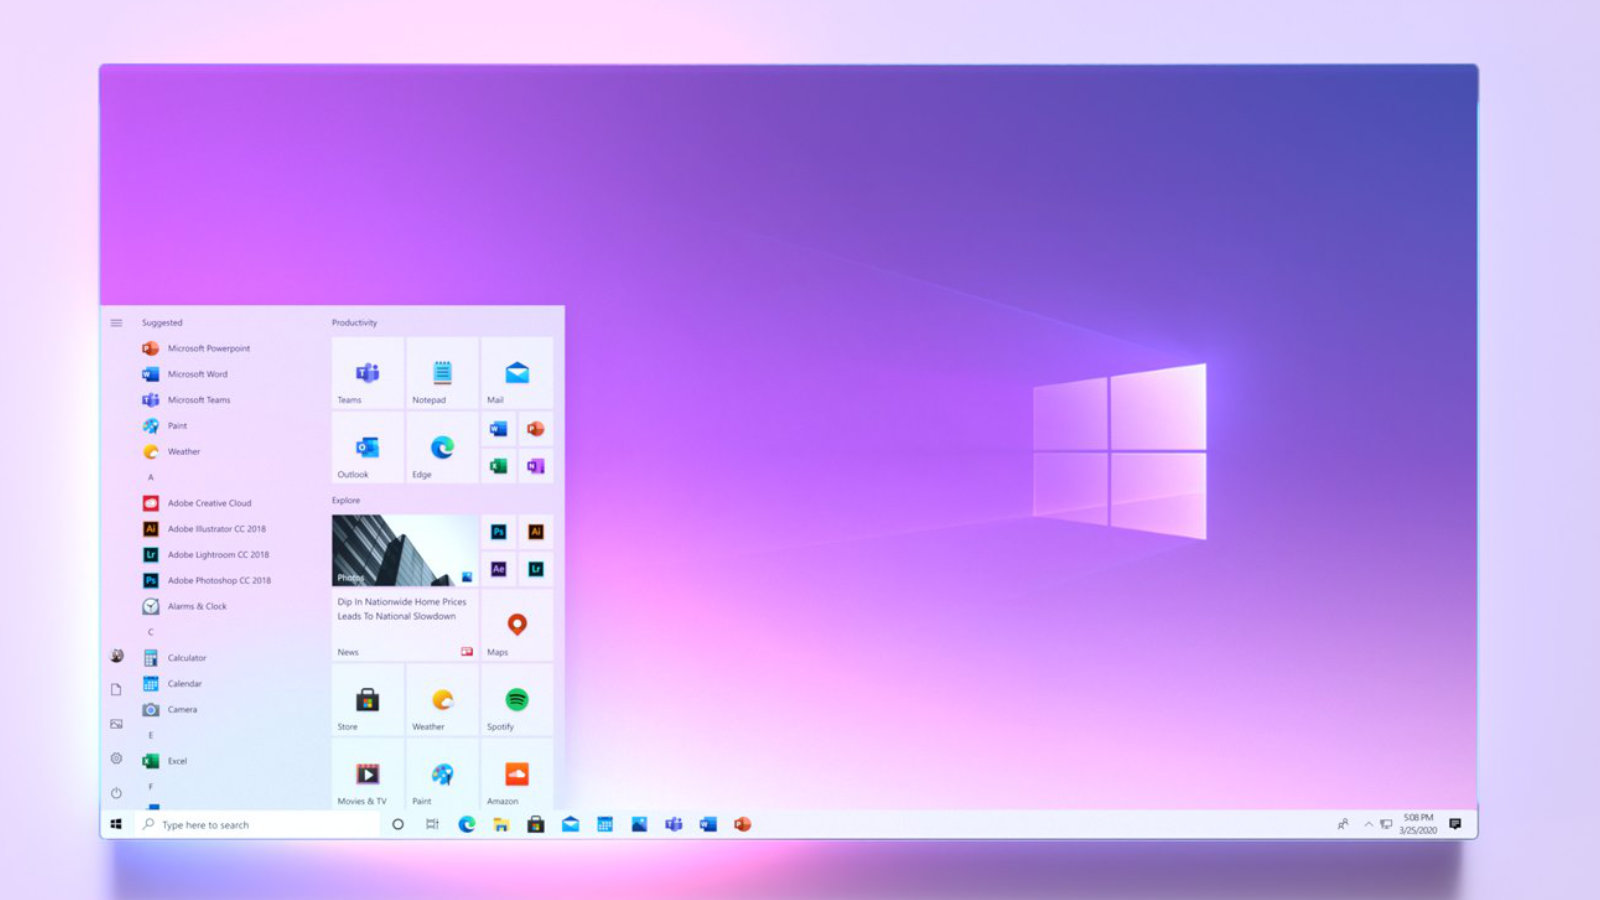
The 20H2 update offers new ways to customise your PC, increases security and holds some creative features Some interesting features are: Colour mode: under „Colours“ in the settings you can choose between light and dark mode. This makes it easier to work on the screen and is easier on the eyes. Tabs: Those who always open many tabs for websites will love this feature! Simply pin the most frequently used page to the taskbar, and by swiping the mouse you can then see and click on open tabs in the preview at a glance. Read aloud function: Use the screen magnifier to mark a section of text and select „Read aloud from here“. The text is then read aloud. Emoji keys: The key combination Windows + dot (.) is not only interesting for Facebook and Co. It opens the emoji area directly and makes posts, subject lines or email greetings look much friendlier. Cursor: Practical when reading, writing or correcting longer texts. Go to „Ease of use“ in the settings and click on „Text cursor“. The stroke is then coloured, making it easier to find.
Header image: © Tierney, stock.adobe.com
Windows 10 Home or Pro - which is right for me?
Windows 10 Home or Pro - which is right for me?
The competition never sleeps. Nevertheless, for the vast majority of users (especially in Germany), Microsoft’s Windows operating system is still the ultimate when it comes to applications on the PC. When purchasing a new system, however, many are faced with the question Windows 10 Home or Windows 10 Pro – what are the respective advantages and disadvantages? The following article describes which Windows 10 version is the right one, what 32-bit or 64-bit is all about and everything else there is to know.
The Windows 10 versions in comparison
To effectively find out which of the numerous Windows 10 versions suits you, it is first worth taking a look at the designations of the different editions.
- Education is an offer for educational institutions. This Windows 10 version contains education-specific default settings.
- Mobile is optimised for mobile devices such as tablets and smartphones.
- Home is the standard, which is generally ideal for private users.
- Pro is suitable for companies or freelancers who need more extensive professional tools for their work.
The competition never sleeps. Nevertheless, for the vast majority of users (especially in Germany), Microsoft’s Windows operating system is still the ultimate when it comes to applications on the PC. When purchasing a new system, however, many are faced with the question Windows 10 Home or Windows 10 pro – what are the respective advantages and disadvantages? The following article describes which Windows 10 version is the right one, what 32-bit or 64-bit is all about and everything else there is to know.
The Windows 10 versions in comparison
To effectively find out which of the numerous Windows 10 versions suits you, it is first worth taking a look at the designations of the different editions.
- Education is an offer for educational institutions. This Windows 10 version contains education-specific default settings.
- Mobile is optimised for mobile devices such as tablets and smartphones.
- Home is the standard, which is generally ideal for private users.
- Pro is suitable for companies or freelancers who need more extensive professional tools for their work.

Do I need 32 bit or 64 bit?
Whether it is Microsoft Office 32 or 64 bit is needed depends entirely on how fit your PC is – for the Windows 10 versions, this plays a subordinate role for the time being. However, older models – including Windows tablets that are getting on in years – often have too little power or no 64-bit processor built in at all. Here, of course, a Windows 10 home 32-bit version Pro is the order of the day. The 64-bit processor is especially interesting for a working memory with 4 GB or more. Because only with this can the memory for Windows 10 home 64 bit be used effectively. Newer computers usually have the powerful processor.
How to find out if you can use Windows Home 32 bit or Windows Home 64 bit
In Windows 7 and Windows Vista, „Performance Information and Tools“ must be entered in the search via the „Control Panel“ button In the entry, one then clicks either on „View and print details“ or on „View and print detailed performance and system information“, depending on the version. The item „System Type > System“ then shows which operating system the PC is currently running and whether Windows Home 32 Bit or Windows Home 64 Bit and also Microsoft Office 32 or 64 Bit can be used.
Header image: © piter2121, stock.adobe.com
Windows 8, Windows 7 or Windows 10 Pro - what do I need?
Windows 8, Windows 7 or Windows 10 Pro - what do I need?
A lot has happened in the past few years since Microsoft revolutionised the computer market in 1985 with the Windows 1.0 operating system. Numerous versions followed, some of which were very successful, while others were rather displeasing to users. After Windows NT, Windows 98, Windows XP and Windows 8.1, the Windows 10 Home or Windows 10 Pro operating system is now the measure of all things . However, it is available in different versions. We explain here which one you really need.
Should you upgrade to Windows 10 Pro now?
If not now, when? could be the counter question. For really old Windows operating systems, there have been no new programmes for what feels like an eternity, and certainly no support or updates. For Windows 7 (since 2009), which is still installed on around 23% of all computers, support will end in January 2020 Support for Windows 7 and Windows 8 or Windows 8.1 (since 2012/2013) is also coming to an end. Here, even the already extended support will expire in January 2023 A Windows 8 Update can make sense, however, if the operating system has sufficient capacity (64 bit, at least 4 gigabytes of RAM). The same applies to a Windows 7 update. Even if there was a recent – unannounced – update, it makes sense to switch to one new Windows 7 Update the switch to one of the current operating systems such as Windows 10 Home or Windows 10 Pro makes sense in any case. And do it now!

Which operating system is installed on the PC?
To find out which version of the Windows operating system is currently installed on your computer, 3 simple steps are allyou need:
- After clicking on the Windows symbol (Start), enter „Control Panel“ and press Enter
- Navigate to „System„, here you will find out the speed of the operating system (32 or 64 bit)
- Under „Windows Edition“ you will find the exact version of the installed Windows operating system.
Who needs Windows 10 Pro and for whom is Home sufficient?
Not every PC user needs to install the nearly 230 euro Windows 10 Pro or the other versions of this operating system on his computer. It depends on how the computer is used. Windows 10 Home is best suited for purely private applications.With the new voice assistant Cortana, Windows Hello for logging in via camera and an individual adaptation of the start menu to one’s own needs, it contains all the essential functions. If you also install the free Classic Shell tool, you can even optically return to the Windows 7 user interface. Windows Defender protects against hacker attacks and malware. Windows 10 Pro uses all the functions of Windows 10 Home. On the other hand, features are built in that also satisfy small businesses and advanced users. With Remote Desktop, for example, it is possible to access one’s own computer from another PC The BitLocker programmeencrypts the contents of the hard disk and thus protects it from unauthorised access. The group policy editor is interesting for several users. It enables settings that precisely adapt Windows 10 Pro to personal needs. Windows 10 Education is a special solution for pupils, students and teachers. Only this user group and non-profit associations are to be entitled to purchase it Cortana is not installed in this version, but Windows to go is, for example, with which the operating system and personal data can be started on another computer via a USB stick. The security of the system is increased with the AppLocker function, which also allows individual applications to be blocked Windows 10 Enterprise was developed especially for companies with several employees. In addition to the usual functions plus Windows to go and AppLocker, it can be used to manage multiple computers and new updates can be checked before installation. The operating system is sold with multiple licences directly to companies.
Header image: © dennizn, stock.adobe.com
Windows 8, Windows 7 or Windows 10 Pro - what do I need?
Windows 8, Windows 7 or Windows 10 Pro - what do I need?
A lot has happened in the past few years since Microsoft revolutionised the computer market in 1985 with the Windows 1.0 operating system. Numerous versions followed, some of which were very successful, while others were rather displeasing to users. After Windows NT, Windows 98, Windows XP and Windows 8.1, the Windows 10 Home or Windows 10 Pro operating system is now the measure of all things . However, it is available in different versions. We explain here which one you really need.
Should you upgrade to Windows 10 Pro now?
If not now, when? could be the counter question. For really old Windows operating systems, there have been no new programmes for what feels like an eternity, and certainly no support or updates. For Windows 7 (since 2009), which is still installed on around 23% of all computers, support will end in January 2020 Support for Windows 7 and Windows 8 or Windows 8.1 (since 2012/2013) is also coming to an end. Here, even the already extended support will expire in January 2023 A Windows 8 Update can make sense, however, if the operating system has sufficient capacity (64 bit, at least 4 gigabytes of RAM). The same applies to a Windows 7 update. Even if there was a recent – unannounced – update, it makes sense to switch to one new Windows 7 Update the switch to one of the current operating systems such as Windows 10 Home or Windows 10 Pro makes sense in any case. And do it now!
Which operating system is installed on the PC?
To find out which version of the Windows operating system is currently installed on your computer, 3 simple steps are allyou need:
- After clicking on the Windows symbol (Start), enter „Control Panel“ and press Enter
- Navigate to „System„, here you will find out the speed of the operating system (32 or 64 bit)
- Under „Windows Edition“ you will find the exact version of the installed Windows operating system.
Who needs Windows 10 Pro and for whom is Home sufficient?
Not every PC user needs to install the nearly 230 euro Windows 10 Pro or the other versions of this operating system on his computer. It depends on how the computer is used. Windows 10 Home is best suited for purely private applications.With the new voice assistant Cortana, Windows Hello for logging in via camera and an individual adaptation of the start menu to one’s own needs, it contains all the essential functions. If you also install the free Classic Shell tool, you can even optically return to the Windows 7 user interface. Windows Defender protects against hacker attacks and malware. Windows 10 Pro uses all the functions of Windows 10 Home. On the other hand, features are built in that also satisfy small businesses and advanced users. With Remote Desktop, for example, it is possible to access one’s own computer from another PC The BitLocker programmeencrypts the contents of the hard disk and thus protects it from unauthorised access. The group policy editor is interesting for several users. It enables settings that precisely adapt Windows 10 Pro to personal needs. Windows 10 Education is a special solution for pupils, students and teachers. Only this user group and non-profit associations are to be entitled to purchase it Cortana is not installed in this version, but Windows to go is, for example, with which the operating system and personal data can be started on another computer via a USB stick. The security of the system is increased with the AppLocker function, which also allows individual applications to be blocked Windows 10 Enterprise was developed especially for companies with several employees. In addition to the usual functions plus Windows to go and AppLocker, it can be used to manage multiple computers and new updates can be checked before installation. The operating system is sold with multiple licences directly to companies.
Header image: © dennizn, stock.adobe.com
Windows 10 Lizenz kaufen – wo, wie und welche ist die richtige?
Windows 10 Lizenz kaufen – wo, wie und welche ist die richtige?
Mit Windows 10 steht Usern eine einheitliche Software-Plattform zur Verfügung, mit der unterschiedliche Gerätetypen bedient werden können. PC, Tablet, Laptop, Smartphone, Xbox, Internet – alles ist möglich! Das Komfort-Plus: Das Betriebssystem passt sich mit der Continuum-Funktion an das Endgerät an und erkennt automatisch, ob mit Maus, Tastatur oder per Touch gearbeitet wird. Wir erklären, worauf es beim Windows 10 Lizenz kaufen ankommt.
Zwischen diesen Versionen kannst du beim Windows 10 Lizenz kaufen wählen
Microsoft gibt für sein Betriebssystem keine neuen Versionsnummern mehr heraus – ab jetzt bleibt grundsätzlich alles bei Windows 10. Da es aber seit Erscheinen des Systems im Jahr 2015 einige Updates existieren, sind mehrere Versionen erhältlich. Die wichtigsten auf dem Markt sind derzeit folgende:
- Windows 10 S: Geeignet für Privatanwender und Bildungseinrichtungen. Das System ist für PC und Laptop optimiert, allerdings lassen sich ausschließlich Windows-Store-Apps nutzen. Als Browser ist lediglich Edge verfügbar.
- Windows 10 Home: Gedacht für Privatanwender auf dem PC oder Notebook. Der Browser Edge, der Sprachassistent Cortana sowie das App-Framework Continuum sind Standards.
- Windows 10 Pro: Für Privatanwender und kleine Unternehmen auf dem PC und dem Notebook geeignet.
- Windows 10 Enterprise: Ist für Unternehmen geeignet, läuft auf PC und Laptop.
- Windows 10 Education: Hierbei handelt es um einen Upgrade von Home und Pro, der für PC und Notebook für Schüler und Universitäten gedacht ist.
- Windows 10 Mobile: Im Privatbereich für Smartphone und Tablet gedacht.
- Windows 10 Mobile Enterprise: Die Mobile-Version für Unternehmen, die auf neueste Sicherheits-Upgrades angewiesen sind.
Windows 10 LTSC und LTSB wo liegen die Unterschiede?
Im Grunde genommen ist LTSC (Long Term Servicing Channel) eine Update-Version von LTSB (Long Term Servicing Branch). Das ältere Windows 10 LTSB hat mehrere Varianten mit unterschiedlichen Services:
Current Branch (CB):
Neue Features und Updates werden sowohl für für Privat- als auch für Geschäftskunden automatisch heruntergeladen.
Current Branch for Business (CBB):
Gilt ausschließlich für Geschäftskunden. Der Vorteil: Updates lassen sich zum Testen erst mal bis zu 8 Monate aufschieben.
Long Term Servicing Branch (LTSB):
Diese Variante war und ist für Geschäftskunden gedacht, die möglichst wenig an ihren bestehenden Systemen ändern wollen. Nur alle 2 bis 3 Jahre erscheinen hierbei neue LTSB-Versionen, die von den Kunden sogar abgelehnt werden können. Das aktuelle Windows 10 LTSC kommt ohne Current Branch und Current Branch for Business aus. An deren Stelle tritt der Semi-Annual Channel (SAC).
LTSC:
Diese Version ist für Großkunden gedacht, die alle zwei bis drei Jahr ein Update erhalten. Diese können wie vorher auch abgelehnt werden. Allerdings wird LTSC ausschließlich bei Enterprise Varianten angeboten, alle anderen Windows 10 Versionen sind davon ausgeschlossen.
SAC:
Ist für Privat- und Geschäftskunden geeignet und erhält zweimal pro Jahr ein Update der Features.
32 Bit oder 64 Bit – auch darauf solltest du achten, wenn du eine Windows 10 Lizenz kaufen willst
Die Größenordnung 64 Bit und 32 bezieht sich auf die Informationsverarbeitung des Prozessors, der im Computer verbaut ist. Ein größerer und schnellerer Prozessor ist das vor allem bei großen Programmen oder wenn mehrere Programme gleichzeitig zur Verfügung stehen sollen wichtig.
Hat das Betriebssystem des Rechners die 32 Bit-Variante eingebaut, lässt sich ein Arbeitsspeicher von maximal 4 Gigabyte (GB) nutzen.
Wie viel Bit hat mein Prozessor?
Wer eine Windows 10 Lizenz kaufen will, sollte natürlich wissen, wie viel Bit der Prozessor verarbeiten kann. Um das herauszufinden, geht man ganz einfach in 4 Schritten vor:
- Zuerst die „Windows-Taste“ drücken, dann im Suchfeld „Systemsteuerung“ eingeben.
- Dann im entsprechenden Fenster auf „System und Sicherheit“ klicken.
- Die Option „System“ wählen.
- Unter dem Eintrag „Systemtyp“ findet man heraus, ob 32 oder 64 Bit installiert sind.
Kann ich trotzdem eine 64 Bit Windows 10 Lizenz kaufen?
Dazu muss der Computer 64 Bit fähig sein.
- Steht im Eintrag „Systemtyp“ der Vermerk „x64-basierter Prozessor“, sind die Grundvoraussetzungen schon mal gegeben.
- Jetzt kommt es allerdings noch auf den Arbeitsspeicher an. Unter dem Menüpunkt „Installierter Arbeitsspeicher (RAM)“ sollte ein Wert von mindestens 4 GB eingetragen sein.
Header-Bild: © PhotoGranary, stock.adobe.com
Buying a Windows 10 licence - where, how and which is the right one?
Buying a Windows 10 licence - where, how and which one is the right one?
Windows 10 provides users with a uniform software platform that can be used on different types of devices. PC, tablet, laptop, smartphone, Xbox, Internet – everything is possible! The comfort plus: The operating system adapts to the end device with the Continuum function and automatically recognises whether the user is working with a mouse, keyboard or touch. We explain what is important when buying a Windows 10 licence.
You can choose between these versions when buying a Windows 10 licence
Microsoft no longer issues new version numbers for its operating system – as of now, everything basically stays with Windows 10. However, since there have been several updates since the system was released in 2015, there are several versions available. The most important ones on the market are currently the following
- Windows 10 S: Suitable for private users and educational institutions. The system is optimised for PCs and laptops, but only Windows Store apps can be used. Only Edge is available as a browser
- Windows 10 Homedesigned for private users on a PC or notebook. The Edge browser, the Cortana voice assistant and the Continuum app framework are standard.
- Windows 10 Pro: Suitable for private users and small businesses on the PC and notebook.
- Windows 10 Enterprise: Suitable for businesses, runs on PC and laptop.
- Windows 10 Education: This is an upgrade from Home and Pro, intended for PC and notebook for students and universities
- Windows 10 Mobile : Intended for smartphone and tablet in the private sector.
- Windows 10 Mobile Enterprise : The mobile version for businesses that need the latest security upgrades.
Windows 10 LTSC and LTSB what are the differences?
Basically, LTSC (Long Term Servicing Channel) is an update version of LTSB (Long Term Servicing Branch). The older Windows 10 LTSB has several variants with different services:
Current Branch (CB):
New features and updates are automatically downloaded for both residential and business customers.
Current Branch for Business (CBB):
Applies exclusively to business customers. The advantage: Updates can be postponed for up to 8 months for testing purposes.
Long Term Servicing Branch (LTSB):
This variant was and is intended for business customers who want to change as little as possible in their existing systems. New LTSB versions are only released every 2 to 3 years, and customers can even reject them. The current Windows 10 LTSC does without Current Branch and Current Branch for Business. The Semi-Annual Channel (SAC) takes their place
LTSC:
This version is intended for large customers who receive an update every two to three years. As before, these can also be rejected. However, LTSC is only offered for Enterprise versions, all other Windows 10 versions are excluded
SAC:
Is suitable for private and business customers and receives an update of the features twice a year.
32 bit or 64 bit - you should also pay attention to this if you want to buy a Windows 10 licence
The order of magnitude 64 bits and 32 refers to the information processing capabilities of the processor built into the computer. A larger and faster processor is particularly important for large programmes or if several programmes are to be available at the same time. If the computer’s operating system has the 32-bit variant built in, a maximum of 4 gigabytes (GB) of RAM can be used.
How many bits does my processor have?
If you want to buy a Windows 10 licence, you should of course know how many bits the processor can process. To find out, you simply proceed in 4 steps:
- First press the „Windows key“, then enter „Control Panel“ in the search field.
- Then click on „System and Security“ in the corresponding window.
- Select the option „System“.
- Under the entry „System type“ you can find out whether 32 or 64 bits are installed.
Can I still buy a 64-bit Windows 10 licence?
The computer must be 64-bit capable
- If the entry „System type“ says „x64-based processor“, the basic requirements are already met.
- Now, however, it still depends on the working memory. Under the menu item „Installed RAM“, a value of at least 4 GB should be entered.
Header image: © PhotoGranary, stock.adobe.com

How to deactivate Cortana
How to deactivate Cortana
Cortana is software from Microsoft and the vendor’s personal productivity assistant. It’s supposed to help save time so users can focus on what’s important. However, it is not clear what Cortana records and where the recording of Cortana’s voice commands end up. These privacy issues are leading many users to want to disable Cortana.
The problem
The voice assistant Cortana in Windows 10 is criticised by some users because Cortana is suspected of transferring users‘ data to the cloud and monitoring the user. Cortana cannot simply be deleted and uninstalled, but there are a few ways to deactivate the tool in Windows 10. Especially users with Windows 10 Pro and Enterprise find it easy because they can rely on group policies. In the smaller Windows 10 versions, you have to rely on manual settings.
Disable Cortana
Cortana can be deactivated at any time – but the configuration is retained if desired. Those who still use the original version of Windows 10 can deactivate Cortana quickly and easily in the settings:
- To deactivate, click on the search field in the taskbar and then on the left-hand side on the Notebook symbol (third symbol from the top), then click on Settings
- The Slider for Cortana can offer suggestions, ideas, reminders, alerts and much more slide it to „Off. At this point, you can reactivate the assistant at any time
Deactivating Cortana in Windows 10 versions before Anniversary Update (1607)
Even from version 1607 and 1703, Cortana can neither be uninstalled nor completely removed. However, Cortana can be largely eliminated from the system so that the assistant can no longer collect data. Users with Windows 10 Pro and Windows 10 Enterprise have it a little easier: They can deactivate Cortana in the policy settings. To do this,open the tool „gpedit.msc“ and navigate to Computer ConfigurationAdministrative TemplatesWindows ComponentsSearch. On the right-hand side, you can prevent users from activating Cortana and searching the Internet, for example, with „Do not search the web and do not display web results in the search“ With the policy setting „Allow Cortana„, one candisableCortana on all computers using this policyby setting the option „Disable„.Users will then only be able to use normal search, but not Cortana.
Deactivating Cortana in Windows 10 Home via the Registry
In smaller Windows 10 versions, you can only disable Cortana via the registry:
- Open the registry editor by entering regedit.exe in the search field of the Start menu.

- Go to the path „HKEY_LOCAL_MACHINESOFTWAREPolicyManagercurrentdeviceExperience„navigate
- On the right-hand side, select the entry „AllowCortana“ to „0“ (zero) and restart the computer
If the entry is not available, proceed as follows:
- Right-click on the key „Experience“ and select from the context menu New DWORD value (32-bit) from the context menu. There give the value the designation „AllowCortana and set the value to „0“ (zero).
- Restart the computer. In the search field the entry „Search Windows“ instead of „Ask me something“ should appear.
Uninstall Cortana
If you are willing to experiment, you can uninstall Cortana via an unofficial script that can be found on the site „deskmodder.de“. However, you should make a full backup of Windows 10 before uninstalling, as there is no guarantee that the system will survive this unscathed. The execution of the script is only recommended for experienced users.
Header image: © monticellllo, stock.adobe.com

This is what Windows should look like in the future
Windows 10: Plans new design for 2021
Five years after the first release, Microsoft wants to implement new ideas in Windows 10. First reports indicate that users will have to change in many areas. What does Microsoft have in mind? Microsoft is working on a new design for Windows 10. What the update will mean for users is not clear in detail according to initial reports, but the direction is clear. The operating system is to receive a completely new look in 2021, in which, among other things, the Start menu will be refreshed. The new design is not expected to be released until the end of 2021.
There is to be a new look in the following areas:
Start menu:
Only with the Windows 10October Update was the appearance of the Start menu adjusted, but that was not it yet. Apparently Microsoft is working on the effects used.
Taskbar:
Allegedly, the code of the taskbar will be changed more extensively, but the details are not yet clear. Of course, fans are already dreaming of features such as a centred start button like in Windows 10X or a transparent taskbar, all of which you still have to set yourself with additional tools.
Explorer
Explorer has not had any new features for a long time, so the interface could certainly be improved. The direction is clear: users should no longer be overwhelmed with options.

Windows 10 pin removal: simple instructions!
Remove Windows 10 pin: simple instructions!
Deactivating the Windows 10 pin
To deactivate the Windows pin, open the system settings with the key combination „Windows+I“. Select the „Accounts“ menu and switch to the „Login options“ tab on the left-hand side

Under „Login Options“ click on the button „Windows Hello PIN.„In the button box that now opens, next click the „Remove.“ button Windows 10 now displays a notice that it is easier to log in with a pin and that without a pin the face and fingerprint recognition no longer works. A second click on „Remove“ removes the pin.

If you often take your laptop to appointments or to work, or if you live in a household where not everyone should have access to your desktop PC, you should choose a different password protection for your end device.
Deactivating the login for reactivations
If you only want to switch off the login information when you reactivate your computer, you can do this in the system settings. To do this, call up the control panel with the key combination „Windows+I“. As before, go to „Accounts“ and open the „Login Options “ window Select the option „ Never“ under „ Logon required „.
Disable the login for Windows 10
If youdon ‚t need or want a password for your computer at all, you can also deactivate it completely – although this is a bit more complicated. To deactivate the login, first open the „Run “ window with the key combination „ Windows+R “ and enter the command “ netplwiz“. Then confirm your entry with the Enter key. This command opens the „User Accounts “ window Here, under the tab „Users „, you will find the field „Users must enter user name and password“ Remove the tick here by clicking on the square field to the left of it and confirm with „OK“ After clicking on „Ok“, a new window should open. Here you type your own password into thefields provided for confirmation and confirm again with „Ok.“
Header image: © Pixel-Shot, stock.adobe.com
Installing Windows 10 - Info on versions and installation
Installing Windows 10 - Version and installation info
Although Microsoft stopped supporting Windows 7 in January 2020, not all Windows users have installed the latest Windows 10 operating system. One month after the end of support, about a quarter of all computers worldwide were still using Windows 7 as their operating system. Using this Windows 7 instead of the new Windows 10 is a security risk for every user that should not be underestimated. It is easy to bring your computer up to date with a Windows 10 upgrade. Until a few months ago, Windows users could download Windows 10 free of charge. This offer from Windows has now expired – now you have to buy Windows 10 to get the licence key. There are several ways to install Windows 10. Windows 10 as a download can be installed like an update. Alternatively, you can download a Windows 10 iso file and install it from there. We present which variant is the right one for you in this blog article.
Windows 10 as an update
Installing Windows 10 as an update is particularly easy for Windows 7 and Windows 8.1 users. With these two operating systems, the Windows 10 upgrade can be installed almost like a normal update. If you choose this option, Windows will automatically offer to install the corresponding Windows 10 version. There are differences between the upgrades. Depending on the installed version, you will receive a corresponding Windows 10 version. This can be seen in the following table:
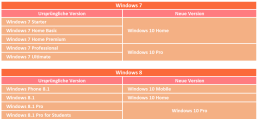
After entering the Windows 10 key, the installation programme takes over the installation almost completely independently and retains most of the system settings, passwords, bookmarks, preferences and already installed programmes should continue to work after the update. With this variant, the Windows 7 or 8.1 user must click on the small icon for the Windows 10 Update in their taskbar. The computer then starts the Windows 10 download automatically. The installation of Windows 10 is then almost completely automatic, the user only has to enter the Windows 10 key and some preferences during the installation. Although experience has shown that this form of installing Windows 10 runs completely smoothly, it is still advisable to back up your own files, such as documents, photos and music, on an external data carrier before the upgrade.
Re-installing the system with Windows 10
Those who do not want to keep their old system as much as possible can also rebuild the system. Before the installation, all important files should be backed up again! After the Windows 10 update, users can then select the item „Recovery“ and „PC“ via the system settings in the submenu “ Update and Security„. A complete reinstallation of the system can be carried out here. Alternatively, the system can also be deleted manually and the new operating system installed with a Windows 10 iso file. To do this, the file must be downloaded from Microsoft using the Media Creation Tool. This Windows 10 iso file must then be installed on an external data carrier, via which the installation runs after the system has been deleted. This method is also suitable for installing Windows 10 on a PC that was not used to download Windows 10.
Windows 10 as a second operating system on a computer
Those who want to keep their old operating system can buy Windows 10 and also install it as a second operating system. For example, the old Windows 7 installation can still be used offline, while Windows 10 serves for all online tasks. Users who still often have to fall back on older programmes that are not compatible with Windows 10 should opt for this variant. To do this, a second hard disk partition must first be created for Windows 10. With Windows 7, this can be done via the disk management. For Windows 10, the „NTFS“ format must be used for the new partition! For this installation, Windows 10 must be downloaded via the Media Creation Tool. Here, the option „Create installation medium for other PC“ is selected. The installation on a partition other than drive C: works best via a Windows 10 iso installed via an external data medium. During the setup of the installation, the option „Custom“ must be selected so that the installation path itself can be selected. Otherwise Windows 10 would automatically install itself on drive C:. The following Windows 10 versions are available from us:
- Buy Windows 10 Home
- Buy Windows 10 Pro
- Buy Windows 10 Enterprise
- Buy Windows 10 Enterprise LTSB 2015
- Buy Windows 10 Enterprise LTSB 2016
- Buy Windows 10 Enterprise LTSC 2019
- Buy Windows 10 Education
Header image: © rvlsoft, stock.adobe.com