How to read out product keys and licences under Windows
How to read product keys and licences under Windows
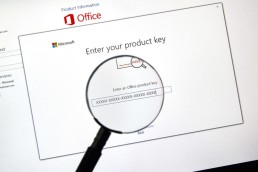
It is not easy to get the product key of Office. Especially if you want to do without third-party programmes and you have to face the fact that you can’t achieve anything via command prompt (cmd). Instead, we have to use the new PowerShell. For the readout process, the normal editor must first be opened. You can easily find it using the Windows search function. Copy the following source code into the editor window:
[code lang="php"]
function Get - MSOfficeProductKey
{
    param([string[]]$computerName = ".") $product = @() $hklm = 2147483650$path = "SOFTWAREMicrosoftOffice "foreach ($computerin $computerName)
    {
        $wmi = [WMIClass]"\$computerrootdefault:stdRegProv"$subkeys1 = $wmi . EnumKey($hklm, $path) foreach ($subkey1in $subkeys1 . snames)
        {
            $subkeys2 = $wmi . EnumKey($hklm, "$path$subkey1") foreach ($subkey2in $subkeys2 . snames)
            {
                $subkeys3 = $wmi . EnumKey($hklm, "$path$subkey1$subkey2") foreach ($subkey3in $subkeys3 . snames)
                {
                    $subkeys4 = $wmi . EnumValues($hklm, "$path$subkey1$subkey2$subkey3") foreach ($subkey4in $subkeys4 . snames)
                    {
                        if ($subkey4 - eq "digitalproductid")
                        {
                            $temp = "" | selectComputerName, ProductName, ProductKey $temp . ComputerName = $computer$productName = $wmi . GetStringValue($hklm, "$path$subkey1$subkey2$subkey3", "productname") $temp . ProductName = $productName . sValue $data = $wmi . GetBinaryValue($hklm, "$path$subkey1$subkey2$subkey3", "digitalproductid") $valueData = ($data . uValue) [52..66]
                            # decrypt base24 encoded binary data
                            $productKey = ""$chars = "BCDFGHJKMPQRTVWXY2346789 "for ($i = 24;$i - ge0;$i--)
                            {
                                $r = 0for ($j = 14;$j - ge0;$j--)
                                {
                                    $r = ($r * 256) - bxor $valueData[$j]$valueData[$j] = [math]::Truncate($r / 24) $r = $r % 24
                                }
                                $productKey = $chars[$r] + $productKeyif (($i % 5) - eq0 - and $i - ne0)
                                {
                                    $productKey = "-" + $productKey
                                }
                            }
                            $temp . ProductKey = $productKey$product += $temp
                        }
                    }
                }
            }
        }
    }
    $product
}
[/code]
Now you have to save the file as office.ps1 on the desktop. Small tip: Put the file name in inverted commas in the save dialogue, i.e. „office.ps1“. This way no unwanted .txt will be appended. Next you need the bit version of your Office. If you don’t know it, open Word, for example, click on File in the top left-hand corner, then on Account and then on Info about Word (for Office 2013). This path may differ depending on the Office version. In the upper part of the window that appears, you should be able to see whether it is a 32-bit or 64-bit Office. Then search for powershell using the Windows search function. For a 64-bit Office, right-click on the Windows PowerShell entry and select Run as administrator. For a 32-bit office, select the Windows PowerShell (x86) entry and start it as administrator. Now enter the following command in the blue window that appears: Set-ExecutionPolicy RemoteSigned Then call the saved script with the following command. Note that you have to use your own user name (e.g. Lisa) instead of %User% (e.g. C:UsersLisaDesktop…). Import-Module C:Users%User%Desktopoffice.ps1; Get-MSOfficeProductKey Congratulations! The product key should now be displayed.
Header image: © dennizn, stock.adobe.com
Removing programmes from the Autostart (Windows 7)
Removing programmes from the Autostart (Windows 7)
Finding the Autostart in Windows 7
There are several ways to affect the autostart. However, in this tutorial we have only chosen one of these options, as it also works under other Windows installations. In addition, no external programmes are necessary.
-
- In a first step,open the Start menu
by clicking on the Windows button in your taskbar.
-
- In the input field Search programmes/files, look for the application Run and open the command line with a mouse click.
Note: Alternatively, you can also use the key combination Windows key + R
- In the input field Search programmes/files, look for the application Run and open the command line with a mouse click.
to call up the command line under Windows 7.
-
- Type the command msconfig
into the input field via the keyboard. This opens the system configuration of your operating system. Here you will find the autostart services.
- In the tab menu, switch to the item System start
. Voilà: The services now displayed are loaded in the background at every start.

Remove programmes from the Autostart
Now we can start to clean out the Autostart a bit and deactivate all services, applications and programmes that are not needed at all during system start-up. Most of the time, there are many, many of them.
Note: Make sure, however, that you only deactivate services in the Autostart that you really do not need.
However, all changes can be easily undone if necessary. In this case, however, remember what you have deactivated.
-
- To prevent a programme from being included again the next time you start the system, you can easily deactivate it via the small box in the System Start-up Element
area. Simply remove the tick in front of the respective programme.
- When you have deselected all applications whose start should be prevented, you must confirm your intervention by clicking on Apply. You can then close the System Configuration window by clicking on OK.
- Windows 7 will now inform you that all changes will only be carried out after a restart
. Carry this out and enjoy the faster system start.

Putting applications in the autostart
Now, however, it may happen that we want to put an application itself into the autostart under Windows 7, which cannot be selected or deselected simply by ticking it. In other words, a programme that does not appear at all in the previous list.
-
- To add such a programme to the Autostart, click once on the Start button in the taskbar and select the entry All Programs
.
-
- There, among the numerous files and folders, you will also find one called Autostart
. By default, this is empty under Windows 7.
-
- Right-click on this folder and select the Open
button in the context menu that opens. A new window opens.
- You can now copy application shortcuts
into this window, which will then be executed in the background during a repeated system start. If you remove these shortcuts again, they also disappear from the autostart.

Note: Be careful to only put shortcuts in the named folder
and not the .exe of a programme, otherwise it „can’t find“ its own path. We have summarised how to create such a shortcut for you in the article Windows 7: Creating a Shortcut.
Which programmes should be deactivated in the Autostart?
Unfortunately, it is not possible to give a blanket answer to this. However, most applications that are automatically started at system start-up are not necessary.
In any case, we would recommend that you leave your computer’s antivirus programme in the autostart and also not prevent all applications that are related to the sound or graphics card from starting. However, this is not generally valid.

Installation of ISO files & activations of (Office 2013, 2016 & individual applications Word, Excel, Powerpoint etc.)

- Click on„Install now“ to install all office applications or customise the installation by clicking on„Customise„.


- Installation has been completed successfully, click on „Close“
Activating Office
- Start any Office application (e.g. Word) and open an empty document.
- Now click on „File“ in the top left-hand corner and then on „Account“.
- Now you will find the option on the right under „Product Information“ to enter the key you received from us there under „Change Product Key“.
- Then enter the product key and click on “ Install“ to complete the activation.


Header-Bild: © monticellllo, stock.adobe.com

Manually make USB stick bootable/ prepare UEFI USB stick
Diskpart - Manually make USB stick bootable/ Prepare UEFI USB stick
Prepare UEFI USB stick
Create a new primary partition on the USB stick using Diskpart, format it with the FAT32 file system and assign a drive letter. To do this, execute the following commands:
diskpart
list disk
select disk #
clean
create partition primary
select partition 1
active
format quick fs=fat32
assign
exit

Copy Windows installation files to the USB stick
Next, the Windows installation files must be copied to the USB stick. You can do this simply by using Copy – Paste. It does not matter whether you have mounted an ISO image in Windows, unpacked it or inserted an installation DVD. If the install.wim file of the Windows image is larger than 4GB, an error will occur during the copying process. At the end of the copying process, a message will appear stating that the file is too large. This message appears because the FAT32 file system has reached its limits and cannot process >4GB files. To still be able to complete the UEFI USB stick, you have to use a little trick: Using DISM, the file must be split into two or more <4GB files. Please note that this procedure is only supported by Microsoft up to Windows 7 or Windows Server 2008.[3] [4] To do this, simply enter the following command:
-
Dism /Split-Image /ImageFile:E:sourcesinstall.wim /SWMFile:C:UsersAdministratorDesktopinstall.swm /FileSize:3000
- /ImageFile: Path of the source file install.wim in the sources folder of the Windows ISO
- /SWMFile: Path of the splitted target files
- /FileSize: maximum size of the splitted target files in MB

Now the splitted install.wim, install2.wim, install3.wim etc… can be copied to the USB stick in the „sources“ directory.
Fix error message status 0xc0000d
If you get the error message EFIMicrosoftBOOT\BCD status 0xc000000d when booting the USB stick, please check the following things:
- If it is a system with Secure Boot, disable Secure Boot.
- Select the USB stick (not Windows Boot Manager) in the boot menu.
Booting should work afterwards.
Header image: © PheelingsMedia, stock.adobe.com
Create screenshot (Windows 10)
Create screenshot (Windows 10)
This does not even require any other programmes to be downloaded and installed anywhere. Windows itself has programmes such as the „Snipping Tool“. Alternatively, screenshots can also still be provided with symbols and other coloured markings using tools such as „Paint“.
How to take a normal screenshot under Windows 10
If you want to take a screenshot of the current screen content, press the key combination “ Windows key + Print“. The image is now saved in the clipboard and can be pasted from there into a programme such as „Paint“. To do this, press the key combination „Ctrl + V“. If you use several monitors, a complete large image of all screens is created. Alternatively, to take a screenshot of the current active window, press the key combination „Alt+Print“. Again, the screenshot can be pasted into any programme with „Ctrl + V“
How to create a screenshot with the Snipping Tool
The Snipping Tool is an on-board Windows tool. If you want to take a screenshot quickly, it is best to call up the small programme in the Start menu by entering its name. After the tool has started, you can mark the area to be displayed in the screenshot with the mouse pointer. This is particularly advantageous if you only want to show individual small areas. After taking the screenshot, functions such as a highlighter, pen and eraser are available. Furthermore, the screenshot can also be saved or sent directly by e-mail with just one mouse click. Try it out for yourself.
Header image: © charnsitr, stock.adobe.com

You want to install Windows 10 on your PC? using Windows MediaCreationTool
You want to install Windows 10 on your PC? using Windows MediaCreationTool
Create bootable USB stick for Windows 10 from the Internet
If Windows 10 is available to you as an ISO file, the easiest way to create a bootable USB stick is based on Windows 7 or Windows 8 / 8.1 as well as Windows 10. Microsoft provides the ISO files of Windows 10 free of charge. You download the free MediaCreationTool from this page and run it. Then download the ISO files. To do this, select the option Create installation media for another PC.

If you have an ISO file of Windows 10, you can download an ISO for free from Microsoft using a tool.
02. Selecting the edition, language and architecture
On the next page of the tool , you then select the language you want, the edition you want to download and the architecture, i.e. 32-bit or 64-bit. The Enterprise Edition is not available via this route. If you want to create a bootable USB stick from it, you have to get the ISO file in another way.

In the MediaCreationTool you can download an ISO file with your desired edition if you wish.
03. Perform ISO download and select USB stick
In the next step, you can either copy the installation files immediately to a suitable USB stick or download the installation files as an ISO. This is the best way in most cases, as you can quickly and easily create a USB stick from the ISO at any time.

You can quickly and easily create an ISO file from the MediaCreationTool, or a bootable USB stick.
04. Finalise configuration
If you want to create a USB stick from the MediaCreationTool, it must now be connected to the computer. Then you can select which stick you want to use. The stick must have at least 4 GBytes of memory, preferably more. The wizard then downloads the Windows 10 installation files and copies them to the USB stick or to the ISO file.

In the Windows 10 Download Wizard, you can select a USB stick.
05. Creating a bootable USB stick from an existing ISO file
If you already have an ISO file of Windows 10, you can also create a bootable USB stick from Windows 7/8/8.1/10 using on-board tools. To do this, make the ISO file available as a drive via the context menu and start a command prompt with administrator rights. The USB stick must also be connected to the computer. Start a command prompt for this via the context menu in administrator mode. For example, enter cmd on the start page/start menu, click on the command prompt symbol that appears and click on Run as admin.

In Windows 8/8.1 and Windows 10, start the command prompt with administrative rights to create a bootable USB stick.
Header image: © rvlsoft, stock.adobe.com
Windows 10 Change language
Change Windows 10 language
With Windows 10, it is possible to use not only the language set by default. In addition, other language packages can also be installed, managed and assigned to different users. For example, the respective languages of their user profile are assigned to different speakers and can be changed. In this guide, we will show you how to successfully adjust the language settings.
Managing languages in Windows 10
You have the option to change the user language and keyboard language of Windows 10 at any time. This is how they manage the different languages:
- Add a new language by opening the system settings. To do this, press the key combination „Windows key + I„. Then click on „Change language and keyboard options„.
- In the administration you will see a list of all languages available on the computer under „Preferredlanguages“. When apps and websites are opened, Windows 10 tries to display them in the selected language. If this is not available, the language below it is used. Using the arrow symbols, it is possible to change the order.
- There are symbols to the right of the language. These show you for which areas of application this language is suitable (for example, speech recognition, keyboard language, etc.).
Installing additional languages in Windows 10
- You can install a new language at any time. To do so, click on the „plus„symbolabove the list.
- Now enter the name of the desired language. All languages available for installation are displayed in the results list. Here, too, the symbols to the right of the name indicate what the language can be used for. Click on the language and then on „Next„.
- Now a selection menu opens in which several features can be selected. If you select „Set as my Windows display language„, the entire operating system is displayed in this language.
Change display language in Windows 10
If the installation of the new language was carried out successfully, it can be directly adjusted under „Region and language“ in the settings. Windows is now displayed in the national language.
Change language for home screen and new accounts
- Open the normal and classic control panel to change the display language of Windows 10.
- Enter the term „Region“ in the search field and then open the search hit.
- Switch to the „Administrative Tools“ tab and click on „Copy Settings“.
- At the bottom, you now have the option to change the activated display language for the start screen, the lock screen and newly created user accounts by means of checkboxes. Click on „OK“ to apply the new settings.
Change keyboard language in Windows 10
- If several languages are installed, you can change the keyboard language in Windows 10 separately.
- To do this, press the key combination „Windows key + space bar„.
- A small info box opens showing the available languages. Now click the „space bar“ again to switch back and forth between the languages.
Change speech output in Windows 10
- The voice output can also be changed in Windows 10. To do this, open the „Speech output settings“ in the system settings. Enter the term in the search field.
- The individual languages are displayed in the list under „Select voice„. These are installed together with the respective language package.
- After selection, you can also change settings such as „Speech speed“, „Voice pitch“ and the „Voice volume„.
Changing the language of Cortana voice input in Windows 10
- To change the language of the Cortana speech input, open the system settingsas in the previous step and search for „Settings for speech recognition“.
- In the upper selection, you can then change the desired speech recognition language for Cortana. Further settings such as speed are also possible here.
Header image: © kotoyamagami, stock.adobe.com

Remove / disable start-up programs in Windows 10
Remove / disable startup programs in Windows 10
When the computer is switched on, some programmes start automatically when the computer boots up. The so-called start-up programmes (also known as Autostart) can thus be used more quickly. However, not all programmes are always necessary. If a lot of programmes start at the same time, Windows takes a little longer. We show you how to remove or deactivate certain start-up programmes in Windows 10 that are not needed. Often, programmes are simply added to the startup list after installation, even though you don’t want them to be or don’t know about them. Find all programmes that load unnecessarily and thus take up system performance unnecessarily.
How to remove and disable unnecessary start-up programmes in Windows 10
- Open the task manager. For example, you can use the key combination„Ctrl+Shift+Esc„
- In the task manager you will see an overview of all currently open programmes
- Click on„More details“ at the bottom left
- In the overview, click on the„Autostart“ tab. All programmes that can be opened automatically at system start-up are displayed here. Behind each programme name you can see the respective„Status„. This is either activated or deactivated.
- Click on„Status“ at the top to group all elements. In this way, you can see in groups which programmes are intended for automatic system start-up.
- To exclude an activated programme from the autostart, click on it with the right mouse button. Then click on„Deactivate„. It will no longer be loaded at the next system start.
Header image: © dennizn, stock.adobe.com

Merge partitions in Windows 10
Merge partitions in Windows 10
Managing and setting up partitions can be quite useful. They provide more order and overview on the hard disk. If certain storage spaces are no longer used and are superfluous, these partitions can be assigned to others. In this article we explain how it works.
How to merge partitions in Windows 10
Windows 10 has its own tool for this purpose, which can be used to manage partitions. The disk management. In any case, it is important that all files on the partition are backed up beforehand. Partitions that are used by Windows and contain backup/restore points cannot be easily dissolved.
-
- Click with the right mouse button on the Windows symbol (bottom left in the task bar) and then on „Disk Management
„.
-
- Now select the partition in the administration that is to be dissolved and assigned to another partition. To do this, click on the partition with the right mouse button and on „Delete volume
„.
-
- Now the deleted partition is available as „Unallocated
volume“.
-
- Select the partition that is to be enlarged. Click with the right mouse button on the drive and then on „Expand Volume
„.
- Now select the volume you deleted in step 2.
- Both partitions are now merged and your new larger drive is ready for use.
Header image: © Pichsakul, stock.adobe.com
Save Microsoft Office document as PDF file
Save Microsoft Office document as PDF file
Whether it’s an invoice, a form to fill out or a list. Often it is not enough to simply save a document in Word format. If you want to send a document by e-mail, for example, it is advantageous to save it as a PDF on your hard drive. This alone has the advantage that the document will not contain any formatting errors when it reaches the recipient. But how does this work? In this step-by-step guide, we explain how to save a Microsoft Office document as a PDF file.
- Once you have finished writing your document, click on „File“ in the top left-hand corner of Word.
- Then click on „Saveas“.
- Now click on „Download as PDF„.
- Click on „Download“ again to successfully save the document as a PDF file.
You can't find a PDF entry under "Save as"?
Depending on the installed Office version, the order for saving may be different. If step number 2 does not appear or work for you, please proceed as follows:
- Click on „File“ in the top left-hand corner as before.
- In the new menu, click on „Export„.
- In the submenu that appears, click on the button „Create PDF/XPS document„.
- Now select the location where you want to save the PDF file and click on „Publish„.
Done!
Header image: © IB Photography, stock.adobe.com