Installing Windows 10 - Info on versions and installation
Installing Windows 10 - Version and installation info
Although Microsoft stopped supporting Windows 7 in January 2020, not all Windows users have installed the latest Windows 10 operating system. One month after the end of support, about a quarter of all computers worldwide were still using Windows 7 as their operating system. Using this Windows 7 instead of the new Windows 10 is a security risk for every user that should not be underestimated. It is easy to bring your computer up to date with a Windows 10 upgrade. Until a few months ago, Windows users could download Windows 10 free of charge. This offer from Windows has now expired – now you have to buy Windows 10 to get the licence key. There are several ways to install Windows 10. Windows 10 as a download can be installed like an update. Alternatively, you can download a Windows 10 iso file and install it from there. We present which variant is the right one for you in this blog article.
Windows 10 as an update
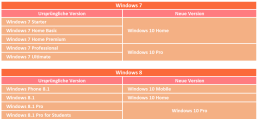
Installing Windows 10 as an update is particularly easy for Windows 7 and Windows 8.1 users. With these two operating systems, the Windows 10 upgrade can be installed almost like a normal update. If you choose this option, Windows will automatically offer to install the corresponding Windows 10 version. There are differences between the upgrades. Depending on the installed version, you will receive a corresponding Windows 10 version. This can be seen in the following table:
After entering the Windows 10 key, the installation programme takes over the installation almost completely independently and retains most of the system settings, passwords, bookmarks, preferences and already installed programmes should continue to work after the update. With this variant, the Windows 7 or 8.1 user must click on the small icon for the Windows 10 Update in their taskbar. The computer then starts the Windows 10 download automatically. The installation of Windows 10 is then almost completely automatic, the user only has to enter the Windows 10 key and some preferences during the installation. Although experience has shown that this form of installing Windows 10 runs completely smoothly, it is still advisable to back up your own files, such as documents, photos and music, on an external data carrier before the upgrade.
Re-installing the system with Windows 10
Those who do not want to keep their old system as much as possible can also rebuild the system. Before the installation, all important files should be backed up again! After the Windows 10 update, users can then select the item „Recovery“ and „PC“ via the system settings in the submenu “ Update and Security„. A complete reinstallation of the system can be carried out here. Alternatively, the system can also be deleted manually and the new operating system installed with a Windows 10 iso file. To do this, the file must be downloaded from Microsoft using the Media Creation Tool. This Windows 10 iso file must then be installed on an external data carrier, via which the installation runs after the system has been deleted. This method is also suitable for installing Windows 10 on a PC that was not used to download Windows 10.
Windows 10 as a second operating system on a computer
Those who want to keep their old operating system can buy Windows 10 and also install it as a second operating system. For example, the old Windows 7 installation can still be used offline, while Windows 10 serves for all online tasks. Users who still often have to fall back on older programmes that are not compatible with Windows 10 should opt for this variant. To do this, a second hard disk partition must first be created for Windows 10. With Windows 7, this can be done via the disk management. For Windows 10, the „NTFS“ format must be used for the new partition! For this installation, Windows 10 must be downloaded via the Media Creation Tool. Here, the option „Create installation medium for other PC“ is selected. The installation on a partition other than drive C: works best via a Windows 10 iso installed via an external data medium. During the setup of the installation, the option „Custom“ must be selected so that the installation path itself can be selected. Otherwise Windows 10 would automatically install itself on drive C:. The following Windows 10 versions are available from us:
- Buy Windows 10 Home
- Buy Windows 10 Pro
- Buy Windows 10 Enterprise
- Buy Windows 10 Enterprise LTSB 2015
- Buy Windows 10 Enterprise LTSB 2016
- Buy Windows 10 Enterprise LTSC 2019
- Buy Windows 10 Education
Header image: © rvlsoft, stock.adobe.com
Create screenshot (Windows 10)
Create screenshot (Windows 10)
This does not even require any other programmes to be downloaded and installed anywhere. Windows itself has programmes such as the „Snipping Tool“. Alternatively, screenshots can also still be provided with symbols and other coloured markings using tools such as „Paint“.
How to take a normal screenshot under Windows 10
If you want to take a screenshot of the current screen content, press the key combination “ Windows key + Print“. The image is now saved in the clipboard and can be pasted from there into a programme such as „Paint“. To do this, press the key combination „Ctrl + V“. If you use several monitors, a complete large image of all screens is created. Alternatively, to take a screenshot of the current active window, press the key combination „Alt+Print“. Again, the screenshot can be pasted into any programme with „Ctrl + V“
How to create a screenshot with the Snipping Tool
The Snipping Tool is an on-board Windows tool. If you want to take a screenshot quickly, it is best to call up the small programme in the Start menu by entering its name. After the tool has started, you can mark the area to be displayed in the screenshot with the mouse pointer. This is particularly advantageous if you only want to show individual small areas. After taking the screenshot, functions such as a highlighter, pen and eraser are available. Furthermore, the screenshot can also be saved or sent directly by e-mail with just one mouse click. Try it out for yourself.
Header image: © charnsitr, stock.adobe.com
Windows 10 Change language
Change Windows 10 language
With Windows 10, it is possible to use not only the language set by default. In addition, other language packages can also be installed, managed and assigned to different users. For example, the respective languages of their user profile are assigned to different speakers and can be changed. In this guide, we will show you how to successfully adjust the language settings.
Managing languages in Windows 10
You have the option to change the user language and keyboard language of Windows 10 at any time. This is how they manage the different languages:
- Add a new language by opening the system settings. To do this, press the key combination „Windows key + I„. Then click on „Change language and keyboard options„.
- In the administration you will see a list of all languages available on the computer under „Preferredlanguages“. When apps and websites are opened, Windows 10 tries to display them in the selected language. If this is not available, the language below it is used. Using the arrow symbols, it is possible to change the order.
- There are symbols to the right of the language. These show you for which areas of application this language is suitable (for example, speech recognition, keyboard language, etc.).
Installing additional languages in Windows 10
- You can install a new language at any time. To do so, click on the „plus„symbolabove the list.
- Now enter the name of the desired language. All languages available for installation are displayed in the results list. Here, too, the symbols to the right of the name indicate what the language can be used for. Click on the language and then on „Next„.
- Now a selection menu opens in which several features can be selected. If you select „Set as my Windows display language„, the entire operating system is displayed in this language.
Change display language in Windows 10
If the installation of the new language was carried out successfully, it can be directly adjusted under „Region and language“ in the settings. Windows is now displayed in the national language.
Change language for home screen and new accounts
- Open the normal and classic control panel to change the display language of Windows 10.
- Enter the term „Region“ in the search field and then open the search hit.
- Switch to the „Administrative Tools“ tab and click on „Copy Settings“.
- At the bottom, you now have the option to change the activated display language for the start screen, the lock screen and newly created user accounts by means of checkboxes. Click on „OK“ to apply the new settings.
Change keyboard language in Windows 10
- If several languages are installed, you can change the keyboard language in Windows 10 separately.
- To do this, press the key combination „Windows key + space bar„.
- A small info box opens showing the available languages. Now click the „space bar“ again to switch back and forth between the languages.
Change speech output in Windows 10
- The voice output can also be changed in Windows 10. To do this, open the „Speech output settings“ in the system settings. Enter the term in the search field.
- The individual languages are displayed in the list under „Select voice„. These are installed together with the respective language package.
- After selection, you can also change settings such as „Speech speed“, „Voice pitch“ and the „Voice volume„.
Changing the language of Cortana voice input in Windows 10
- To change the language of the Cortana speech input, open the system settingsas in the previous step and search for „Settings for speech recognition“.
- In the upper selection, you can then change the desired speech recognition language for Cortana. Further settings such as speed are also possible here.
Header image: © kotoyamagami, stock.adobe.com

Merge partitions in Windows 10
Merge partitions in Windows 10
Managing and setting up partitions can be quite useful. They provide more order and overview on the hard disk. If certain storage spaces are no longer used and are superfluous, these partitions can be assigned to others. In this article we explain how it works.
How to merge partitions in Windows 10
Windows 10 has its own tool for this purpose, which can be used to manage partitions. The disk management. In any case, it is important that all files on the partition are backed up beforehand. Partitions that are used by Windows and contain backup/restore points cannot be easily dissolved.
-
- Click with the right mouse button on the Windows symbol (bottom left in the task bar) and then on „Disk Management
„.
-
- Now select the partition in the administration that is to be dissolved and assigned to another partition. To do this, click on the partition with the right mouse button and on „Delete volume
„.
-
- Now the deleted partition is available as „Unallocated
volume“.
-
- Select the partition that is to be enlarged. Click with the right mouse button on the drive and then on „Expand Volume
„.
- Now select the volume you deleted in step 2.
- Both partitions are now merged and your new larger drive is ready for use.
Header image: © Pichsakul, stock.adobe.com