
Support for Windows Server 2008 is discontinued
Support for Windows Server 2008 has been discontinued
As of 14 January 2020, support for Windows Server 2008and2008 R2 has been discontinued. This means that the regular security updates from Microsoft will no longer be provided. Stop the threat and ensure that your infrastructure and applications remain protected. Migrate to Windows Server 2019. The new Windows Server 2019 is the operating system for digitising your customers. It helps you grow your business and take your first steps into the cloud with security and confidence. Existing investments remain protected, while completely new possibilities open up. The most secure, innovative and efficient Windows Server 2019 future-proofs your IT infrastructure – whether on-premises, in the cloud or hybrid.
Licensing model Server 2019 at a glance:

Header image: © Alexey Novikov, stock.adobe.com

Office for Mac: macOS Catalina - which Office version is supported?
Office for Mac: macOS Catalina - which version of Office is supported?
For the release of macOS 10.15, Microsoft promises full Office compatibility. At the same time, support for macOS 10.12 ends, old Office apps no longer run.
Microsoft readies Office for macOS 10.15 Catalina
Microsoft is preparing users and administrators for changes to Office for Mac support. Office 2019 and Office 365 are expected to offer „full compatibility“ with the new operating system version in time for macOS 10.15 Catalina’s public release day in the autumn, the software company promises. The Office suite can already be used with the Catalina beta if at least build 16.26 is used with the Office 2019 or Office 365 programmes, according to Microsoft’s Office Deployment Insiders video channel. Office 2016 runs from build 16.16.11 onwards under macOS 10.15. The company is asking developers to provide feedback in case of problems in the interaction with Word, Excel, PowerPoint & Co. Due to the future obligatory Apple notarisation of signed apps that are obtained outside of the App Store, there may still be error messages when installing Office apps in macOS 10.15, notes an employee of the software manufacturer. They want to iron this out by the time of the general Catalina release in autumn, he adds.
Office 2019/365 drop support for macOS 10.12
With the release of macOS 10.15, Microsoft will simultaneously discontinue support for macOS 10.12 Sierra, Office 2019 and Office 365 will then require at least macOS 10.13 High Sierra. Microsoft already announced last year that Office would only support the three most recent macOS versions. Existing installations of the Office apps could continue to be used under macOS 10.12, but would then no longer receive updates.
Office 2016 still supported until 2020
Office 2016 for Mac, however, remains exempt: Due to the older code base, this version is to be supported unchanged on macOS from version 10.15 back to OS X 10.10 Yosemite. Office 2016 as a whole, however, is on the brink of extinction: according to Microsoft, this version will be obsolete from October 2020, when no more updates will be made available.
Office 2011 facing complete demise
It will not be possible to continue using Office for Mac 2011 in conjunction with macOS 10.15, the manufacturer notes: Since Apple’s upcoming operating system no longer runs 32-bit software, the old Office programmes can no longer be opened either. Microsoft discontinued support for Office 2011 a good year and a half ago.
Header image: © PixieMe, stock.adobe.com

Norton Activation
Norton Activation
You can choose which way you want to activate it, either via our download link or via the official Norton site. The download link will take you directly to the key entry, but the official one requires you to do the following:
1) Go to the official Norton page – my.norton.com/home/setup
Once you are on the page, please go to „Enter product key“

2) Create an account – if not existing – via „Create account“.
If you already have an existing account, please go to „Login“ and thus simply log in.

3) The last step
Enter the product key you received from us into the empty field and click on the arrow pointing to the right. This will give you the download and you can start right away.

Header image: © monticellllo, stock.adobe.com


Activation of AVG - TuneUP/ Internet Security/ Ultimate
Activation of AVG - TuneUP/ Internet Security/ Ultimate
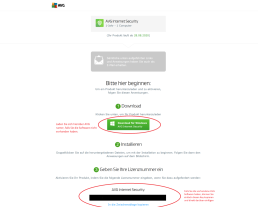
1) Please go to the official AVG activation page www.avg.com/de-de/activation.

Enter the product key you received from us and then click on „Confirm code“.
2) After you have entered your product key, the following will be displayed:

Please enter all your data here and then go to „Activate“.
3) Now a new page opens and you can see that your licence has been accepted.
At the top you will see exactly which version, for how many devices and how long it is still valid
.
and enter the product key. You will receive an email from AVG immediately after activation, where you will be sent all this information again.

Unpacking ISO files with WinRAR
Unpacking ISO files with WinRAR
How to unpack ISO files?
The ISO file can be stored on the computer and considered as a copy of a CD or DVD. But how can you open the ISO file? Can you open the file directly? Actually, the extension of the ISO file is .iso and obviously you cannot open this file directly. Instead, you have to unpack the ISO file first. But how can you unzip ISO file? Can you unzip the ISO file for free or do you have to convert the opened ISO file? So to unzip ISO file, one should burn ISO images on a CD or DVD and then access the file in the image. But nowadays, with the help of modern ISO utility software, you can integrate, unpack or view the ISO file without burning the file to a disc. Next, I will show you the method for unpacking the ISO file. WinRAR is a free file archiver for Windows, MAC, Linux, FreeBSD and Android developed by Eugene Roshal of WinRAR GmbH. It can create and display archives in RAR or ZIP file formats and unpack numerous archive file formats. WinRAR also supports the creation of encrypted, multipart and self-extracting archives. The following compression formats are supported:(RAR, ZIP, CAB, ARJ, LZH, ACE, TAR, GZip, UUE, ISO, BZIP2, Z and 7-Zip). Further down you can download WinRAR for free.
How to unpack ISO files with WinRAR?
As mentioned above, the ISO file is in the format of the archive and most operating systems cannot process the ISO file. To unpack the ISO file, you need to install an archive utility or a compression utility. Here WinRAR is the best option for you. Take a look at the following steps.
Step 1: Download WinRAR

Step 2: After downloading, you can install the setup by double-clicking the WinRAR icon to start the installation process. During the installation process, you need to set some parameters, such as linking the „WinRAR with“ option. Under the box, you need to make sure that you have checked the „ISO“ box because if you select the ISO option, your computer will automatically unpack the ISO file with WinRAR.

Step 3: Unpack the ISO file on your computer. Locate the ISO file you want to unzip, and then look for the WinRAR logo on the ISO file. You just need to right click on the ISO file and select „Extract Here“. And then the ISO file will be extracted into a folder. Or you can just double-click the ISO file to open it. The WinRAR will display the ISO file in a new folder and allow you to check the details of the ISO file.


Then it’s done from unzipping the ISO file using WinRAR. It’s not hard at all, is it? Besides WinRAR compression utility, you can also find a lot of additional software for your reference, such as Ultra ISO. You can choose which one you prefer.
Header image: © Gstudio, stock.adobe.com

Colour-coding e-mails in Outlook
Colour-coding e-mails in Outlook
With so many emails arriving in your inbox every day, it can be helpful to instantly recognise emails from specific senders. Follow these steps if you want to highlight emails from specific senders, such as those from your boss:
1. In Outlook, switch to the Inbox of your mailbox.
2. On the View tab, in the Current View group, click on the command Change View
.
3. Click on the Manage Views
button. The following window opens:

4. Select the Compact view and then click on the Change button. The following dialogue opens:

5. Click on the Conditional Formatting button. The following dialogue screen appears:

6. Click on the Add button and give the new rule a meaningful name, e.g. Chief.
7. Now click on the Font button and select the desired formats.

8. Define the conditions for the formatting. To do this, click on the Condition button. The following dialogue appears:

9. Enter the name of your boss in the From field.
10. Click on the OK button. The following dialogue screen appears again:

11. Close the individual dialogue screens again by clicking on the OK
button in each case. After saving the changed view, all e-mails from the assigned sender will be formatted in the Inbox
as you have specified. In this example, all e-mails would appear in blue.

Repair an Office application (Excel for Office Word Office Outlook for Office More...)
Repair an Office application (Excel for Office Word Office Outlook for Office More...)
If an Office application such as Word or Excel isn’t working correctly, sometimes restarting it will fix the problem. If that doesn’t work, you can try repairing it. When you’re done, you might need to restart your computer.
Repair Office from the Control Panel
The steps to access the repair tool vary depending on your operating system. Choose from the drop-down list below.
Running Repair didn’t help. Now what?
Use this easy fix tool to completely uninstall Office.
1. Click this easy fix button to uninstall Office.
2. For the remaining steps showing how to save and use the easy fix, select your browser from the drop-down list below:
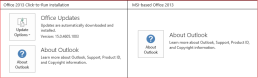
Is my Office Click-to-Run or MSI-based?
1. Open an Office application, such as Outlook or Word.
2. Go to File > Account or Office Account.
3. If you see an „Update Options“ item, you have a Click-to-Run installation. If you don’t see the „Update Options“ item, you have an MSI-based install.

Steps:
1. Download the fix it above
2. Install and run
3. Restart, run it again then restart
Download the Tool: https://outlookdiagnostics.azureedge.net/sarasetup/SetupProd_OffScrub.exe
Header-Bild: © wachiwit, stock.adobe.com

Removing Office 365 (trial or older Office versions) registry remnants
Remove Office 365 (trial or older Office versions) registry remnants
-
Download RemoveTool – Download here → RemoveTool
-
Run or open RemoveTool
-
After running the tool, click on„extended“ in the bottom left-hand corner of the window and uncheck the„Repair“ checkbox
-
Then follow the instructions step by step. If an error is found, click on„Fix problem„
-
Then restart the PC
Header image: © dennizn, stock.adobe.com
How to read out product keys and licences under Windows
How to read product keys and licences under Windows
It is not easy to get the product key of Office. Especially if you want to do without third-party programmes and you have to face the fact that you can’t achieve anything via command prompt (cmd). Instead, we have to use the new PowerShell. For the readout process, the normal editor must first be opened. You can easily find it using the Windows search function. Copy the following source code into the editor window:
[code lang="php"]
function Get - MSOfficeProductKey
{
    param([string[]]$computerName = ".") $product = @() $hklm = 2147483650$path = "SOFTWAREMicrosoftOffice "foreach ($computerin $computerName)
    {
        $wmi = [WMIClass]"\$computerrootdefault:stdRegProv"$subkeys1 = $wmi . EnumKey($hklm, $path) foreach ($subkey1in $subkeys1 . snames)
        {
            $subkeys2 = $wmi . EnumKey($hklm, "$path$subkey1") foreach ($subkey2in $subkeys2 . snames)
            {
                $subkeys3 = $wmi . EnumKey($hklm, "$path$subkey1$subkey2") foreach ($subkey3in $subkeys3 . snames)
                {
                    $subkeys4 = $wmi . EnumValues($hklm, "$path$subkey1$subkey2$subkey3") foreach ($subkey4in $subkeys4 . snames)
                    {
                        if ($subkey4 - eq "digitalproductid")
                        {
                            $temp = "" | selectComputerName, ProductName, ProductKey $temp . ComputerName = $computer$productName = $wmi . GetStringValue($hklm, "$path$subkey1$subkey2$subkey3", "productname") $temp . ProductName = $productName . sValue $data = $wmi . GetBinaryValue($hklm, "$path$subkey1$subkey2$subkey3", "digitalproductid") $valueData = ($data . uValue) [52..66]
                            # decrypt base24 encoded binary data
                            $productKey = ""$chars = "BCDFGHJKMPQRTVWXY2346789 "for ($i = 24;$i - ge0;$i--)
                            {
                                $r = 0for ($j = 14;$j - ge0;$j--)
                                {
                                    $r = ($r * 256) - bxor $valueData[$j]$valueData[$j] = [math]::Truncate($r / 24) $r = $r % 24
                                }
                                $productKey = $chars[$r] + $productKeyif (($i % 5) - eq0 - and $i - ne0)
                                {
                                    $productKey = "-" + $productKey
                                }
                            }
                            $temp . ProductKey = $productKey$product += $temp
                        }
                    }
                }
            }
        }
    }
    $product
}
[/code]
Now you have to save the file as office.ps1 on the desktop. Small tip: Put the file name in inverted commas in the save dialogue, i.e. „office.ps1“. This way no unwanted .txt will be appended. Next you need the bit version of your Office. If you don’t know it, open Word, for example, click on File in the top left-hand corner, then on Account and then on Info about Word (for Office 2013). This path may differ depending on the Office version. In the upper part of the window that appears, you should be able to see whether it is a 32-bit or 64-bit Office. Then search for powershell using the Windows search function. For a 64-bit Office, right-click on the Windows PowerShell entry and select Run as administrator. For a 32-bit office, select the Windows PowerShell (x86) entry and start it as administrator. Now enter the following command in the blue window that appears: Set-ExecutionPolicy RemoteSigned Then call the saved script with the following command. Note that you have to use your own user name (e.g. Lisa) instead of %User% (e.g. C:UsersLisaDesktop…). Import-Module C:Users%User%Desktopoffice.ps1; Get-MSOfficeProductKey Congratulations! The product key should now be displayed.
Header image: © dennizn, stock.adobe.com